


Luxury vinyl flooring has become a top choice for homeowners seeking a balance of durability, comfort, and modern design. Its realistic textures, waterproof qualities, and easy installation make it a favorite for DIY enthusiasts and professionals alike. In this guide, we’ll walk you through how to prepare, plan, and install your own luxury vinyl floors with confidence, plus explore why porcelain and ceramic tiles remain a great alternative for lasting, high-end style.

Exploring Luxury Vinyl Flooring
Luxury vinyl flooring has become one of today’s most practical yet stylish choices for homeowners. Known for its realistic look, comfort underfoot, and impressive durability, it offers a balance between function and design that fits nearly any interior. Before installation begins, it helps to understand what makes this material so versatile and why it continues to be a top pick for both renovations and new builds.
What Is Luxury Vinyl Flooring?
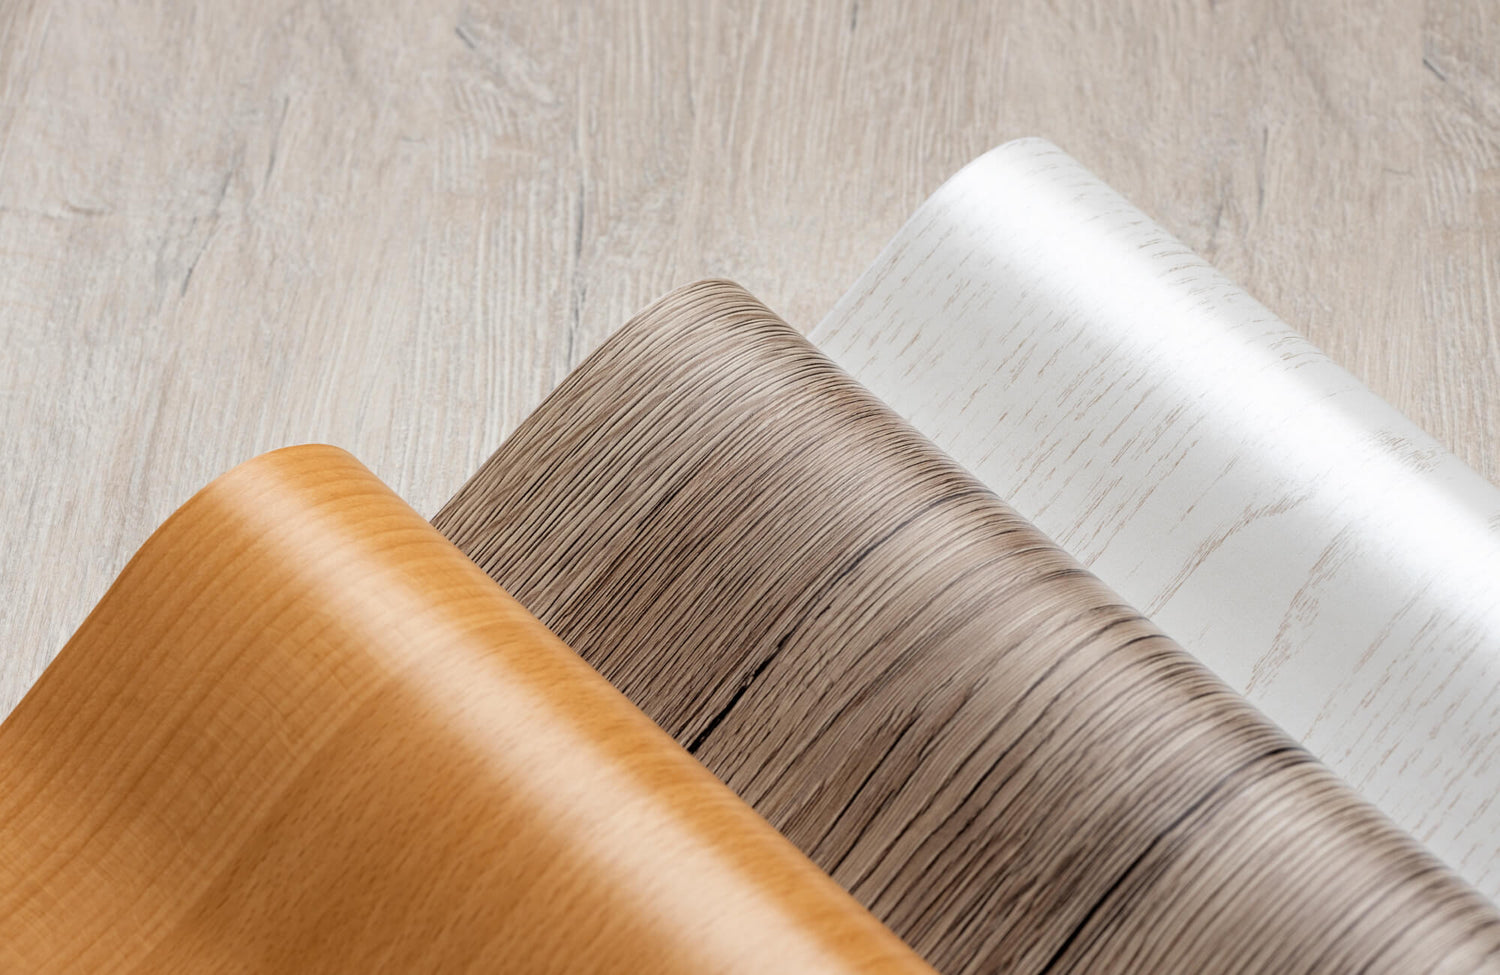
Luxury vinyl flooring, often referred to as LVP (Luxury Vinyl Plank) or LVT (Luxury Vinyl Tile), is made of multiple layers designed for strength, comfort, and realism. It typically includes a durable wear layer on top to resist scratches and stains, a printed layer that mimics wood or stone, and a resilient core for stability. Beneath it all sits a backing layer that provides structure and sound absorption. This combination gives the material a sturdy yet comfortable feel that stands up well to everyday life without sacrificing aesthetic appeal.
Types of Luxury Vinyl – Plank vs. Tile
Luxury vinyl comes in two main formats: plank and tile. LVP mimics the natural grains and textures of hardwood, making it ideal for living rooms, bedrooms, and open-plan spaces where a warm, organic look is desired. LVT, on the other hand, replicates the appearance of natural stone or ceramic, offering elegance and precision for bathrooms, kitchens, or entryways. Both share the same layered construction, but their shapes and textures allow homeowners to achieve entirely different design effects depending on the atmosphere they want to create.
Why Homeowners Choose It
Homeowners are drawn to luxury vinyl flooring for its mix of practicality and visual appeal. It resists moisture, scratches, and dents far better than traditional wood, making it perfect for busy households and pet owners. Installation is also simple, with click-lock or glue-down systems that save time and effort. Beyond its resilience, luxury vinyl offers stunning realism, such as embossed textures that mimic the look and feel of natural materials. Together, these qualities make it a smart, stylish investment that suits both everyday comfort and long-term design goals.

Assessing Your Space Before Installation
Before laying down luxury vinyl flooring, it’s essential to evaluate your space carefully. Proper preparation helps prevent uneven finishes, wasted materials, or premature wear. This stage sets the foundation for a smooth installation, ensuring the floor fits perfectly and performs well in every room where it’s installed.
Measuring the Room Accurately
Accurate measurements are key to a successful flooring project. Start by calculating the room’s square footage, multiply the length by the width, then add 10–15% extra to cover cutting and fitting waste. For irregularly shaped areas, divide the space into smaller sections, measure each, and add them together. Taking time to double-check dimensions saves both money and effort later, preventing shortages or unnecessary returns. A precise measurement plan also helps you visualize layout direction and plank alignment before installation begins.
Checking the Subfloor Condition
A stable, level subfloor is vital to the long-term success of luxury vinyl floors. Begin by inspecting for cracks, bumps, or uneven spots that could affect how planks lock together. Moisture testing is equally important, especially on concrete bases, to avoid potential warping or adhesive failure. If imperfections exist, patch or sand the surface to create a smooth, even foundation. Addressing these details early ensures a professional-quality finish and helps your new floors look flawless from day one.
Determining the Right Vinyl Type for Each Room
Not all luxury vinyl is created for the same environment, so matching product specifications to your space is crucial. For instance, waterproof or high-wear options are ideal for bathrooms, kitchens, or entryways where moisture and activity levels are higher. Softer, more cushioned planks suit bedrooms or living areas for added comfort. Consider wear layer thickness as well—the thicker it is, the better it withstands daily wear and tear. Choosing the right type for each room ensures both beauty and durability for years to come.

Gathering Tools and Materials
Having the right tools and materials on hand makes installation faster, safer, and more efficient. Preparation is key, and creating a checklist before starting prevents interruptions once work begins. By gathering everything in advance, you’ll ensure a smoother process from the first plank to the final touch.
Essential Tools You’ll Need
Every successful vinyl flooring installation starts with the right set of tools. You’ll need a utility knife or vinyl cutter for precise trimming, a measuring tape, spacers, and a tapping block to help secure tight seams. A pull bar is also useful for fitting planks along walls or corners. Keep a straight edge or T-square nearby for accurate cuts and alignment. These simple but essential tools make the process more manageable and help achieve a clean, professional-looking finish.
Choosing Underlayment and Adhesives
Selecting the right underlayment and adhesive depends on your installation method and flooring type. For click-lock vinyl, an attached or separate underlayment can provide sound reduction, added comfort, and minor subfloor leveling. Glue-down systems, on the other hand, require pressure-sensitive or hard-set adhesive for stability and longevity. Always refer to the manufacturer’s recommendations to ensure compatibility. Taking the time to choose correctly can improve performance, comfort, and noise control for years to come.
Safety Gear and Prep Supplies
Safety and comfort go hand in hand when tackling flooring projects. Protective gloves, knee pads, and safety goggles help prevent common injuries during cutting or fitting. A dust mask is also smart to have, especially when working in enclosed spaces. Keep a broom, vacuum, and microfiber cloth nearby for quick cleanup and to maintain a dust-free work area. Preparing a clean, safe environment not only protects you but also ensures that each tile or plank adheres properly.

Planning the Layout for a Professional Finish
Before cutting or securing any planks, it’s important to plan your layout carefully. The direction, symmetry, and alignment of each piece can dramatically influence how the space looks once finished. Taking time to map everything out ensures your flooring appears balanced, natural, and professionally installed from wall to wall.
Deciding on Direction and Pattern
The direction in which you lay your vinyl flooring sets the tone for the entire room. Running planks parallel to the longest wall helps create a sense of spaciousness, while laying them diagonally adds visual interest and energy. In smaller rooms, aligning planks with the main light source can make the space appear larger and more cohesive. Before committing, visualize how the pattern interacts with furniture placement and architectural lines. This simple planning step ensures your layout feels intentional rather than improvised.
Balancing Seams and Cuts
Even spacing and clean cuts make all the difference between an amateur and a professional-looking installation. Start by centering the layout so that the cut pieces at the edges are roughly the same width on both sides of the room. Avoid having thin, uneven strips near walls or doorways, as these can disrupt symmetry and weaken the visual flow. Using spacers helps maintain consistent gaps for expansion and contraction. A well-balanced layout not only looks polished but also improves long-term durability.
Acclimating the Flooring Material
Luxury vinyl flooring performs best when it adjusts to the room’s temperature and humidity before installation. Allow the unopened boxes to rest flat in the space for at least 48 hours so the material can naturally adapt. This step helps prevent issues like expansion, warping, or shifting after installation. Maintaining a stable environment during this period ensures the planks fit snugly and stay in place over time. Skipping acclimation might save a day, but can lead to uneven results later.
Dry-Laying for a Preview
Before securing any planks, it’s a good idea to dry-lay a few rows to preview the layout. This process helps identify pattern inconsistencies, awkward cuts, or mismatched seams before they become permanent. Adjusting now saves both time and materials later in the installation. It also gives you a clearer sense of how the flooring interacts with light and furniture placement. Think of this as your final rehearsal before committing to the finished look.

Preparing the Subfloor Properly
A flawless vinyl installation starts with a well-prepared subfloor. Even the highest-quality planks can shift, lift, or squeak if the surface beneath isn’t stable and clean. Taking the time to smooth, level, and protect the base ensures a solid foundation that supports long-term performance and visual consistency throughout your space.
Cleaning and Leveling the Surface
A clean, level subfloor is crucial for achieving a professional finish. Begin by sweeping and vacuuming to remove any dirt, dust, or debris that might interfere with adhesion or plank alignment. Next, check for uneven spots using a long straightedge or level, filling in low areas with a patching compound and sanding down any high points. This process prevents gaps, creaks, and visible imperfections once the flooring is in place. A smooth foundation not only improves installation but also enhances the durability and comfort underfoot.
Installing or Skipping Underlayment
Underlayment provides sound insulation, cushioning, and moisture protection, but it isn’t always required. If your vinyl flooring comes with an attached underlayment, additional layers may not be necessary. However, if you’re installing over concrete or uneven subfloors, a separate underlayment can help smooth imperfections and reduce sound transfer. Always check the manufacturer’s recommendations before deciding. Choosing the right approach here makes a big difference in how the floor feels, performs, and wears over time.
Moisture Barriers for Concrete Floors
Concrete subfloors, especially those at or below ground level, are prone to moisture issues that can compromise your vinyl flooring. Installing a moisture barrier, typically a plastic sheet or specialized vapor underlayment, prevents water vapor from seeping up and causing warping or mold growth. Before installation, perform a simple moisture test by taping a plastic sheet to the surface for 24 hours and checking for condensation. If moisture is present, sealing the concrete or adding a vapor barrier is essential. Protecting against moisture now ensures your floors stay beautiful, stable, and damage-free in the long run.

Step-by-Step Installation Guide
Installing luxury vinyl flooring is a straightforward process when approached with care and preparation. Each step, from choosing your starting wall to adding the finishing trim, plays an important role in the final outcome. If you’re unsure about any step, consulting a professional installer can ensure your flooring performs and looks its best for years to come.
Starting from the Right Wall
Choosing the correct starting point sets the tone for your entire layout. Begin along the longest and most visible wall, ideally one that runs parallel to the main light source in the room. This orientation helps reduce the appearance of seams and enhances visual flow. Always measure from the wall to confirm you won’t end up with narrow planks on the opposite side. Taking this small step early prevents misalignment later and ensures the layout feels balanced and intentional from the very first row.
Click-Lock Installation Method
For click-lock vinyl flooring, precision and consistency are key. Begin by locking planks together at an angle, gently pressing them down until you hear a secure click. Use a tapping block and mallet to tighten seams without damaging the edges. Check alignment after each row to maintain a straight line throughout the installation. Once you’ve established the rhythm, the process becomes smooth and efficient, producing a tight, seamless fit that resists shifting over time.
Glue-Down Installation Method
Glue-down vinyl requires a steady hand and attention to detail for the best results. Start by spreading adhesive evenly across a small section of the subfloor using a notched trowel, then lay the planks carefully into place. Use a floor roller to press the planks firmly and eliminate air bubbles, ensuring maximum bond strength. Work in manageable sections to prevent the adhesive from drying too quickly. This method takes a bit more effort but delivers unmatched stability and long-term durability.
Cutting Around Corners and Fixtures
When working around door frames, vents, or other obstacles, accurate measuring makes all the difference. Mark the plank carefully, leaving a slight expansion gap before cutting with a utility knife or jigsaw. Always double-check your measurements before trimming to avoid waste. For tricky areas, creating a paper template can help guide your cuts more precisely. Taking your time here results in cleaner lines and a smoother, more professional finish around every corner.
Finishing Edges with Trim and Molding
Once the main installation is complete, finishing edges with trim and molding brings everything together. Install baseboards or quarter-rounds to cover expansion gaps and create a polished look. Transition strips between rooms or different flooring types help maintain continuity and prevent wear on exposed edges. Nail or glue these pieces carefully to avoid damaging the new floor surface. With the right finishing touches, your vinyl flooring will look cohesive, refined, and ready to enjoy.

Post-Installation Care and Maintenance
Once your luxury vinyl floors are installed, proper care ensures they stay beautiful, comfortable, and long-lasting. Regular maintenance helps preserve their finish, prevents damage, and keeps them looking as good as the day they were laid. With a few mindful habits, you can maintain both their appearance and performance for years to come, without complicated cleaning routines or costly upkeep.
Allowing Time to Settle
Before moving furniture or heavy objects back into the room, give your newly installed floors time to settle. This period allows the adhesive to fully cure or the floating planks to lock securely into place. Typically, waiting 24 to 48 hours is enough to prevent shifting or misalignment. It’s a simple but essential step that protects your hard work and ensures your flooring remains stable. Patience during this stage contributes significantly to long-term durability.
Routine Cleaning Tips
Keeping luxury vinyl floors clean doesn’t require harsh chemicals or elaborate tools. A soft broom or microfiber mop is usually enough to remove dust and debris. For deeper cleaning, use mild, non-abrasive solutions designed for vinyl surfaces to preserve their protective coating. Avoid steam mops or excess water, as moisture buildup can affect seams over time. Regular light cleaning keeps your floors fresh, comfortable, and easy to maintain.
Preventing Scratches and Wear
Even durable flooring benefits from protection in busy areas. Use felt pads under furniture legs and rugs or runners in high-activity zones to reduce friction and wear. This simple step prevents scratches while adding an extra layer of comfort underfoot. Consider rotating furniture occasionally to distribute use evenly. These habits keep your floors looking smooth and polished, no matter how often the space is used.
Handling Repairs or Replacements
One of the biggest advantages of luxury vinyl flooring is how simple it is to repair. If a plank gets damaged, it can usually be replaced individually without disturbing the rest of the floor. Keep a few spare planks from your installation for future touch-ups; they’ll ensure a seamless match. With minimal effort, you can refresh worn areas and maintain a flawless finish over time. This convenience is part of what makes vinyl such a practical, long-term flooring solution.

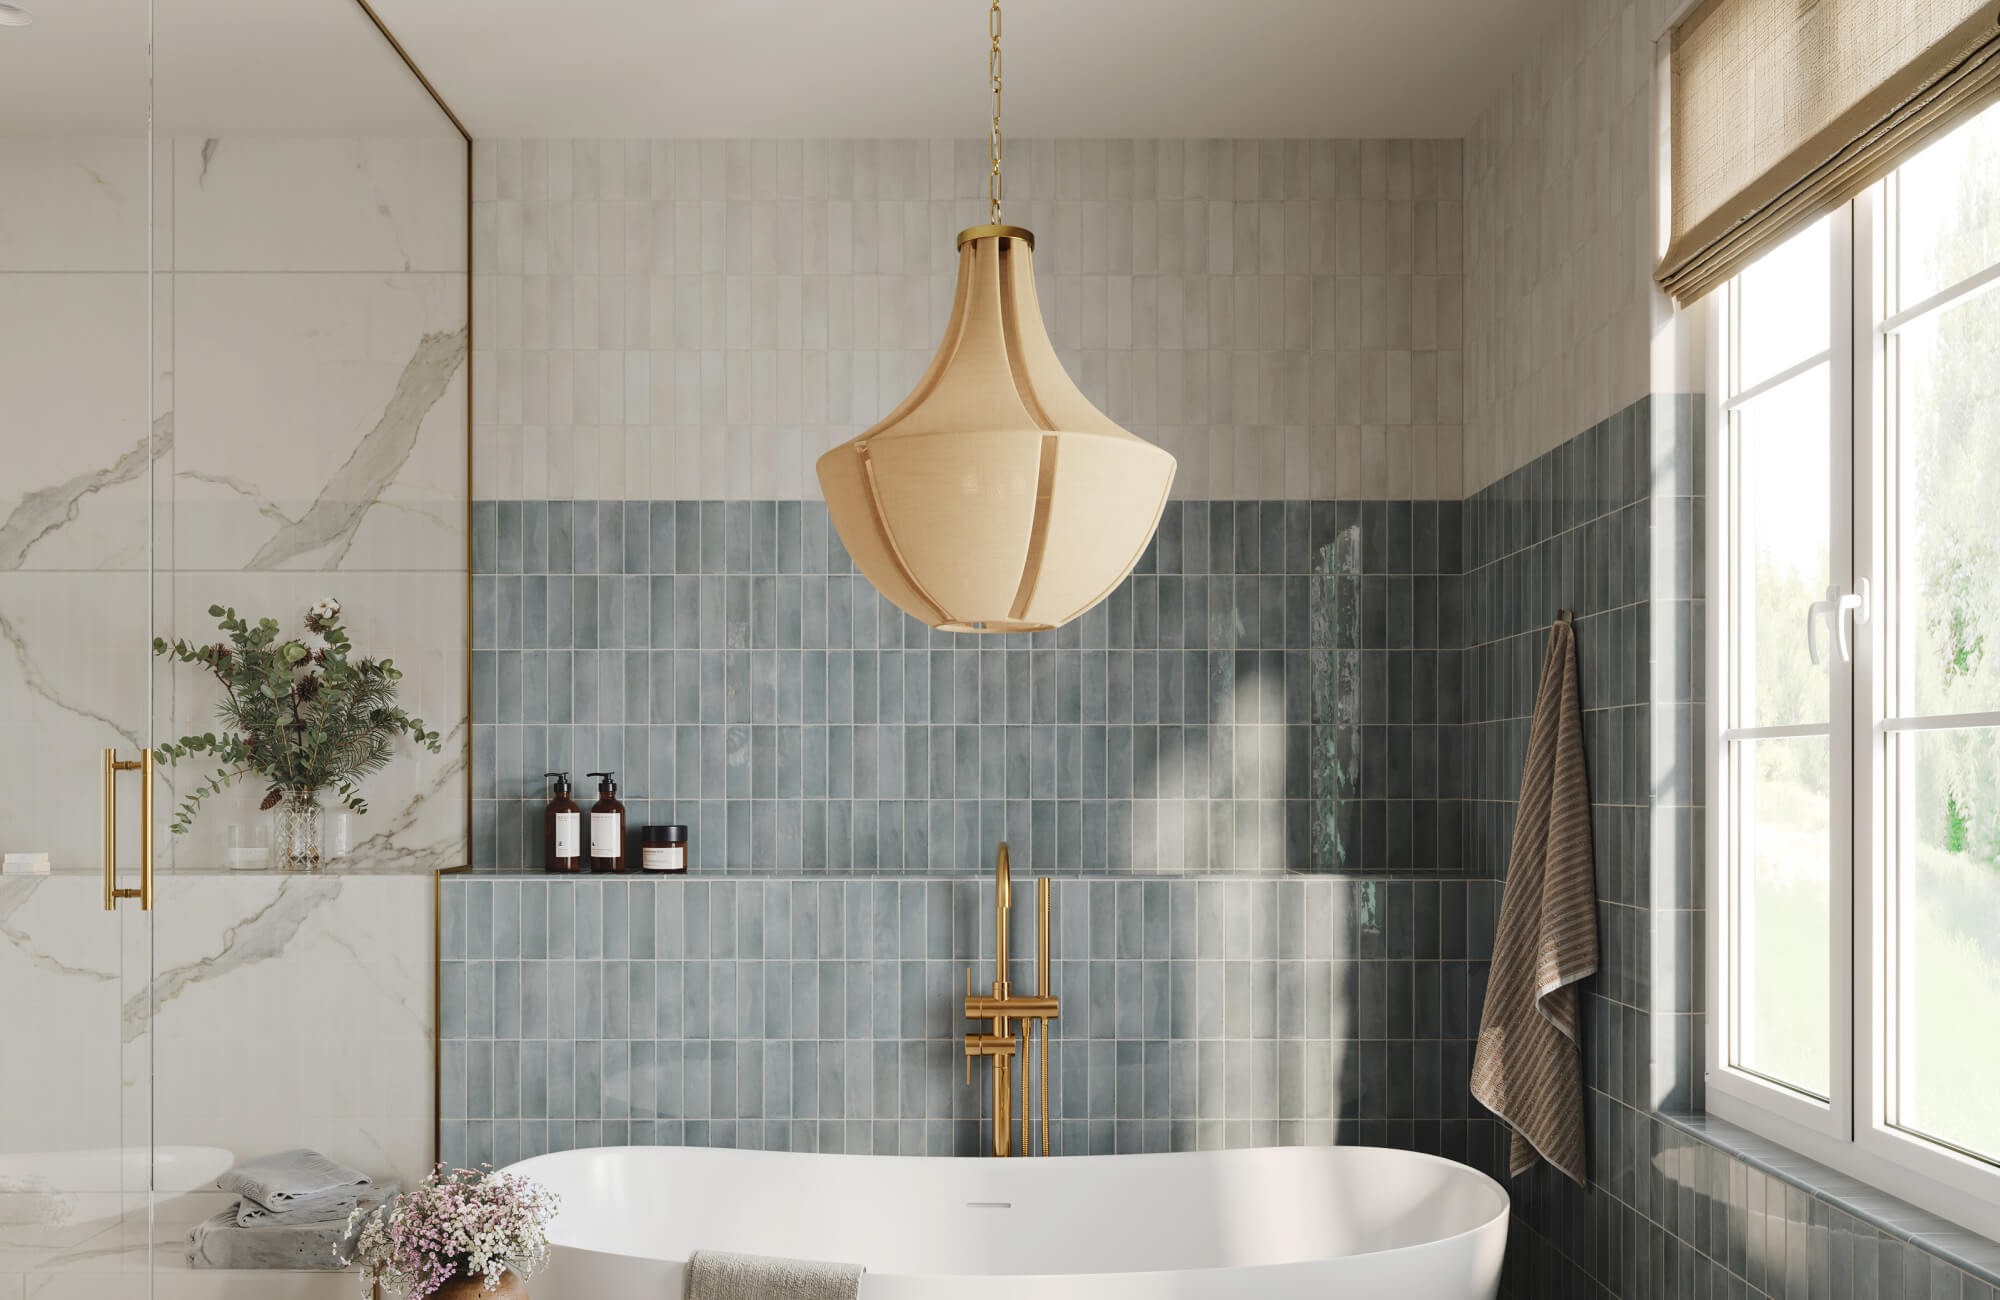
Why Porcelain and Ceramic Tiles Stand the Test of Time
While luxury vinyl offers convenience and comfort, porcelain and ceramic tiles stand out as long-term, high-performance alternatives. Known for their strength, water resistance, and lasting appeal, these tiles provide a solid investment for homeowners seeking both beauty and resilience. They’re ideal for spaces that demand durability and timeless design, offering unmatched longevity where vinyl may wear faster.
Why Porcelain and Ceramic Work Well
Porcelain and ceramic tiles are built to endure decades of use without losing their shape or finish. Their dense composition makes them naturally resistant to moisture, scratches, and stains, qualities that suit kitchens, bathrooms, and busy areas. Beyond performance, their design flexibility allows for elegant, seamless integration into nearly any interior style. Whether you prefer the cool sophistication of porcelain or the earthy warmth of ceramic, both materials deliver enduring value. These qualities make them a top choice for homeowners focused on lasting beauty and practicality.
Comparing Maintenance and Lifespan
One of the biggest advantages of porcelain and ceramic tiles is their low maintenance and exceptional lifespan. Once installed, they require minimal upkeep, just routine sweeping and occasional mopping to keep them looking new. Unlike vinyl, which can wear or fade over time, tiles maintain their appearance for decades when properly sealed and grouted. Their hard, non-porous surfaces resist stains and water absorption, ensuring they stay beautiful even in demanding environments. Over time, this durability translates into greater cost efficiency and long-term satisfaction.
Ideal Applications for Each Material
Both porcelain and ceramic have unique strengths depending on where they’re installed. Porcelain, with its dense and water-resistant structure, excels in high-moisture areas such as bathrooms, laundry rooms, and even outdoor patios. Ceramic, being slightly lighter and easier to cut, works beautifully for interior walls and moderately used floors. Together, they cover a wide range of functional needs while maintaining aesthetic consistency. Choosing between them often depends on the balance of performance, ease of installation, and the intended use of each space.
Design and Finish Options
Modern porcelain and ceramic tiles come in an impressive variety of finishes that replicate natural materials like marble, wood, and stone. Glossy finishes bring brightness and a polished elegance, while matte and textured surfaces provide warmth and grip underfoot. These finishes allow homeowners to achieve virtually any aesthetic, from sleek contemporary interiors to rustic or organic-inspired spaces. The versatility of tile design ensures you can match or elevate your home’s style without compromising function. Whether you prefer understated tones or bold patterns, the options are nearly limitless.
A great example of this versatility is our Preston 8x48 Matte Porcelain Tile in Pine, shown above. Its elongated plank format captures the natural warmth and grain movement of hardwood while offering the lasting durability of porcelain. The matte finish and earthy brown tones create an inviting, organic atmosphere that feels both timeless and modern, making it a perfect fit for dining areas, living rooms, and open-plan spaces.
Cost and Installation Considerations
Although porcelain and ceramic tiles may cost more upfront than luxury vinyl, they deliver significant long-term value. Their lifespan can easily exceed 30 years with proper maintenance, reducing the need for replacement or repairs. Installation, however, is more labor-intensive and typically best handled by professionals due to precise leveling and grouting requirements. For those investing in a permanent flooring solution, the extra effort pays off through superior durability and timeless appeal. In the long run, tiles provide both peace of mind and an enduring return on investment.
Finding the Right Flooring for Your Home
Installing your own luxury vinyl floors is a rewarding project that blends practicality with design freedom. With the right preparation, tools, and planning, you can achieve a professional-quality finish that enhances both comfort and style in your home. Paying attention to layout, subfloor preparation, and post-installation care ensures your floors not only look beautiful but also perform well for years. Whether you’re upgrading a single room or transforming an entire space, thoughtful execution makes all the difference in achieving lasting results.
For homeowners seeking an even more durable and long-term solution, porcelain and ceramic tiles remain a great alternative. Their strength, water resistance, and timeless beauty make them ideal for busy or moisture-prone areas. If you’re unsure which flooring option best fits your home and lifestyle, our design professionals are here to guide you. Book a personalized design consultation today to find the perfect material, finish, and layout that aligns with your vision and everyday needs.