


Renovating a bathroom is one of the most rewarding home improvement projects, but it also requires careful coordination. Every step builds on the one before it, which is why understanding the proper order makes the entire process easier to manage. Remodeling a bathroom can feel overwhelming, but following a structured sequence prevents costly mistakes and unnecessary delays. When we map out each phase in advance, we approach the project with clarity and confidence. This article guides you through the entire process, helping you move from planning to completion with confidence in every step.

Planning the Bathroom Remodel from the Ground Up
Before any materials are removed or installed, it helps to have a clear vision of what you want this bathroom to become. Thoughtful planning provides the structure needed to prevent mid-project changes that can extend both the timeline and the budget. Once we define the project with intention, the rest of the remodel becomes far more manageable and predictable.
Clarify the Remodel Scope
The first step is deciding whether your bathroom needs a simple refresh, a partial update, or a full renovation. Consider how long you plan to stay in your home, which functional problems you want to address, and which features are most important to your daily routine. A cosmetic update might involve new paint and fixtures, while a full remodel often includes opening walls or relocating plumbing. Once you understand the level of work involved, choosing the right direction becomes much clearer.
Set a Realistic Budget
Next, consider building a budget that aligns with your goals. Rather than relying on broad estimates, it’s helpful to break the project into clear categories, such as flooring, vanity, tile, labor, and contingencies. This approach shows you where you have flexibility and where you may want to invest in higher-quality materials. As you compare options, you can adjust each category without losing sight of the overall cost. A well-organized budget minimizes surprises and gives you greater control throughout the project.
Confirm Measurements and Technical Limits
Accurate measurements are essential for preventing delays once the remodel begins. Start by recording every dimension, including wall lengths, fixture spacing, ceiling height, and door clearances. From there, identify limitations such as plumbing stack locations, electrical pathways, and structural framing. This information helps you choose layouts that fit the existing conditions or understand which changes may require professional support. Simple tools, such as digital tape measures, templates, or planning apps, can also make this step both easier and more precise.

Preparing the Space and Protecting the Home
Once planning is complete, preparation lets you protect your home and maintain order throughout the remodel. Small preventative steps help you avoid unnecessary cleaning, repairs, or setbacks. By setting up the space properly, you can create a safer environment for both you and anyone working on the project.
Protect Surrounding Areas
Before demolition begins, take steps to protect the surrounding parts of your home. Plastic sheeting helps contain dust, and floor protection boards guard against scratches as tools and materials move through the space. These precautions also keep debris from spreading into adjacent rooms. By establishing a clear, well-protected workspace, you can reduce disruptions and make cleanup far more manageable.
Shut Down Utilities Safely
Turning off the water and electricity is essential for preventing accidents. Begin by shutting off the bathroom’s water supply, securely capping the lines, and checking for any remaining leaks. You should also switch off the electrical circuit at the panel and confirm that the outlets and lighting are no longer active before removing anything. These precautions also help to create a safe environment and to approach the next steps with confidence.
Plan for Waste Removal
Planning how to manage debris ensures that materials are removed efficiently rather than piling up during the remodel. A small bathroom may generate only a few bags of waste, while a full renovation might require a dump trailer or a scheduled pickup from a local service. By estimating the amount of debris ahead of time, you’ll know exactly where everything should go and avoid unnecessary clutter around your home.

Demolition in the Correct Sequence
Demolition creates the starting point for rebuilding, and following a clear order helps you stay organized while protecting the parts of the bathroom you intend to keep. As you take out old materials, you uncover the structural and mechanical elements that shape the next phase of the project. A steady, step-by-step approach keeps the process manageable and makes it easier to handle any unexpected issues that may arise along the way.
Remove Fixtures First
We begin by disconnecting and removing items such as toilets, vanities, mirrors, and lighting. Taking these components out early opens the room and gives us a clear view of what remains. This step also prevents fixtures from breaking during heavier demolition. Once they are removed, it becomes easier to move tools and navigate the space.
Take Down Wall Materials Next
Once the fixtures are out of the way, you can move on to the wall surfaces. Removing tile, backer board, or drywall exposes the plumbing and electrical systems behind them. As you work, keep an eye out for moisture damage, mildew, or outdated wiring. Finding these issues early gives you the chance to address them before new materials are installed. Careful removal also helps prevent accidental damage to the pipes or wires hidden within the walls.
Finish by Pulling Up Flooring
Floor demolition comes last, so debris stays manageable throughout the process. Once the walls are open, you can lift the tile, vinyl, or laminate and take a close look at the subfloor underneath. This step helps you spot issues such as rot or structural deterioration early on. A solid, stable subfloor is essential because it supports everything that comes next, including your tile, cabinetry, and fixtures.

Rough-In Work for Plumbing, Electrical, and HVAC
With the bathroom opened up, the rough-in stage allows you the opportunity to update the systems you rely on every day. This phase requires precision because the decisions made here influence every step that follows. When you handle the rough-ins carefully and correctly, you can create a reliable foundation for all the visible finishes that will complete the space.
Update Plumbing Lines
You’ll start by positioning the supply lines, drains, and shower valves to match your new layout. This may involve adjusting lines to accommodate updated fixtures or modifying heights for better comfort and usability. Venting also plays a key role because it influences how efficiently your plumbing drains. When the rough-in heights and spacing are set correctly, your fixtures will function smoothly once everything is installed.
Rework Electrical Layout
Next, update the electrical system to support your lighting and outlet needs. This includes placing switches, outlets, and light fixtures in accessible, code-compliant locations. You may also run wiring for features, such as LED mirrors, dimmable lighting, or added task illumination. By handling this stage carefully, you can set the foundation for a bathroom that feels more functional and aligned with your daily routines.
Address Ventilation and Heating
Proper ventilation protects your bathroom from excess moisture, so this is the time to evaluate the exhaust fan’s capacity and the condition of the ducting. You can also consider adding radiant heating or other features that could improve comfort, especially in cooler climates. These systems can also help maintain a balanced environment that supports both durability and everyday use.

Closing the Walls and Building the Wet Areas
Once the rough-ins are finished, it’s time to close the walls and build the moisture-resistant surfaces that define the bathroom’s structure. Precision matters at this stage because even small uneven areas can affect how well the tile adheres and how effectively the space is waterproofed. A careful, methodical approach ensures results that remain durable and reliable over time.
Install Wallboard and Backer Panels
Different parts of the bathroom call for specific materials. Moisture-resistant drywall works well in general areas, while cement board or foam board is better suited for shower and tub surrounds. Using the right panel in the right location helps prevent water from reaching the underlying structure. When you secure these materials evenly, you can create stable, reliable surfaces for the next stages of the remodel.
Waterproof the Shower and Tub Zones
Next, apply waterproofing membranes to the areas that receive the most water exposure. These products seal seams, corners, and transitions to create a continuous, reliable barrier. Once the waterproofing is complete, you can test the pan or liner to make sure it holds water without leaking. This step also helps prevent future problems and gives you greater peace of mind moving forward.
Prepare Surfaces for Tile or Panels
The next step is preparing the surfaces for your tile or wall panels. Level the walls, correct any uneven areas, and choose adhesives that match the specific materials you’re installing. Creating a smooth, well-prepared base helps your tile or panels bond securely and creates a cleaner finish. This stage has a direct impact on both the appearance and durability of the final installation.

Installing Finishes and Final Fixtures
As you move into the finishing phase, the bathroom finally starts to take shape. The order in which each element is installed matters because every component relies on the stability of the work completed earlier. A gradual, thoughtful approach protects the progress you’ve made and helps create a cohesive, well-built result. For the best outcome, especially with plumbing and electrical installations, it’s always wise to consult a qualified professional.
Install Flooring and Wall Tile
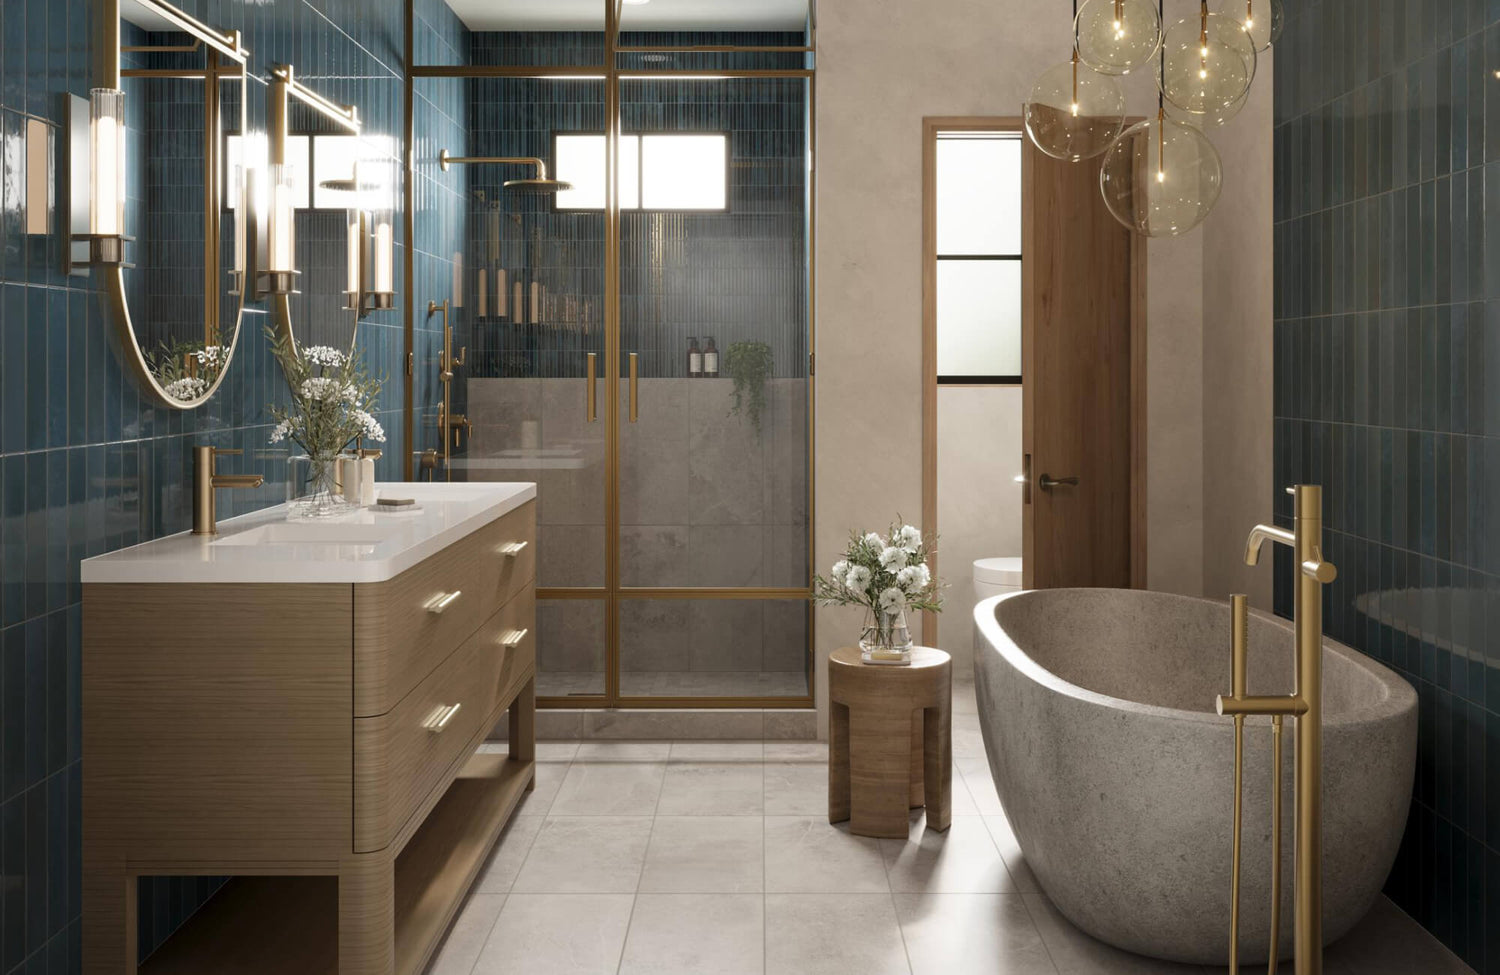
Start by installing the floor tile or, if your layout requires it, beginning with the wall tile instead. The right starting point depends on your design and how the transitions between surfaces need to align. Taking a moment to map out the layout helps you avoid awkward cuts and ensures the room feels balanced. For example, floors finished with our Preston 8x48 Matte Porcelain Tile in Birch, as pictured above, create a warm foundation that pairs well with a variety of wall materials.
Once the floor is in place, you can move to the walls and create a cohesive contrast or complement. In the photo featured above, the shower walls use Edward Martin’s Aniston 24x48 Matte Porcelain Tile in Calacatta Top, and the surrounding areas are finished with Natasha 2x6 Glossy Porcelain Tile in Ice. This combination highlights how mixing tile sizes, textures, and tones can add depth and dimension to the room. After setting the tile, apply the grout and allow it to cure fully so the installation remains strong and secure. Clean alignment, proper spacing, and well-finished edge trims tie everything together, giving your bathroom a refined and cohesive look.
Mount the Vanity, Toilet, and Accessories
Once the flooring and wall tile are complete, you can proceed to installing the major fixtures. Setting the toilet after the flooring helps ensure a proper seal, and mounting the vanity once the wall finishes are in place creates a clean, well-fitted look. In the photo above, the space features Edward Martin’s Bridgette 60" Double Vanity in Bright White with a 3 cm White Zeus Quartz Top, which offers a bright, balanced focal point against both the floor and wall tile.
Before securing anything, it’s also helpful to double-check measurements and confirm that plumbing and electrical connections align with the new fixtures. Accessories like towel bars, shelving, and hooks can be added afterward, allowing you to fine-tune their placement for comfort and convenience. With careful alignment and secure fastening, these pieces remain stable during daily use, helping create a polished and functional space.
Finish Lighting and Hardware
The finishing phase is where the bathroom truly comes together, and lighting and hardware play a major role in shaping the final look. This is the moment to install the mirrors, light fixtures, faucets, and cabinet hardware that define the room’s character. In the photo featured above, the combination of Edward Martin’s Esmeralda Round Mirror in Polished Brass, the Posey Wall Sconce in Aged Brass, and the elegant Aida Pendant in Aged Brass shows how well-chosen pieces can add warmth and balance to the finished bathroom design.
Before securing each piece, take the time to confirm that everything is level, properly aligned, and comfortable to use. Small details like these make a noticeable difference in how the room feels each day. Once the lighting and hardware are secured and all connections are working correctly, the bathroom reaches its final, cohesive stage—marking the true completion of your remodel.
Ensuring a Smooth Bathroom Remodel
Renovating a bathroom becomes far more manageable when you follow a clear, well-structured sequence. Each phase supports the next, helping you avoid complications and keeping the project on track. By planning thoughtfully, preparing the space, completing demolition, updating the mechanical systems, rebuilding with moisture-resistant materials, and installing the finishes with care, you create a bathroom that functions reliably and feels comfortable for years to come. If you need guidance selecting materials or arranging a layout that suits your space, feel free to contact us. Our design services can help you refine your vision and create a bathroom that suits your style and everyday needs.
