


Subway tiles may look like one of the more straightforward tile choices, but a clean, polished installation often involves more planning than many homeowners expect. While their uniform shape and timeless versatility make them a popular choice for kitchens, bathrooms, and backsplashes, factors like tile material, layout complexity, surface preparation, and installation method can all affect how manageable the project actually feels. If you are weighing a DIY approach or wondering when professional installation makes more sense, this guide walks you through what to expect so you can make smarter decisions and set your project up for a result that looks beautifully finished.

What Are Subway Tiles?
If you have ever considered subway tiles for a kitchen, bathroom, or backsplash, you have probably noticed how often they show up across very different design styles. Their clean rectangular shape, traditionally around 3x6 inches, gives them a timeless look that feels just as natural in classic spaces as it does in more modern ones. First introduced in New York City subway stations in the early 1900s, they became popular for their durability, easy upkeep, and ability to brighten darker interiors by reflecting light. Today, subway tiles come in materials like porcelain, ceramic, glass, and natural stone, along with finishes ranging from matte to glossy and colors that stretch far beyond classic white.
Types Of Subway Tile Installation
The installation pattern you choose can completely change how subway tiles look once they are on the wall, which is why this decision matters just as much as the tile itself. If you prefer something clean and minimal, a straight stack layout keeps tiles aligned in neat rows and columns for a more structured appearance. If you want a more classic look, the traditional brick lay, also called a running bond pattern, offsets each tile by half its length to mimic real brickwork. For something with more movement, a herringbone layout introduces a zigzag pattern that can make backsplashes or accent walls feel much more dynamic.
You also have options if you want a more contemporary direction. Vertical stack layouts position subway tiles upright for a sleeker look, while metro-style installations lean into the character of classic subway station designs through tighter grout lines and beveled edges. A third-offset running bond creates a slightly more modern variation of the traditional brick pattern, adding movement while keeping the layout balanced. If your style leans toward industrial or minimalist, a simple stacked grid can feel especially fitting without making the design feel overly busy.
Factors Affecting Installation Difficulty
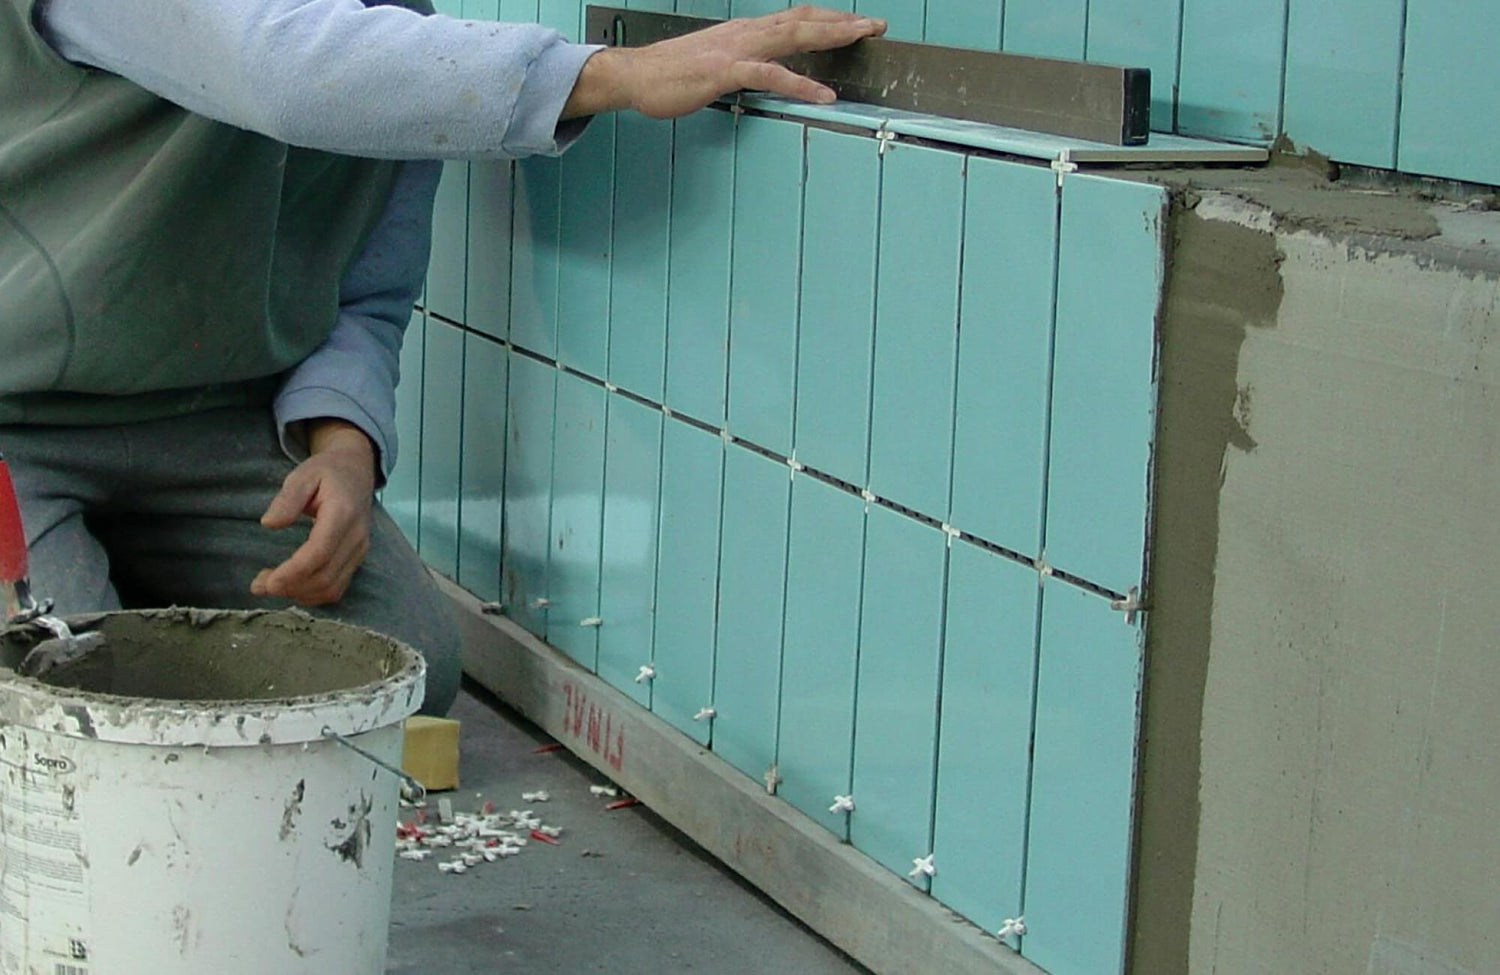
How difficult subway tile installation feels often depends less on the tile itself and more on the choices surrounding the project. Smaller subway tiles usually require more cuts, tighter alignment, and a bit more patience, while larger formats can speed things up but leave less room for surface imperfections. Your installation method matters too. Thin-set mortar creates a strong, reliable bond, but applying it evenly takes a steadier hand, while adhesive mats can feel more approachable for simpler DIY projects, though they are not ideal for every application.
Surface preparation is where many installation issues begin, especially if the wall is uneven, dusty, or still carrying old paint residue. More detailed layouts like herringbone or running bond patterns also demand much more precision because even small spacing inconsistencies become easy to spot once the tiles are installed. If you are tackling the project yourself, patience and proper tools go a long way, but more complex layouts or premium materials may be worth handing over to a professional.
To make planning easier before installation even begins, Edward Martin offers an augmented reality (AR) tool that lets you preview tiles directly in your space. This gives you a much clearer sense of how different sizes, colors, and layout patterns may actually look in your home, helping you make more confident decisions before committing.

The DIY Challenge
Subway tiles may look straightforward at first glance, which is exactly why many homeowners consider installing them themselves. The appeal is understandable. A DIY project can feel rewarding, more budget-conscious, and far more personal when you are shaping the final result with your own hands. At the same time, tile installation tends to be one of those projects that looks easier from the outside than it feels once measurements, cuts, alignment, and finishing details come into play.
That does not mean DIY installation is off the table, but it does mean being realistic about the level of patience, accuracy, and hands-on effort involved. If you are working with a straightforward layout and feel comfortable using the right tools, the experience can be genuinely satisfying. If your space includes tricky corners, complex layouts, or premium materials, however, the learning curve can get expensive quickly. Below, we’ll walk through what makes DIY subway tile installation appealing, where the biggest challenges tend to show up, and what you will need if you decide to take it on.
Pros and Cons of DIY Installation
Deciding whether to install subway tiles yourself usually comes down to how comfortable you are balancing cost savings with the realities of the work involved. For some homeowners, the ability to take full control of the design and save on labor makes the challenge feel well worth it. For others, the pressure of getting every line straight and every cut right can take some of the excitement out of the project. Looking at both sides honestly before you begin usually leads to a much better decision.
|
Pros |
Cons |
|
One of the biggest advantages of DIY installation is reducing labor costs, which can make a noticeable difference in your overall project budget. |
Subway tile installation takes more planning, measuring, and precision than many people expect at first. |
|
There is real satisfaction in stepping back and seeing a finished space you completed yourself. |
Uneven alignment, inconsistent spacing, or rushed adhesive work can quickly affect the final look. |
|
You have complete control over layout decisions, whether you want a classic brick pattern or something more customized. |
Fixing installation mistakes can be frustrating, time-consuming, and sometimes more expensive than hiring help from the start. |
|
Hands-on projects often create a stronger personal connection to your home because your own effort shaped the outcome. |
Tile work involves physical strain, repetitive bending, sharp tools, and materials that require safe handling. |
|
If you are working with premium subway tiles, mistakes can become much more costly to correct. |
Essential Tools For DIY Installation
If you decide to install subway tiles yourself, having the right tools makes a major difference in both the process and the final result. A quality tile cutter is essential for clean, accurate straight cuts, while a wet saw becomes much more useful if your layout involves corners, outlets, or more detailed shaping. A notched trowel helps spread adhesive evenly so the tiles bond properly, while a level keeps your rows from gradually drifting off course as you work. Tile spacers may seem small, but they do a lot of heavy lifting when it comes to maintaining clean, consistent grout lines.
Once the tiles are set, the finishing tools matter just as much. A grout float helps press grout evenly into the joints, while a sponge is essential for cleaning away residue without disrupting the finished lines. Safety gear deserves just as much attention, too, especially gloves and eye protection when cutting tile or handling installation materials. If you are going the DIY route, being properly equipped tends to make the difference between a smoother project and one that becomes far more stressful than expected.

When To Hire a Professional
DIY subway tile installation can absolutely be rewarding, but there are situations where bringing in a professional simply makes more sense. If your layout is more complex, your timeline is tight, or you are working with materials you do not want to risk damaging, professional installation can save you far more than just time. In many cases, the right installer helps you avoid the kind of mistakes that are frustrating and expensive to fix once the tiles are already on the wall.
Expertise And Experience
Professional installers bring the kind of hands-on experience that only comes from doing this work repeatedly across different spaces and installation challenges. From precise cuts around outlets and corners to keeping long rows aligned across uneven walls, they know where problems tend to show up and how to handle them before they affect the final result. That level of accuracy can be difficult to replicate if you are learning as you go.
That becomes even more important with premium tiles, where installation quality has a direct impact on how the finished design reads. As shown in the image above, our Jaden 2.5x16 Glossy Ceramic Tile in Eggshell relies on clean alignment and consistent spacing to maintain its sleek, polished appearance. With glossy surfaces, especially, even small inconsistencies tend to stand out much faster, which is where experienced installation can make a noticeable difference.
What might take you an entire weekend, or longer if unexpected issues come up, can often be completed much more efficiently by a professional with the right tools and workflow. They are also much better equipped to adapt when the space is less cooperative than expected, whether that means uneven walls, awkward transitions, or layouts that demand tighter precision.
Reliable Results and Peace of Mind
If you care most about getting a clean, lasting result without second-guessing every step, professional installation can feel like the easier choice from the start. Smooth grout lines, properly aligned tiles, and clean transitions are the kinds of details that make the finished installation feel intentional rather than slightly off. More importantly, avoiding preventable mistakes can save you from spending even more time and money correcting issues later.
Many professional installers also back their work with warranties or workmanship guarantees, which adds another layer of reassurance if anything needs attention after the project is complete. Whether you are refreshing a kitchen backsplash or finishing a bathroom wall, hiring a professional can make the entire process feel far less stressful when the final outcome matters.
Complex Installation Patterns
Some subway tile layouts are much less forgiving than they look, especially once angles, spacing, and repeated cuts come into the picture. Patterns like herringbone demand much more precision because every tile placement affects the alignment of everything that follows. A small mistake early on can become much more obvious by the time the full installation is complete.
For example, installing our Natasha 2 x 6 Glossy Porcelain Tile in Canvas in a herringbone layout requires careful planning, accurate cuts, and consistent spacing to keep the pattern looking clean instead of chaotic. Because each tile sits at an angle, maintaining even grout lines and avoiding lippage becomes much more demanding than a straightforward stacked layout. If your project includes a more detailed installation style, professional help can make the process significantly smoother.
Surface conditions matter here, too. Walls that are not perfectly flat or floors with dips and uneven areas can complicate installation far beyond the tile pattern itself. Experienced installers know how to correct those underlying issues so the finished result still looks intentional and properly executed.
Limited DIY Experience
If this would be your first tile installation, it is worth being honest about how much of a learning curve you are comfortable taking on. Subway tiles may look approachable, but the combination of measuring, cutting, spacing, adhesive work, and finishing details can become overwhelming faster than many homeowners expect. That pressure only increases if you are working with materials you do not want to replace.
Professional installation can be especially worthwhile if you are on a tighter deadline, preparing your home for sale, or simply want the project completed correctly the first time. When the goal is a polished result without the stress of figuring everything out as you go, handing the work over to an experienced installer is often the smarter call.

Cost Considerations
If you are planning a subway tile project, cost is probably one of the first practical questions on your mind. While the tile itself is an obvious part of the budget, the final number is usually shaped by much more than the product price alone. The tile size you choose, the installation complexity, labor, and even the condition of your walls or floors can all influence what you end up spending, so it helps to look at the bigger picture before you begin.
Tile Size, Material, and Installation Method
The subway tile size you choose can affect the cost more than you might initially expect. Larger formats usually cover more area with fewer pieces, which can help reduce installation time and labor. Smaller subway tiles, however, often require more cuts, tighter alignment, and more precision overall, which can increase both labor costs and material waste depending on your layout.
Your material choice matters just as much. If you are working within a tighter budget, ceramic subway tiles are often the more approachable option, while porcelain usually costs more upfront but offers stronger durability and performance in demanding spaces. As shown in the photo above, our Aniston 3x12 Polished Porcelain Tile in Carrara Bianco gives you the elevated look of marble with the easier upkeep and durability of porcelain, which can be a much more practical route if you love the look of natural stone without the same price commitment.
If you are considering natural marble or granite instead, costs can rise much faster because of both material pricing and the added care required during installation. Your installation method also affects the budget. Thin-set mortar remains one of the most common and cost-effective options, while adhesive mats may feel simpler if you are taking the DIY route, though they can add to overall material costs. If you are planning a more detailed layout like herringbone, expect installation costs to climb because the extra precision and labor involved take significantly more time.
Labor Costs and Surface Preparation
If you are thinking about installing subway tiles yourself to save money, labor is obviously where the biggest savings can happen, but only if the project goes smoothly enough to avoid expensive fixes later. If you are less experienced or dealing with a more demanding installation, hiring a professional may actually make more financial sense in the long run. Labor rates vary depending on your location, the project complexity, and installer experience, but tile installation commonly falls somewhere between $4 and $15 per square foot.
Surface preparation is another cost that can catch you off guard if you are not accounting for it early. If your wall or floor needs leveling, cleaning, patching, or moisture correction before installation begins, those extra steps will add to both labor and material costs. Even the best-looking subway tile will struggle if the surface underneath is not properly prepared, so this is one part of the budget you do not want to underestimate.
Project Complexity and Market Rates
The layout you choose has a direct impact on what you are likely to spend. If you stick with a straightforward stacked or running bond installation, costs are usually more manageable because the work is simpler and faster to complete. If you choose something more intricate, like herringbone or diagonal layouts, the extra measuring, cutting, and precision involved naturally push labor costs higher.
Where you live matters too. If you are in a larger city or an area with a higher cost of living, installation rates will often be noticeably higher than national averages. Local demand can also affect contractor availability and material pricing. If you are budgeting for your project, it is much more useful to think in terms of your actual market conditions rather than relying too heavily on broad pricing estimates.

Maintaining Your Subway Tile Installation
Once your subway tile installation is complete, keeping it looking its best comes down to consistent care rather than complicated maintenance routines. A little regular upkeep can go a long way in preserving the finish, protecting the grout, and helping your installation continue looking clean and polished over time. It is also worth following the manufacturer’s care recommendations, especially if you have selected premium materials or specialty finishes that may require more specific maintenance.
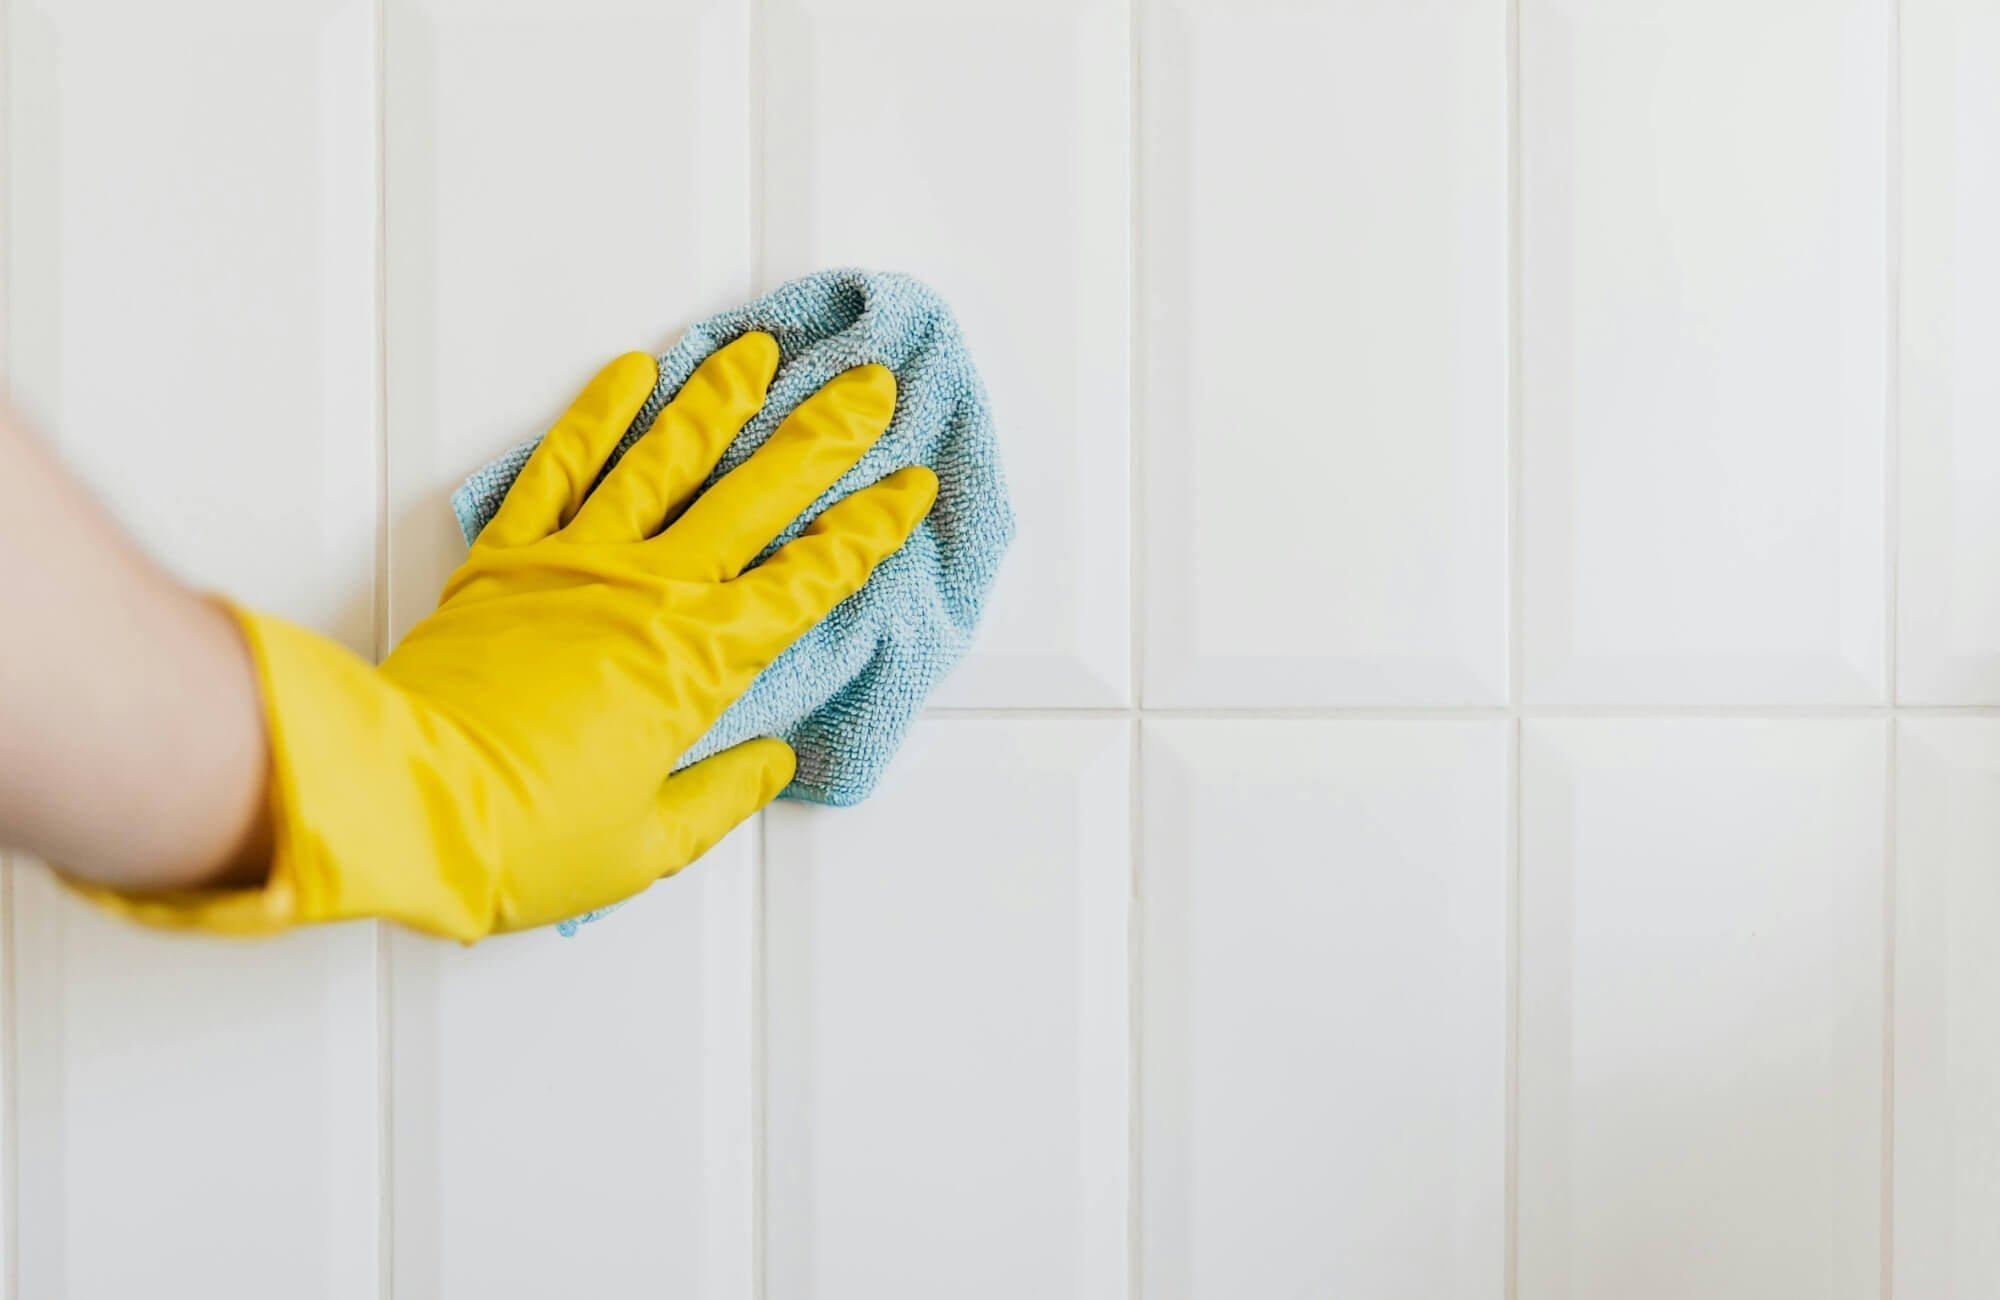
Regular Cleaning
If you want your subway tiles to keep looking fresh, regular cleaning makes the biggest difference. For everyday maintenance, a simple mix of mild soap and warm water is usually all you need to lift surface dirt without being too aggressive on the finish. If your tiles have a glossy surface, avoiding abrasive scrub pads or harsh cleaners becomes even more important, since those can leave scratches that gradually dull the look over time. A soft cloth or sponge is usually the safer choice if you want to clean effectively without damaging the surface.
If your subway tiles are installed in moisture-prone areas like bathrooms or kitchen backsplashes, getting into the habit of quick wipe-downs can save you much more effort later. Soap scum, water spots, and everyday residue tend to build faster than most people realize when moisture is part of the environment. If you stay ahead of that buildup, deep cleaning becomes much less of a chore. Ceramic and porcelain subway tiles are especially approachable in that sense, since non-porous surfaces generally make day-to-day upkeep much simpler.
Grout Care
Even if your subway tiles still look spotless, grout usually tells a different story if it is not getting enough attention. Because grout is naturally more vulnerable to moisture, dirt, and staining, it often needs more maintenance than the tile itself. Sealing the grout regularly, typically around once a year or based on the manufacturer’s guidance, helps create a protective barrier that keeps it looking cleaner for longer.
When it comes time to clean grout, a grout brush paired with a suitable non-abrasive cleaner usually works best for routine maintenance. If staining becomes more stubborn, you may need a grout-specific cleaner, but harsher acidic solutions are generally worth avoiding since they can gradually wear the grout down. If you want your installation to keep looking polished instead of prematurely aged, grout care is one of the easiest places to make a noticeable difference.
Addressing Issues
Even a well-installed subway tile surface can run into occasional issues over time, especially in spaces that deal with regular moisture, temperature changes, or heavier everyday use. If you notice a loose tile, cracked grout, staining, or early signs of mold or mildew, addressing the issue sooner usually keeps the fix much more manageable. Letting small problems sit too long often leads to repairs that are more involved than they needed to be.
If a tile becomes loose, fresh adhesive may be enough to secure it again, while cracked or damaged tiles usually need replacement. Grout repairs often involve removing the compromised section and reapplying fresh grout to restore a clean, stable finish. For stains, starting with mild soap and water or a tile-safe cleaner is usually the safest route, while mold and mildew in humid spaces may need a more targeted cleaning approach. If moisture is a recurring issue in your space, regular drying and better airflow can make a much bigger difference than repeated deep cleaning alone.
Achieving Flawless Subway Tile Installation
Subway tile installation can absolutely be manageable, especially if you are working with a straightforward layout and feel comfortable taking on a hands-on project. Their uniform sizing and versatile formats make them one of the more approachable tile options, but a polished result still depends on thoughtful planning, proper preparation, and careful execution from start to finish. If your project involves more complex layouts, challenging surfaces, or simply higher expectations for the final finish, bringing in professional expertise can often be the smarter path.
Just as important as the installation itself is choosing a subway tile that genuinely suits your space, design goals, and day-to-day needs. If you are weighing finishes, formats, or layout possibilities and want more confidence before making a decision, our Personalized Design Consultation makes the process much easier. Whether you are refining a backsplash, planning a bathroom update, or comparing options for a larger renovation, our team can help you narrow the choices and move forward with a direction that feels thoughtfully considered from the start.