


Whether you’re envisioning a spa-like sanctuary or a compact, energizing space, your bathroom has the potential to become exactly what you need. The true challenge often lies in knowing where to begin and how to navigate the decisions that come with a bathroom renovation. By breaking the process into clear, manageable phases, the entire journey becomes more approachable and far less overwhelming. This step-by-step guide walks you through each stage, from early inspiration to the final installation.

Phase 1: Bathroom Inspiration
Before choosing fixtures or finishes, start by defining the mood and style you want your bathroom to convey. Whether you’re drawn to calming neutrals, sleek modern lines, earthy textures, or bold contrasts, collecting inspiration helps you recognize your preferences and visualize the final result. A primary bathroom often leans toward a serene, spa-like feel, while guest and family bathrooms typically prioritize practicality.
Optional: Streamline the Process With Professional Guidance
To keep the process from becoming overwhelming, consider partnering with a designer or renovation consultant. They can help translate your ideas into a cohesive, budget-friendly plan. Some people often note that expert support made the entire renovation feel smoother, particularly when it came to layouts and fixture choices.
Pro Tip: This is the perfect stage to explore which style truly resonates with you. Digital style quizzes, mood boards, curated palettes, inspiration galleries, and even an AR tool can help you visualize how different choices would look in your home and narrow down the aesthetic you love.

Phase 2: Budgeting & Timelines
Once your vision is set, grounding your plans with a realistic budget and timeline helps you maintain control throughout the renovation. It also clarifies which upgrades are must-haves and which can be modified to better align with your budget.
Establish a Budget
Bathroom remodel costs can vary significantly depending on the material choices, layout changes, and labor. Requesting multiple quotes for fixtures, tile, lighting, cabinetry, and installation services helps you determine where to invest and where to scale back. Many homeowners are surprised by the cost of plumbing and waterproofing, making them an important consideration early in the budgeting process.
Set a Realistic Timeline
The timing of material deliveries and contractor availability significantly influences the overall duration of the project. If you only have one bathroom, careful planning becomes equally important to ensure essential functions remain accessible throughout the renovation. Many people find it helpful to prioritize the most critical tasks early on so the space becomes usable again as quickly as possible. Staying flexible with your schedule also helps reduce stress as the project starts.
Choose the Right Contractor
Recommendations from friends, neighbors, or local community groups are often the most reliable. Many homeowners emphasize that transparent communication and responsiveness were the biggest indicators of a contractor they could trust. It also helps to review portfolios or past projects to gauge their style and quality of work. Scheduling an initial walkthrough can provide insight into their problem-solving approach and overall professionalism.

Phase 3: Finalize the Bathroom Design
With your budget and timeline in place, it’s time to make the key design decisions that will define your bathroom’s look and function. This is where your vision begins to take shape through intentional material choices and well-planned layout decisions.
Choose a Color Palette
Color sets the tone for the entire space. Earthy and neutral tones can create a spa-like atmosphere. Light hues, such as Edward Martin’s Makenna 6x6 Glossy Porcelain Tile in Ice, featured in the photo above, can make small bathrooms feel more spacious. At the same time, darker palettes add depth and sophistication. By establishing your palette early, you can ensure the bathroom feels cohesive and aligned with your overall vision. This clarity also helps you avoid mismatched selections later on, making it easier to achieve a balanced, harmonious design.
Bath, Shower, or Both?
This choice depends on your household’s needs. Showers are ideal for smaller or frequently used bathrooms, while tubs are perfect for families with young children or those who enjoy long soaks. If space allows, having both offers maximum versatility. Evaluating who uses the bathroom most and how often can also guide you toward the setup that provides the greatest long-term benefit.
Select Wall & Floor Coverings
Durability and moisture resistance are essential when selecting wall and floor coverings for a bathroom, which is why tile remains a top choice for most remodels. It offers exceptional longevity, reliable water resistance, and a high-impact style that works across a wide range of aesthetics. In the photo displayed above, the flooring showcases this beautifully with Tatum 24x48 Matte Porcelain Tile in Cross-Cut Straw, and a 2x2 mosaic tile in the shower area for added traction and subtle texture; an effective pairing that enhances both design and functionality.
Aside from tile, there are several other materials worth considering. Paint provides an affordable and easily refreshed option; however, it may require more frequent upkeep in moisture-prone areas. For added personality, vinyl wallpaper introduces pattern and character, but some varieties can peel if not installed properly. If you prefer a warm, organic look, sealed wood brings natural charm, though it does require consistent maintenance to protect against humidity. For a sleek, modern aesthetic, glass surfaces also offer an airy, contemporary finish, even if they tend to show smudges and water spots more readily.
Plan Cabinetry & Storage
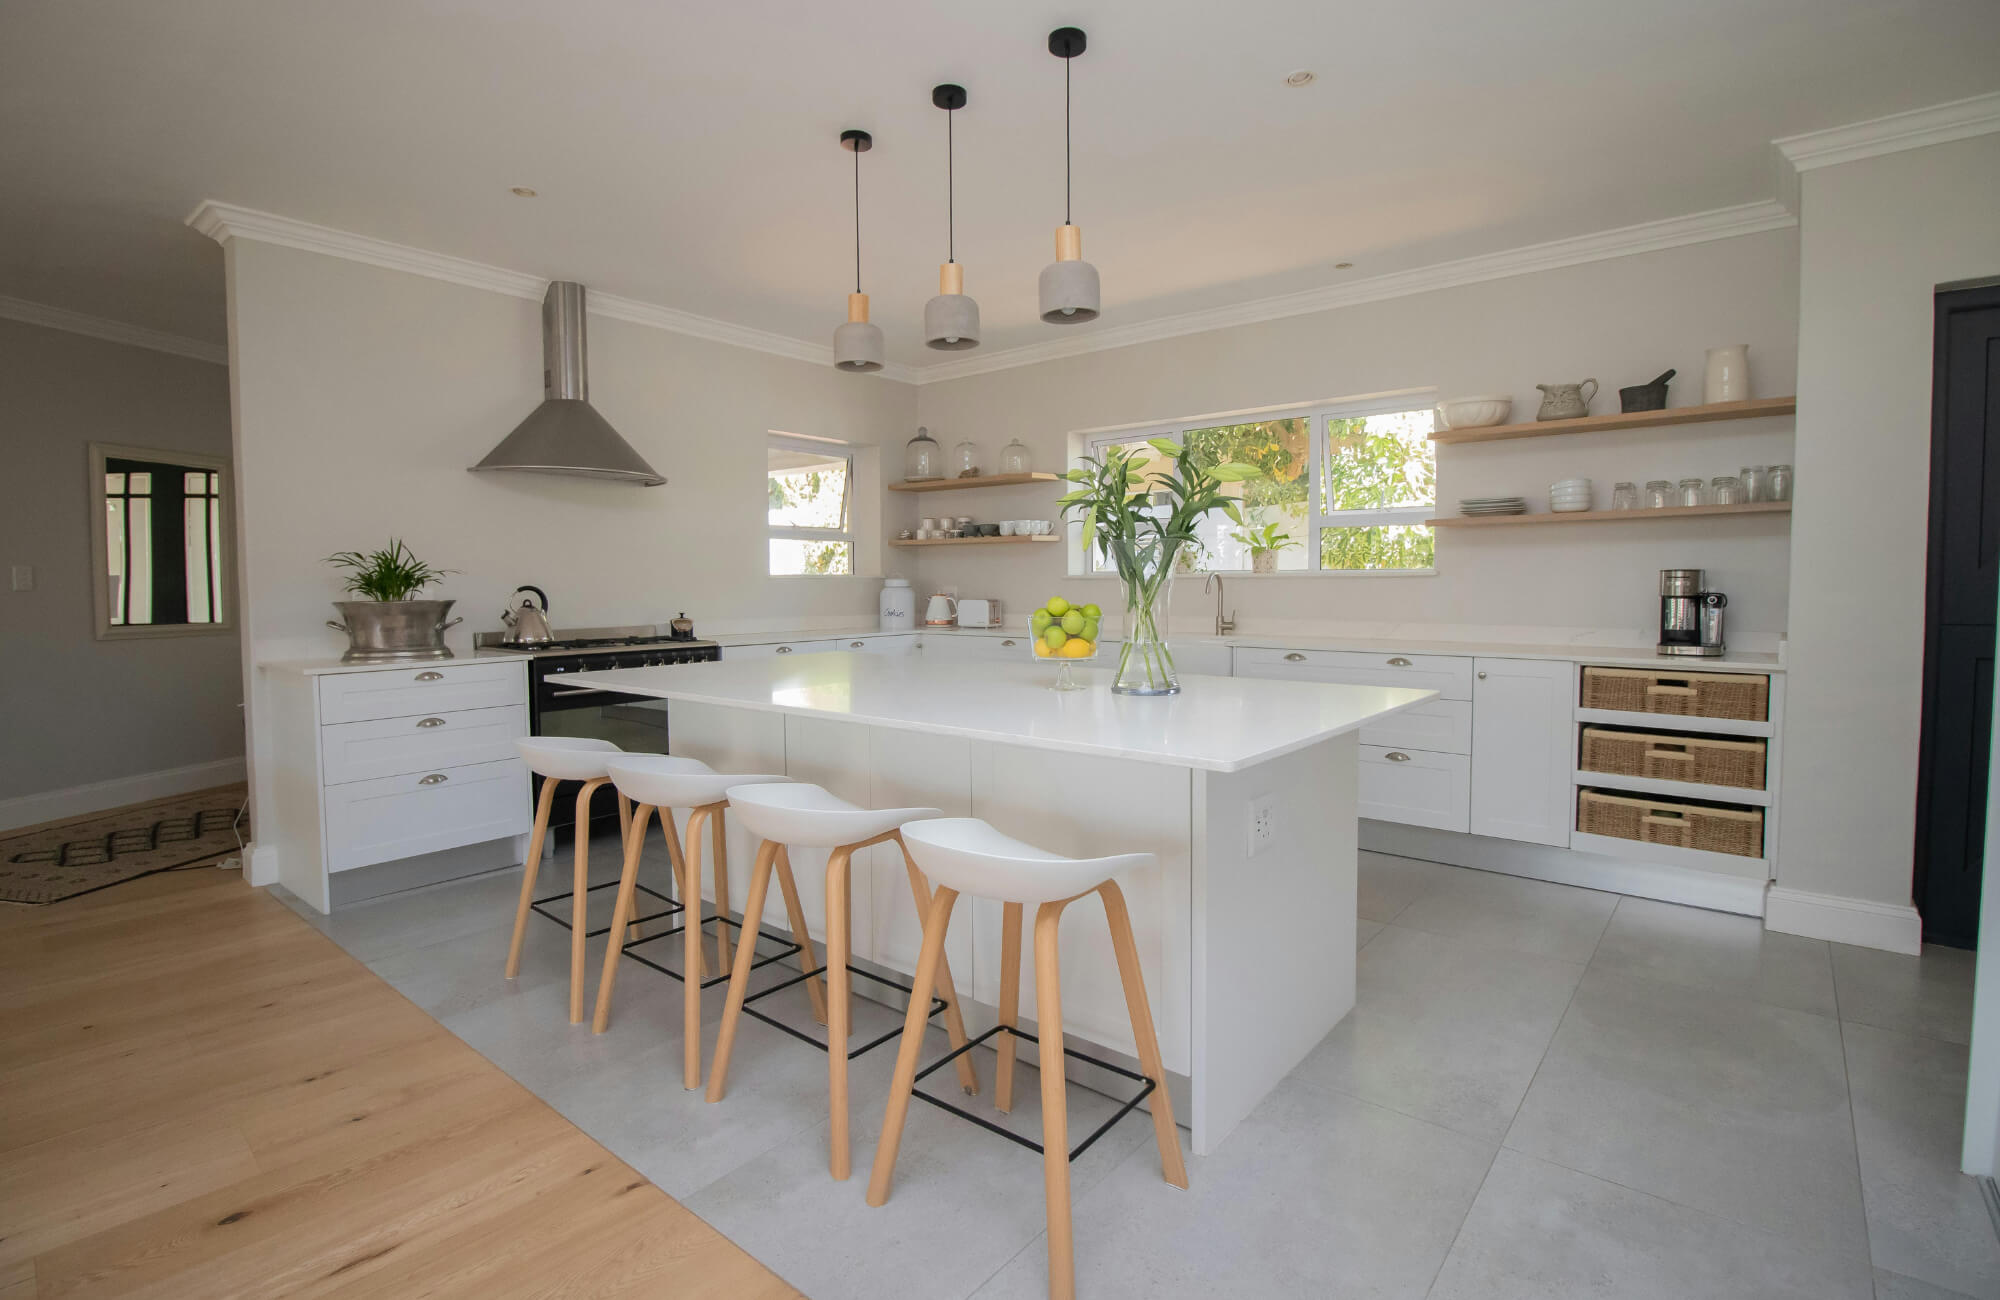
Think realistically about your storage needs. Floating vanities, recessed niches, wall shelving, and built-in cabinetry help keep the space organized, especially in smaller bathrooms. In the photo shown above, the warm wood vanity beautifully demonstrates how thoughtful cabinetry can enhance both function and design—much like Edward Martin’s Abigail 60" Single Vanity in Light Natural Oak with a 3 cm White Zeus Quartz Top, which combines style with smart storage. Behind its double doors, an adjustable shelf with a discreet power and USB outlet keeps daily essentials organized, and the stacked full-extension drawers on each side feature removable bamboo organizers for added convenience. Whether installed as a freestanding piece with a contemporary wood base or mounted to the wall with a sturdy French cleat, a modern vanity like Abigail adapts easily to different layouts and storage needs.
Incorporating vertical storage can also be particularly effective, maximizing space without overwhelming the room. The right combination of solutions ensures both utility and a polished, cohesive look.
Choose Your Fixture Style
Matching or coordinating metal finishes creates a cohesive look. Chrome offers durability, nickel provides warmth, and bronze adds classic character. In spaces like the one shown above, aged brass lighting, such as Edward Martin’s Kaley 16" Pendant and Wilma Wall Sconce, adds a refined, timeless touch that pairs beautifully with warm wood tones and soft tile palettes. It’s also helpful to consider maintenance, as certain finishes show water spots or fingerprints more easily. Choosing fixtures that complement both your design and lifestyle ensures long-lasting appeal.

Phase 4: Execute the Renovation
With your design plan finalized, it’s time to move into installation. At this stage, each decision you’ve made begins to take shape through hands-on construction and detailed finishing work. To ensure every part of the renovation is executed safely and correctly, consider consulting a licensed professional for guidance and support.
Plumbing & Electrical First
Start with behind-the-wall work, like plumbing routes, drainage, wiring, and lighting placement. This stage must be completed before walls are closed or finishes are installed. Taking the time to verify that everything is up to code ensures long-term safety and performance. It also helps prevent costly adjustments later in the process.
Wall Finishes
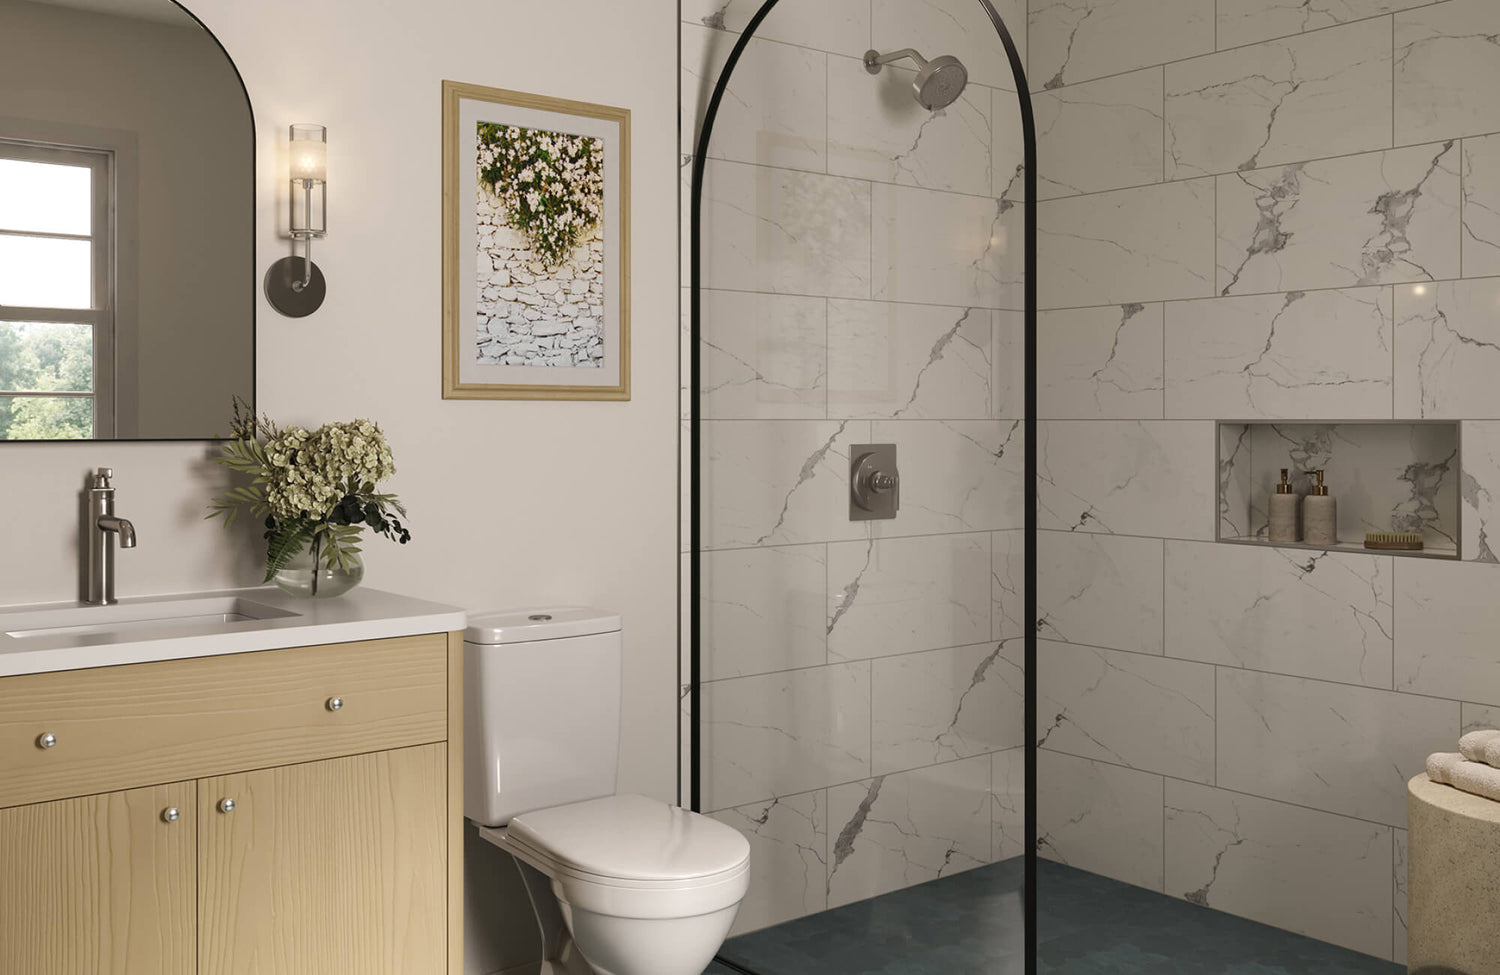
Once utilities are set, apply your chosen wall treatments—tile, paneling, or paint. Completing this step after mechanical work prevents damage or costly rework. This is also the ideal moment to refine details such as grout color, trim pieces, or accent walls, as these choices can significantly influence the final look. In spaces like the one shown above, the Jameson 12x36 Matte Ceramic Tile in Camel Deco brings subtle texture and warmth to the shower accent wall and bathtub backdrop, offering a beautiful focal point that enhances the room without overpowering it. Taking your time here ensures the walls provide a strong visual foundation for the rest of the design.
Flooring
Choose flooring that is durable, water-resistant, and slip-resistant. Porcelain tile remains a leading choice due to its exceptional durability and low maintenance, available in convincing stone-look options that also offer the warmth and character of natural stone without the added upkeep. Meanwhile, luxury vinyl provides a softer, more comfortable feel underfoot; however, it can be susceptible to scratches and may not perform well under extreme heat. For those who prefer true organic texture, sealed natural stone delivers timeless appeal, but it requires periodic sealing and more attentive maintenance to prevent staining. Ultimately, choosing the right flooring ensures both long-term beauty and reliable performance.
Hardware, Storage & Lighting
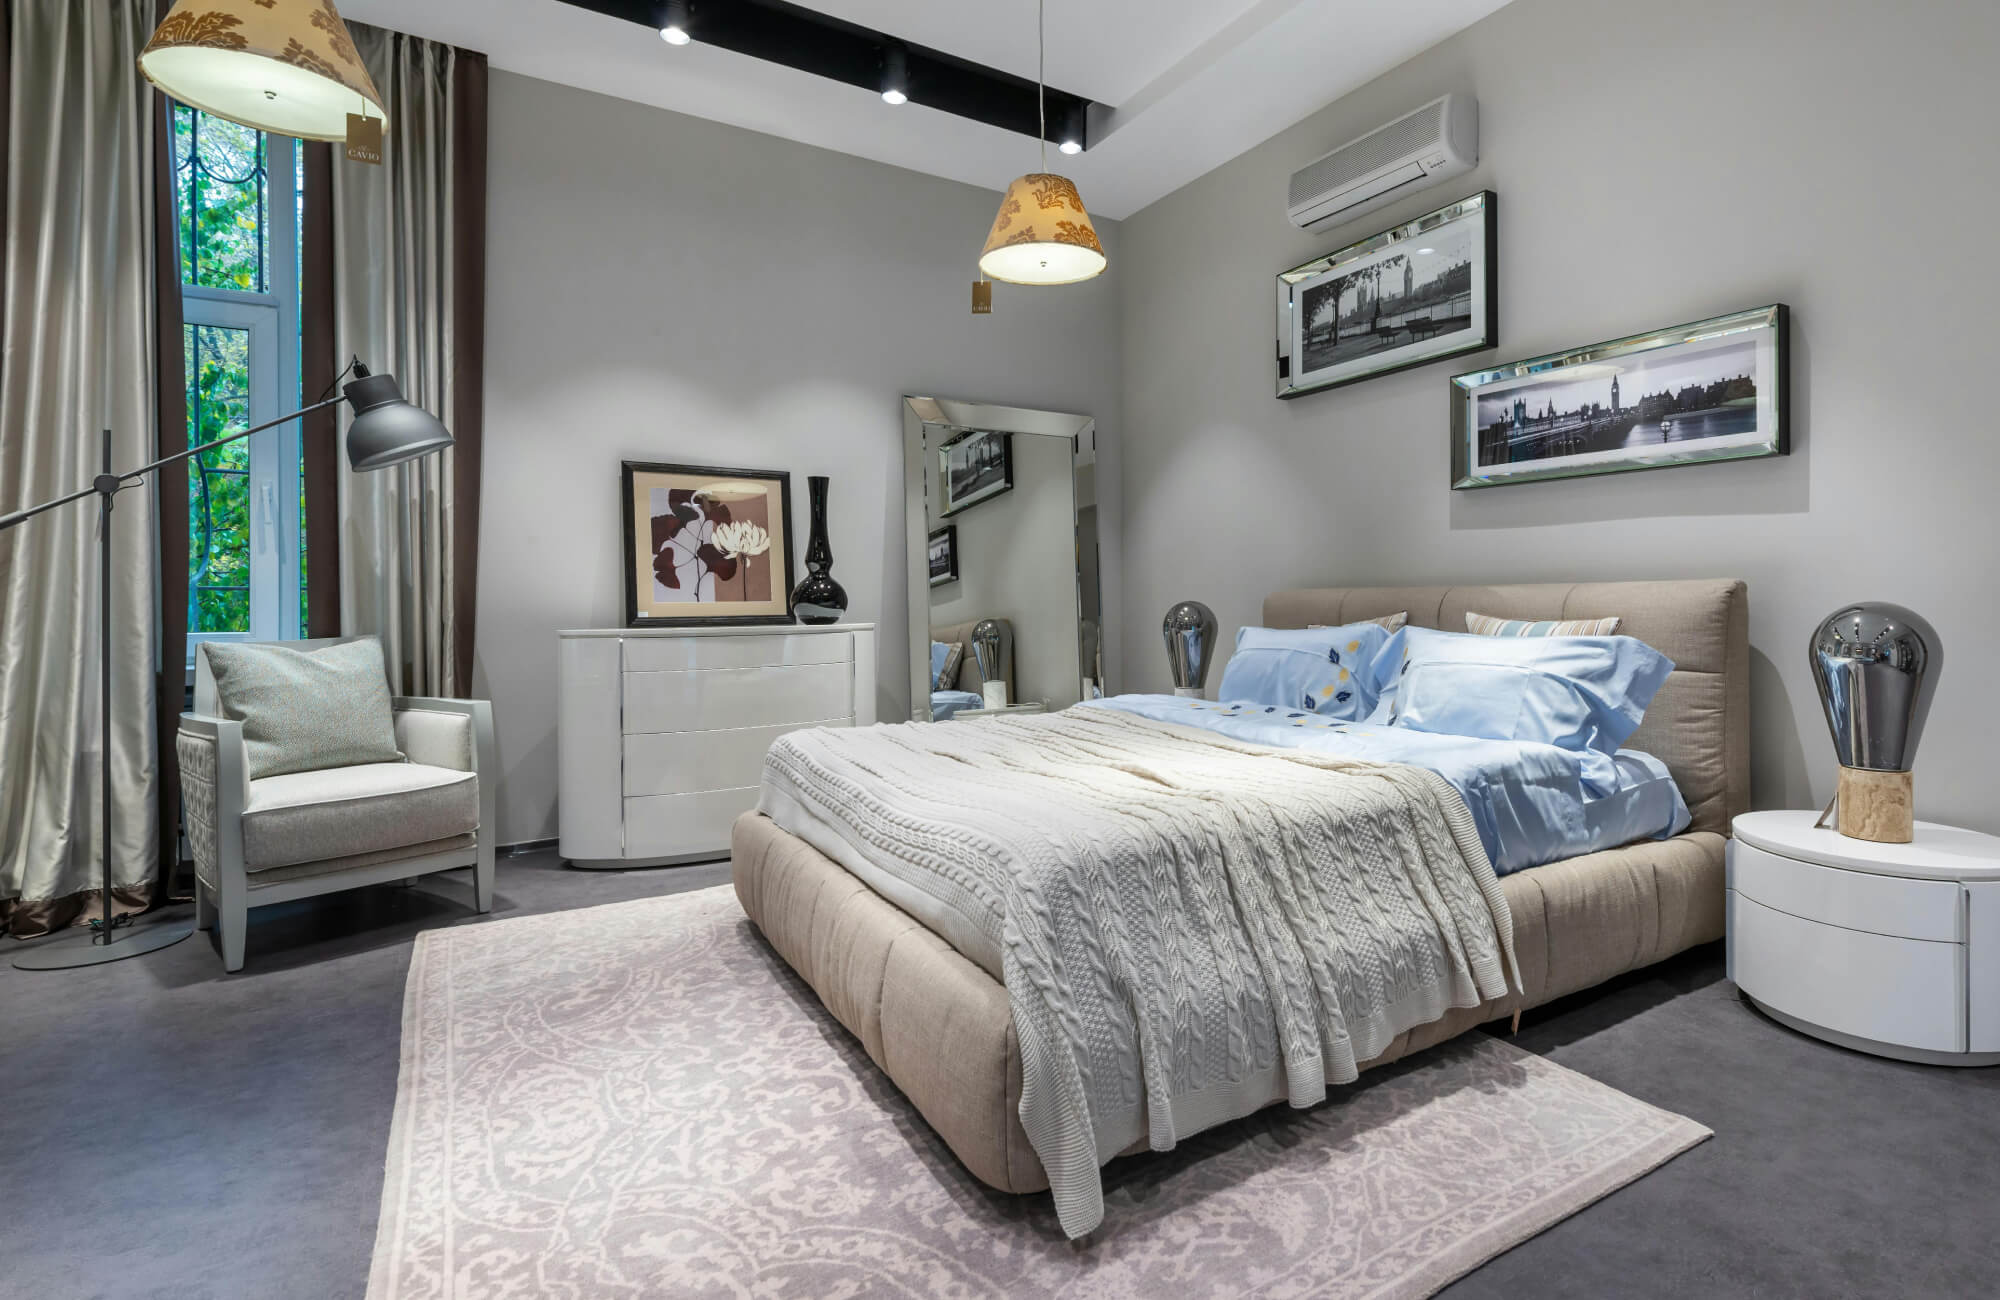
Install mirrors, vanities, shelving, towel bars, and lighting with careful precision. Misaligned hardware is a common frustration in renovation; double-checking measurements before drilling is well worth the time. Lighting plays an equally important role; pieces like Edward Martin’s McKay Chandelier in Black Gunmetal, as featured in the photo above, can enhance both the ambiance and architectural presence of the room, tying the entire design together.
Finishing Touches
After a thorough clean, add the details that bring personality to the bathroom: textiles, greenery, artwork, and décor. These final touches enhance the room’s character and help balance the harder surfaces commonly found in bathrooms. Incorporating items that reflect your style ensures the space feels complete and intentionally designed.

How to Cut Costs With a Mini Bathroom Makeover
If a full renovation isn’t feasible, smaller upgrades can still make a big impact:
- Create a feature wall with paint, wallpaper, or tile.
- Add woven baskets or floating shelves for extra storage.
- Swap in a statement mirror for instant elevation.
- Update old faucets and handles.
- Install a pendant light or stylish fixture as a focal point.
Creating a Bathroom That Truly Works for You
Working through your renovation one phase at a time provides clarity and control from start to installation. Establishing your vision, planning your budget, refining your design, and executing each stage thoughtfully ensures a smoother experience and a more satisfying result. With this structured approach, you’re well equipped to create a bathroom that truly meets your needs. If you’d like expert support along the way, consider exploring our design services to help bring your vision to life with confidence.

FAQs
Bathroom renovations involve many decisions, and having the right information can make each step smoother. Here are answers to the most frequently asked questions to help guide your planning.
1. How long does a bathroom renovation usually take?
Most take 2–6 weeks, depending on materials, layout changes, and contractor availability.
2. What’s the most expensive part of a bathroom remodel?
Labor—particularly plumbing and electrical—typically makes up the largest portion of the budget.
3. Do I need to waterproof the entire bathroom?
While full waterproofing isn’t always required, areas exposed to frequent moisture, such as showers, tub surrounds, and floors, should be properly waterproofed. This helps prevent long-term damage, mold growth, and costly repairs down the line.
4. Can I refresh a bathroom on a tight budget?
Absolutely. Updating lighting, hardware, mirrors, and paint can dramatically transform the space.
5. Should I DIY or hire a contractor?
DIY works well for cosmetic updates. Plumbing, electrical, and structural work should be handled by professionals for safety and long-term performance.