


The herringbone pattern has long been admired for its timeless charm and sense of craftsmanship. Defined by a precise zigzag arrangement of rectangular tiles, it brings movement and sophistication to any room. Yet behind its elegant appearance lies a level of complexity that makes installation more intricate than it seems. In this blog, we’ll explore what makes herringbone tile unique, why it can be more challenging and costly to install, and how proper planning, materials, and professional guidance can help you achieve a flawless, enduring finish that’s worth every detail.

The Herringbone Pattern
The herringbone layout is one of the most timeless and recognizable tile patterns in design. Its distinct, interlocking arrangement instantly draws the eye, creating a sense of rhythm and craftsmanship that feels both traditional and contemporary. Below, we’ll explore what defines this layout and why it continues to hold such lasting appeal in modern interiors.
The Geometry Behind the Design
At its core, the herringbone pattern is formed by rectangular tiles set at precise 90-degree angles, creating a series of connected “V” shapes that resemble the bones of a fish, hence its name. This geometric precision gives the layout a sense of movement that feels natural yet structured. Each tile relies on the next to complete the pattern, producing a continuous flow that guides the eye across the surface. The result is a design that feels both orderly and artistic, bringing a handcrafted quality to any floor or wall.
Where Herringbone Works Best
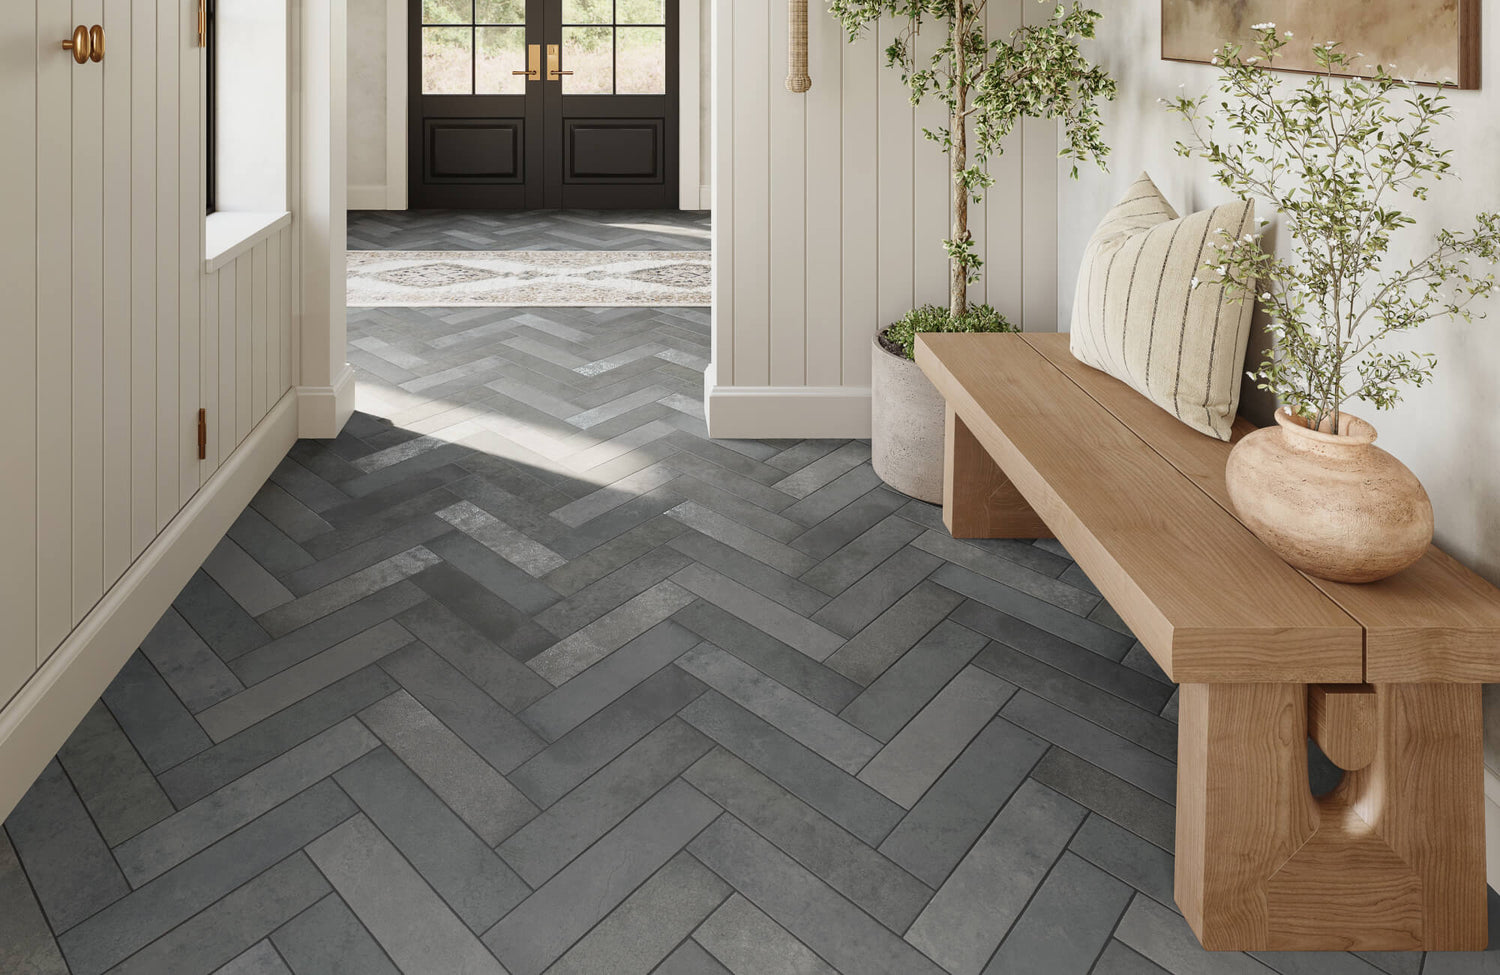
Herringbone layouts are incredibly versatile, finding their place in kitchens, entryways, bathrooms, and even accent walls. In compact spaces like hallways or powder rooms, the zigzag alignment creates a sense of direction and visual expansion, helping the room feel larger. Kitchen backsplashes benefit from their texture and symmetry, adding character without overpowering the surrounding décor. This adaptability makes it a favorite among designers who want to balance creativity with timeless style.
Visual Impact and Design Appeal
The herringbone pattern brings a unique combination of energy and refinement to a room. Its rhythmic structure introduces texture and depth, turning even plain-colored tiles into a focal point. In smaller spaces, this layout adds motion that helps break up monotony and makes the area appear more open and dynamic. Whether paired with warm woods or minimalist tones, herringbone provides a subtle sophistication that complements nearly any design aesthetic.
A great example of this is our Maisie 2.5x16 Glossy Ceramic Tile in Ocean, as seen above. Its soft blue tone and reflective finish highlight the herringbone layout beautifully, adding both dimension and calmness to the space. This pairing of cool color and geometric precision shows how the pattern can feel fresh, elegant, and perfectly suited to modern interiors.

Why Herringbone Installations Are More Complex
While the herringbone pattern is admired for its timeless elegance, it demands a higher level of skill and patience during installation. Each tile must align perfectly for the pattern to flow seamlessly, making precision essential at every stage.
Cutting and Alignment Challenges
Accuracy is key when working with a herringbone layout. Because each tile interlocks at a 90-degree angle, even the slightest misalignment can disrupt the entire pattern. Installers must make precise cuts and double-check measurements to keep lines consistent and corners sharp. This meticulous attention ensures that the finished design maintains its signature zigzag rhythm without uneven joints or awkward edges. The process requires steady focus and experience to execute cleanly from start to finish.
Extra Time and Labor Involved
Unlike simpler layouts that follow straight lines, herringbone installations require more detailed planning and cutting. Each piece must be trimmed and fitted carefully to maintain alignment, especially around edges or corners. This means more time spent measuring, adjusting, and confirming placement before setting tiles. The extra labor and care extend the overall installation time but result in a beautifully coordinated finish that feels intentional and refined.
Skill and Experience of the Installer
Because the herringbone layout depends on perfect symmetry, hiring an experienced tile setter is a smart investment. Skilled professionals know how to maintain consistent spacing, achieve clean joints, and prevent pattern drift. They can anticipate common challenges such as uneven surfaces or complex room layouts and adjust accordingly. Their craftsmanship ensures a polished outcome that highlights the pattern’s precision and artistry rather than its imperfections.
Importance of Proper Surface Preparation
A flawless herringbone installation starts with a perfectly level base. Uneven subfloors or wall surfaces can throw off alignment and cause gaps or lippage once tiles are set. Professional installers take time to smooth and prepare the surface, ensuring proper adhesion and pattern accuracy. This groundwork may seem minor, but it’s what keeps the herringbone pattern looking crisp, cohesive, and long-lasting once complete.

Materials That Work Well in Herringbone Layouts
Choosing the right material plays a huge role in how a herringbone installation looks and performs over time. Some tiles are easier to work with, while others demand more precision or upkeep but reward you with exceptional visual depth. Below, we’ll explore which materials complement the herringbone pattern best and how each one brings its own strengths to the layout.
Ceramic Tiles
Ceramic tiles are a practical and cost-effective choice for herringbone designs, especially on walls or in light-use areas. They’re lightweight and easy to cut, making them ideal for achieving clean, precise angles without heavy labor. Their smooth surface allows grout lines to appear crisp, which enhances the pattern’s geometry. Because ceramics come in a wide range of colors and finishes, they offer plenty of creative flexibility for achieving both classic and contemporary looks.
Porcelain Tiles
Porcelain tiles are a popular option for homeowners who want a durable and long-lasting surface, as you can see above with our Catalina 2x16 Matte Porcelain Tile in Clay. Their density makes them resistant to moisture and wear, which is ideal for high-contact areas like floors or showers. However, that same density means they’re harder to cut, requiring specialized tools and steady precision to maintain the herringbone flow. When installed correctly, porcelain delivers a refined finish that pairs the pattern’s elegance with exceptional durability.
Natural Stone Tiles
Natural stone brings a unique sense of character and luxury to herringbone layouts. Each piece carries its own variation in veining and color, giving the finished surface depth and individuality. However, stone tiles are heavier and more porous, meaning they often require sealing and careful handling during installation. With expert craftsmanship, natural stone herringbone floors or walls can transform a space with texture, warmth, and timeless appeal.
Glass and Mosaic Tiles
For those looking to add light and sparkle, glass or mosaic tiles work beautifully in a herringbone format. Their reflective quality enhances brightness and depth, especially in smaller rooms or accent areas like backsplashes. Because they’re more delicate, these tiles need gentle handling and precise alignment to keep the pattern intact. When properly set, glass herringbone layouts bring a luminous, high-end finish that instantly draws attention.
Cementitious Tiles
Cementitious tiles are known for their handcrafted, organic appearance that adds texture and personality to any space. Their heavier weight and natural surface variation make them slightly more challenging to install in a detailed layout like herringbone. Still, the effort pays off in a surface that feels grounded and artisanal. These tiles are perfect for those who want a tactile, design-forward choice that stands out with its raw and natural charm.

Cost Factors Behind a Herringbone Installation
Installing a herringbone layout often comes with a higher price tag than simpler patterns, mainly because of the time, precision, and expertise it demands. The materials you choose, along with tile size and project details, can all affect the overall cost.
Material Type and Tile Size
Both the material and the size of the tile play a major role in determining cost. Smaller tiles or denser materials like porcelain and natural stone require more cutting and fitting, which adds to labor time. Lightweight ceramics or larger tiles, on the other hand, can help streamline the process and reduce waste. The density of the material also affects the tools and effort needed to achieve clean cuts, influencing both time and budget. Selecting the right balance between appearance, durability, and practicality helps control expenses without compromising design quality.
Layout Complexity and Waste Factor
The diagonal alignment of the herringbone pattern naturally produces more offcuts than straight or grid layouts. Each piece must be measured and trimmed carefully to maintain consistent spacing and pattern flow. This precision not only increases the amount of material waste but also extends installation time. While it may seem like a small detail, these additional cuts and adjustments can significantly influence overall costs. Planning the layout thoughtfully and ordering extra tile in advance helps minimize unexpected expenses during installation.
Professional Labor Rates
Because herringbone installations require such accuracy, professional tile setters with specialized experience often charge higher rates. Their skill ensures that tiles align evenly, grout lines stay consistent, and the final layout looks intentional and cohesive. While the labor cost may be higher upfront, it often saves you from future repairs or uneven finishes that can result from inexperience. Investing in skilled craftsmanship guarantees that the pattern’s symmetry and beauty are preserved for years to come.
Regional and Project-Specific Costs
Installation costs can also vary depending on where you live and the specific conditions of your project. Factors such as local labor rates, tile availability, room shape, and substrate condition all contribute to pricing differences. A room with irregular walls or corners might require additional adjustments, while an uneven subfloor may call for extra prep work. Understanding these localized and project-based factors helps set a more accurate budget and ensures that your investment aligns with both your design vision and practical needs.

Tips for Simplifying a Herringbone Installation
A herringbone layout can appear intricate, but with thoughtful planning, it can be executed smoothly without sacrificing its signature charm. The following tips are meant for general guidance, so please consult with a professional installer if you’re unsure about measurements, materials, or surface preparation.
Choosing the Right Tile Size and Orientation
Opting for medium-format tiles, such as 3x12 inches, helps simplify layout work and minimize the number of cuts required. This tile size keeps the pattern visually balanced while reducing complexity during alignment. Orientation matters too, since diagonal or horizontal placements can influence how spacious a room feels. Choosing the right tile format and direction early on ensures a smoother installation and a consistent, well-proportioned result.
Starting from the Centerline
Laying out a centerline before installing the first tile helps maintain symmetry throughout the space. This reference point acts as a guide for consistent spacing and balanced pattern flow on both sides of the room. It’s a simple yet crucial step that minimizes uneven cuts along walls or corners. Taking time to plan the starting point makes the entire process more efficient and produces a professional-looking finish.
Using Spacers and Guides
Spacers and layout guides are invaluable tools for keeping the herringbone pattern uniform and steady. They help preserve consistent grout lines, prevent gaps, and reduce pattern drift as tiles are set in place. Regularly checking alignment ensures that even small variations are corrected early, keeping the design crisp and orderly. With careful pacing and the right tools, the herringbone layout can be installed with precision and confidence.

Maintaining & Repairing Herringbone Installations
Once your herringbone installation is complete, proper care ensures it stays as striking as the day it was finished. Regular maintenance helps preserve both the pattern’s structure and the material’s longevity. Below, we’ll look at a few simple but effective ways to keep your herringbone surface in top condition and handle minor issues when they arise.
Routine Cleaning and Sealing
Keeping your herringbone surface clean doesn’t require harsh chemicals—gentle, pH-neutral cleaners work best for protecting grout lines and tile finishes. Regular sweeping or vacuuming removes grit that can dull the surface over time. Sealing natural stone or porous tiles periodically adds an extra layer of protection against moisture and stains. With consistent care, your tiles maintain their depth and texture, ensuring the pattern continues to stand out beautifully.
Spot Repairing Chipped or Cracked Tiles
Even with careful use, tiles may occasionally chip or crack, especially in high-contact areas. The good news is that individual tiles in a herringbone layout can be replaced without disturbing the entire pattern. A professional can carefully remove the damaged piece, reapply adhesive, and match the surrounding grout for a seamless finish. Prompt repairs not only restore visual harmony but also prevent further damage that could spread to neighboring tiles.
Preserving Grout Lines
Grout plays a crucial role in defining the herringbone pattern, so keeping it in good shape is key. Over time, dirt and moisture can cause discoloration or erosion, dulling the layout’s crisp look. Regular cleaning with mild solutions and occasional regrouting when needed helps retain the contrast and structure of the design. A well-maintained grout line keeps the pattern visually sharp and contributes to the overall durability of the installation.
Protecting From Busy Areas
In rooms with frequent foot movement, a little prevention goes a long way in maintaining your herringbone surface. Placing rugs or mats near entryways and busy zones reduces wear and prevents scratches from debris. It’s also wise to use felt pads under furniture legs to avoid scuffing. These small protective measures help preserve the finish, extend the lifespan of the tiles, and keep the pattern looking polished over time.
Balancing Beauty, Cost, and Craftsmanship
In the end, choosing a herringbone layout comes down to more than just visual preference; it’s about embracing craftsmanship and balance in design. This layout may take extra effort and precision, yet it rewards you with a surface that feels refined, durable, and full of character. When planned carefully and installed by skilled professionals, herringbone tile adds lasting rhythm and elegance to any space. Over time, the investment in quality materials and expert workmanship pays off in both beauty and longevity.
For homeowners considering this timeless layout, our experts are here to guide you through every step of the process. From selecting the right tile size and finish to planning the best layout for your space, a design consultation helps turn your vision into a cohesive plan. With professional insight and thoughtful coordination, you can achieve a polished, well-balanced design that feels personal and enduring.