


Checkerboard tile floors may look simple at first glance, but choosing the right tile size can make all the difference in how your design feels and functions. While 12x12 and 18x18 inches are the most commonly used options, other sizes, like 4x4, 6x6, or even 24x24, offer their own visual rhythm and spatial impact.
Whether you're aiming for a dramatic entryway or a more subtle pattern in a compact room, checkerboard tile size plays a key role in balancing proportion, layout, and overall style. Below, we’ll walk through how different sizes can shape your checkerboard design and help you find the perfect fit for your space.

How Tile Size Shapes Layout and Symmetry
The size of your checkerboard tiles can have a major impact on how your layout feels and flows. From clean, open expanses to tightly patterned surfaces, each size brings its own sense of rhythm and proportion. Below, we’ll explore how different tile dimensions influence symmetry, spacing, and the overall visual balance of a room.
Large Tiles for Clean and Expansive Layouts
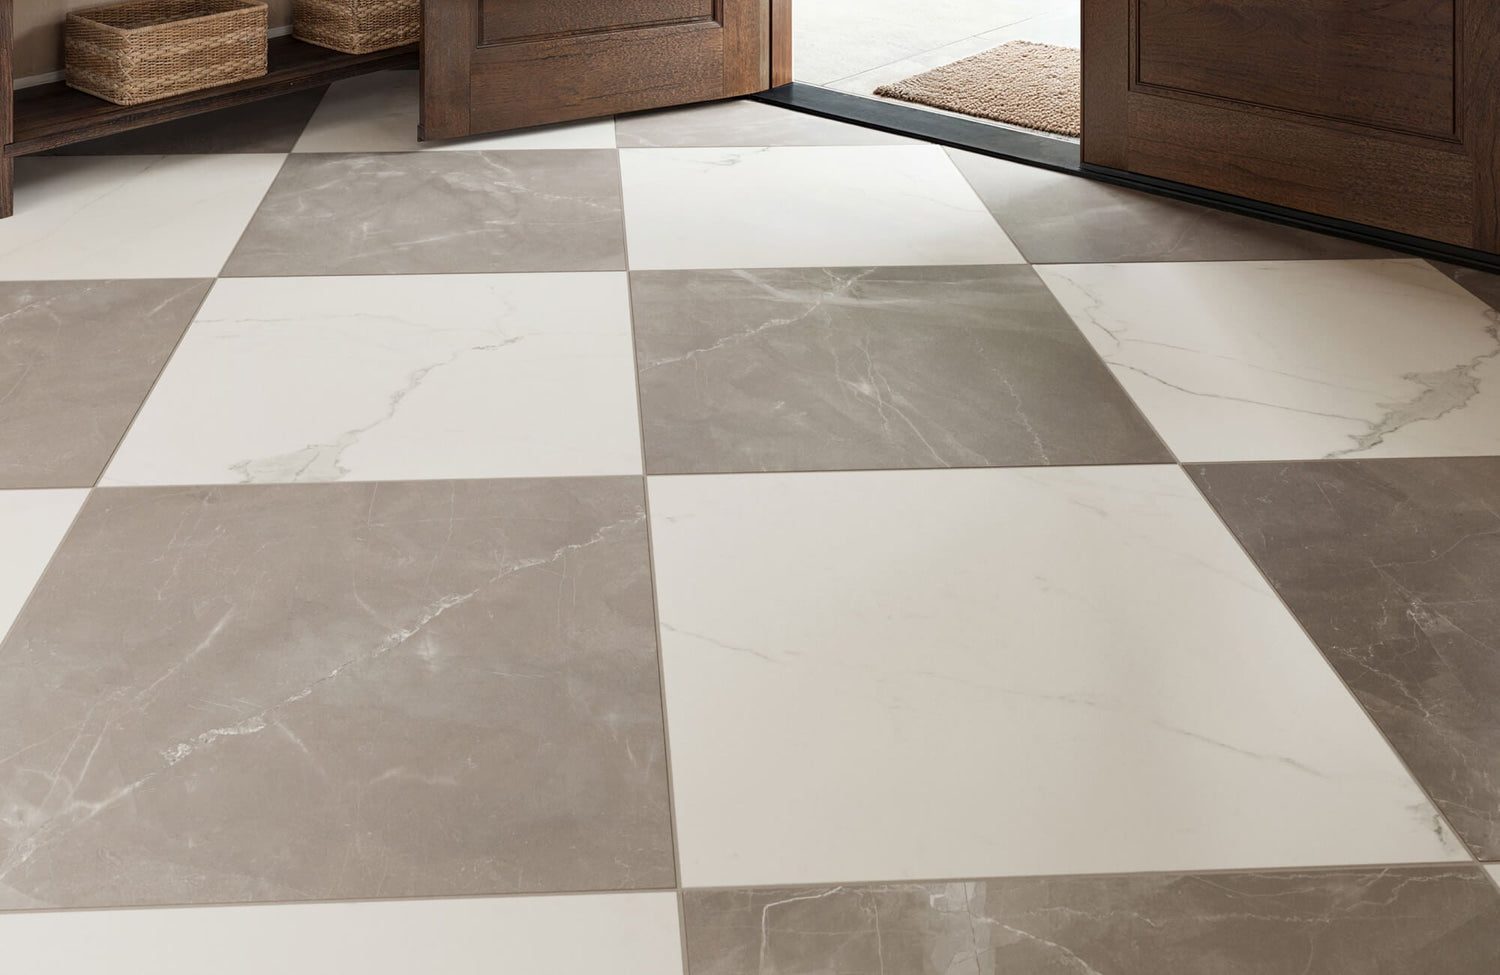
Large-format tiles like 24x24, such as our Leona 24x24 Checkerboard Polished Porcelain Tile in Calacatta and Nero Marquina above, or even 30x30 inches, can instantly make a space feel more open and polished. Fewer grout lines mean the checkerboard pattern reads clearly and consistently across the floor. This size works especially well in spacious entryways or grand hallways, where the broader layout allows the pattern to breathe. Also, larger tiles often require fewer cuts and joints, making them ideal when you want a streamlined, symmetrical look.
Mid-Sized Tiles for Flexibility and Balance
Classic sizes like 12x12 and 18x18 offer a versatile middle ground that adapts well to most room sizes. They’re easy to lay out with minimal waste and can be adjusted with or without borders, depending on your space. These tiles still provide a strong visual impact while offering more layout flexibility, especially in kitchens or open-plan areas. If you're aiming for balance without bold extremes, mid-sized tiles are a reliable choice.
Smaller Tiles for Detail and Movement
For more intimate rooms or vintage-inspired designs, smaller tiles such as 4x4, 5x5, or 8x8 add texture and charm. The increased number of grout lines creates a more detailed checkerboard effect, which works beautifully in bathrooms, laundry rooms, or even on shower walls. These sizes also allow for tighter spacing and more intricate layouts, which can be helpful when working around fixtures or built-ins. Just keep in mind that while smaller tiles offer more pattern control, they may also require a bit more planning to maintain alignment and symmetry.

Tile Sizes and Availability
Finding the right checkerboard tile often starts with a clear vision, but availability and budget can quickly influence your choices. Striking the right balance between size, material, and color feels like a win, but it's just as important to be open to adjustments along the way. In the kitchen featured above, our Palmer 12x12 Checkerboard Matte Porcelain Tile in White and Grey delivers that perfect middle ground. The classic scale, soft contrast, and matte finish provide a timeless look that’s easy to pair with both traditional and modern elements.
Being flexible with tile size can make a big difference when specific options aren't available. For example, if a particular honed marble in 8x8 isn’t in stock or exceeds your budget, switching to a larger 12x12 format like Palmer still offers visual impact with easier sourcing and installation. Larger tiles also help reduce grout lines, creating a cleaner, more open look across the floor. These small shifts in size can make your overall design more practical without sacrificing style.
In many cases, choosing what’s available, rather than waiting for a specific size or finish, helps keep your project moving forward. It’s not just about settling; it’s about finding smart alternatives that achieve the same polished effect. By staying open to nearby sizes and finishes that still support your overall design vision, you’re more likely to complete your space with confidence and consistency.

How Your Tile Material Shapes Size Choice
When narrowing down the perfect checkerboard tile, choosing the best material is just as important as finding the right size. Marble is often the go-to for classic designs—it brings beautiful veining, subtle color variation, and a refined elegance that’s hard to beat. However, while stunning, marble can be more expensive and high-maintenance, which makes it less ideal for busy or moisture-prone areas. That’s why it’s important to consider how your material will perform day-to-day, not just how it looks in a showroom.
Porcelain and ceramic tiles are excellent alternatives that balance style with practicality. These materials can closely mimic the look of natural stone while offering easier upkeep and wider availability in sizes like 5x5, 12x12, and even 24x24, which also plays a role in how bold or soft your checkerboard pattern appears. When material and tile size work together, the result feels intentional, cohesive, and well-suited to your space.
If you’re open to exploring beyond traditional options, consider materials like terrazzo, concrete, or even luxury vinyl tile (LVT). Terrazzo offers a playful yet sophisticated texture, while concrete tiles bring a minimalist edge, both available in larger sizes perfect for spacious layouts. LVT, though more budget-friendly, still allows for flexible sizing and easy installation, especially in small spaces. Just keep in mind that some alternatives, like LVT or unsealed concrete, may not offer the same long-term durability or upscale finish as ceramic, porcelain, or natural stone.

How Finish and Tile Size Work Together
When selecting the right checkerboard tile, the finish is just as important as the size. Finishes affect everything from the tile’s texture and light reflection to how bold or subtle the overall pattern feels. As you explore options like 12x12, 8x8, or even smaller 5x5 tiles, it's worth considering how a polished, matte, or tumbled finish can change the tone of the space. The right combination can either sharpen the look or soften the pattern, depending on the mood you want to create.
Polished finishes are great for making a space feel more formal and open, especially when paired with large-format tiles. Their reflective surface amplifies natural light and adds a glossy, high-end touch, ideal for entryways, dining rooms, or other places where you want a bit of drama. Larger tiles enhance that mirror-like effect, giving rooms a grander feel. This pairing works particularly well in classic black-and-white layouts, where clean lines and shine go hand in hand.
If you prefer a more relaxed or rustic feel, matte and honed finishes are your go-to. These tiles reduce glare and bring a softer, more grounded appearance, especially when combined with medium-sized or smaller tiles. Matte tiles, typically used in ceramic or porcelain, create an inviting, low-maintenance surface, while honed finishes in natural stone offer a warm, slightly textured feel. For an even more aged look, tumbled tiles bring organic charm with uneven edges and surface variation, best showcased in smaller formats where imperfections add character and depth to the checkerboard layout.

The Installation Process
The size of your checkerboard tiles plays a major role in how they should be installed. Larger tiles often require more precision and stronger support, while smaller tiles come with their own set of layout and grout challenges. Below, we break down the installation process based on tile size to help you understand what to expect and how to plan accordingly. For best results, especially with patterned layouts, we recommend consulting a professional installer to ensure long-term durability and a clean, finished look.
Installing Large Checkerboard Tiles
Larger checkerboard tiles, such as 18x18 or 24x24 inches, make a bold impact but demand extra care during installation. These tiles are heavier, which means they need a flat, stable surface to prevent shifting or cracking. Subfloor prep is crucial, any unevenness should be corrected using cement board or self-leveling compounds. It’s also a good idea to start laying tiles from the center of the room, especially in symmetrical spaces, to maintain balance and clean lines.
Because of their size, large tiles benefit from a wider trowel with deeper notches to ensure enough mortar coverage. Back-buttering each tile is also recommended to prevent hollow spots that can cause cracks. Spacers (typically 1/8 inch or larger) help maintain even grout lines, and a laser level can assist in keeping the alignment sharp. These details might seem small, but with large tiles, imperfections are more noticeable, so precision is key.
Installing Small and Mid-Size Checkerboard Tiles
Small to mid-size tiles, such as 6x6, 8x8, or even 12x12, offer more flexibility but require more attention to grout work and spacing. These tiles are easier to handle and cut, making them great for DIYers or for rooms with architectural quirks like alcoves or tight corners. The smaller scale also allows for tighter grout joints, which can give the finished floor a cleaner or more vintage-inspired look, depending on the material and finish.
However, smaller tiles increase the number of grout lines, so planning and precision are still important. Dry-fitting the tiles beforehand helps confirm the layout and avoid awkward slivers at the edges. A smaller notched trowel is usually appropriate, and spacers as narrow as 1/16 inch can achieve a more seamless look. Though less physically demanding than larger tiles, installing small tiles takes patience and consistency to ensure an even, polished finish.
Installing Mosaic Checkerboard Tiles
Mosaic checkerboard tiles are typically pre-mounted on mesh sheets, which makes them easier to install as a group rather than setting each tiny tile individually. These sheets are great for small areas like powder room floors, backsplashes, or decorative inlays where precision would otherwise be tedious tile-by-tile. Because of their scale, mosaic tiles allow for more intricate checkerboard effects and work well in curved spaces or detailed layouts.
When installing, it’s important to make sure each mesh sheet is aligned properly with the next to maintain the checkerboard flow. Even a slight misalignment can throw off the whole look. Use a flat surface for pressing the sheets down evenly, and opt for a smaller trowel (1/4" notch or smaller) to avoid pushing mortar through the mesh. Grout spacing is typically tighter with mosaics, so using a fine grout line and cleaning carefully after application helps maintain the visual clarity of the pattern.
Selecting the Right Tile Size for Your Space
Checkerboard floors offer timeless style, but the key to getting them right lies in choosing the right tile size for your space. Whether you prefer bold 24x24 tiles for open layouts or smaller 6x6 formats for tighter rooms, your selection should reflect both your aesthetic goals and how the space functions day to day. From finish and material to layout and installation, each decision shapes the final result, so it's worth taking the time to plan thoughtfully.
To make the process easier, don’t forget to request our 4" x 4" samples for an accurate preview of how your chosen tiles will look and feel. And if you’re still unsure, our design team is here to help with personalized advice that fits your vision and create a checkerboard floor that doesn’t just work, it stands out.

Frequently Asked Questions
Whether you're finalizing your layout or trying to choose the best material, it's normal to have a few lingering questions. Below, we’ve answered some of the most common ones to help you move forward with confidence. And while these insights offer a great starting point, we always recommend consulting a design or installation professional for advice tailored to your specific space and goals.
What are the benefits of using checkerboard tiles?
Checkerboard tiles bring a timeless, structured look that adds visual interest and balance to any room. They can make small spaces appear larger and give larger rooms a bold sense of symmetry. With a wide range of materials and color combinations, they suit everything from classic to contemporary interiors.
Can checkerboard flooring be used in outdoor settings?
Yes! Checkerboard tiles can work outdoors as long as you choose a product rated for exterior use. Look for tiles that are slip-resistant and weatherproof to handle the elements safely. Porcelain is often the best choice for outdoor checkerboard designs due to its durability.
How do I maintain a checkerboard tile floor?
Routine sweeping and mopping with a pH-neutral cleaner will help your floor stay vibrant and clean. Be sure to use products recommended for the specific material, whether it's porcelain, ceramic, or natural stone, to avoid surface damage.
Are there any color combinations for checkerboard tiles besides black and white?
Absolutely! Checkerboard patterns aren’t limited to just black and white. You can explore softer pairings like grey and beige or bolder contrasts like navy and ivory or terracotta and cream. The right combo depends on your style and the mood you want to create.
