


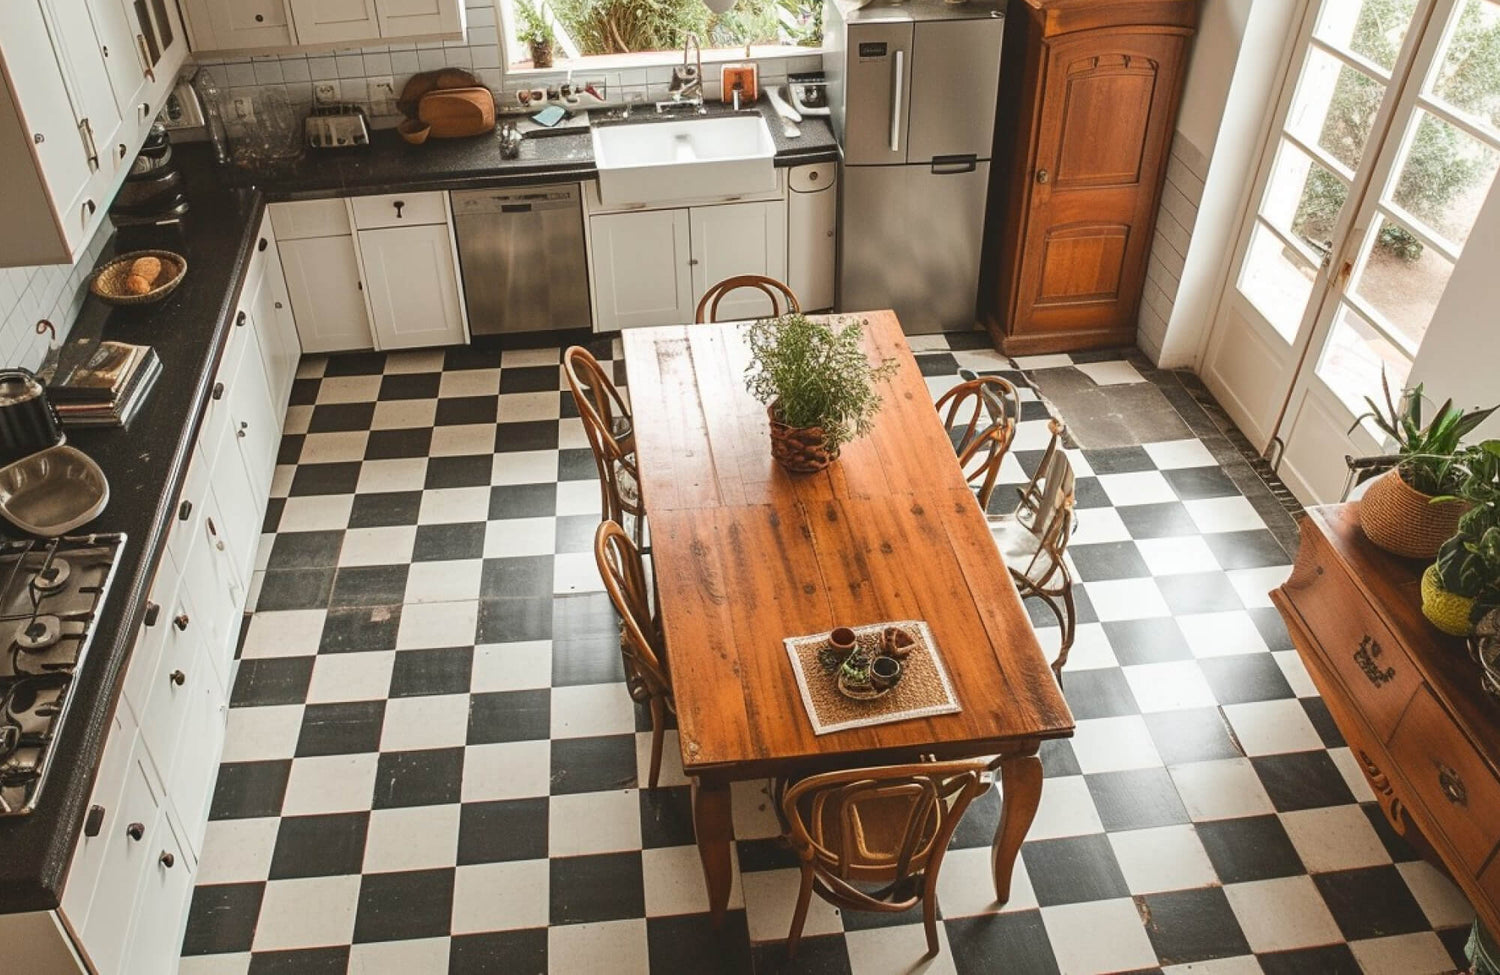
A well-preserved checkerboard tile floor is more than just a design statement. It is a timeless feature that adds character and charm to any space. These classic patterns, with their intricate squares and striking contrasts, have been a staple in homes and public spaces for centuries. However, due to regular use, checkerboard tiles are susceptible to wear, discoloration, and damage, making proper maintenance essential for preserving their beauty.
In this guide, we will explore effective cleaning techniques, repair methods, and maintenance strategies to help you restore and protect your checkerboard tiles. Whether you are tackling a DIY restoration project or looking for the best ways to maintain a cherished family heirloom, this comprehensive guide will provide the insights and practical tips you need to keep your tiles looking their best.

Assessing the Condition of Checkerboard Tiles
Regular inspections are crucial for maintaining the health and beauty of checkerboard tiles. By identifying potential issues early on, you can prevent further damage and take appropriate restoration measures. Here are some common signs of wear and tear that you should watch for:
Discoloration
Checkerboard tiles may become discolored due to exposure to sunlight, moisture, or harsh cleaning products. Fading, yellowing, or uneven pigmentation can affect the overall aesthetic of the tiles, making them look aged or neglected. When assessing discoloration, consider whether it is affecting isolated areas or the entire surface, as widespread fading may indicate prolonged exposure to environmental factors rather than a minor surface issue.
Stains
Stains from spills, dirt, or mineral deposits can alter the original look of checkerboard tiles. Some stains may be superficial and removable with proper cleaning techniques, while others may penetrate deeper into the tile or grout. Identifying the root cause, whether from food spills, hard water deposits, or organic materials, will help determine the best approach for stain removal and long-term prevention.
Cracks and Chips
Physical damage, such as cracks or chips, can compromise the structural integrity of checkerboard tiles. Inspecting edges and corners is particularly important, as these areas are more prone to breakage. When evaluating cracks, consider their depth and whether they impact only the surface or extend through the entire tile. Small chips may be repairable with fillers, but deep cracks might require tile replacement.
Grout Deterioration
The grout between checkerboard tiles can become discolored, cracked, or loose, leading to water infiltration and additional damage. When assessing grout deterioration, check if the damage is widespread or limited to specific sections. If the grout is crumbling or separating from the tiles, it may indicate structural issues, excessive moisture, or lack of regular maintenance.
Efflorescence
Efflorescence appears as a white, powdery deposit on the tile surface, typically caused by moisture and salt buildup. While it is often harmless, it can indicate underlying moisture issues that need attention. If efflorescence continues to reappear after cleaning, it may signal persistent water intrusion, requiring further investigation and possibly sealing treatments.
By thoroughly inspecting the tiles and identifying the type and extent of the damage, you can determine whether minor cleaning and sealing will be sufficient or if professional restoration is necessary. Keeping track of previous maintenance history will also help evaluate if the tiles are showing signs of long-term wear or if the damage is more recent and manageable. Taking these steps will allow you to make informed decisions about the best restoration methods to preserve the beauty and durability of your checkerboard tiles.

Tips on Cleaning and Maintaining Checkerboard Tiles
Regular maintenance and restoration are essential for preserving the beauty and durability of your ceramic or porcelain checkerboard tiles. Here are some tips for keeping these tiles looking their best:
Gentle Cleaning Methods
For routine maintenance, start with mild detergents and soft brushes to avoid scratching the tile surface. A mixture of warm water and a gentle cleaner is often sufficient to remove dirt and grime. Avoid using harsh chemicals or abrasive cleaners that can cause damage over time.
Dealing with Stubborn Stains
For more stubborn stains, natural cleaning agents like baking soda or vinegar can be effective. Create a paste using baking soda and water, apply it to the stain, and let it sit for a few minutes before gently scrubbing. Alternatively, a mixture of equal parts white vinegar and water works well to dissolve stains and freshen the tiles.
Deep Cleaning Techniques
If your tiles are heavily soiled, consider using professional tile cleaning products for a deeper clean. Be sure to follow the manufacturer’s instructions carefully and ensure proper ventilation. Additionally, steam cleaning can be an effective method for lifting dirt and grime, particularly in indoor areas. For outdoor checkerboard tiles, using a pressure washer can help remove built-up dirt; however, it’s important to set the pressure to a low or medium level to prevent potential damage.
Grout Cleaning
Keeping grout lines clean is key to preserving the polished look of checkerboard tiles. Start by applying a grout cleaner or a mixture of baking soda and water directly onto the grout lines. Using a soft-bristled brush, gently scrub to lift dirt and stains without damaging the surrounding tiles. After scrubbing, rinse thoroughly with clean water to remove any residue, ensuring the grout remains bright and free from buildup.
Regular Inspections
Incorporating regular inspections into your cleaning routine helps maintain the integrity of your checkerboard tiles. Check for loose tiles, cracked grout, or any signs of discoloration that may indicate underlying issues. Catching these problems early allows for timely repairs, preventing further deterioration and avoiding costly restorations down the line.

Steps to Repair Checkered Tiles
Cracked, chipped, or broken tiles can detract from the overall aesthetic appeal of your checkerboard flooring or wall, but there are several methods for repairing them based on the severity of the damage.
Minor Cracks or Chips
For minor cracks or chips, a patching compound or tile repair kit can be used to restore the surface. These kits typically include a two-part epoxy resin designed to match the color and texture of your tiles, ensuring a seamless repair. Before applying the compound, make sure the affected area is clean and dry, as this helps with better adhesion and a more durable finish. Follow the manufacturer's instructions carefully for proper application, curing time, and sealing to protect the repaired area and maintain a consistent appearance with the surrounding tiles.
Replacing a Damaged Tile
For more significant damage, replacing the damaged tile is often the best option. Here’s a step-by-step guide:
1. Remove the Damaged Tile
Carefully pry the damaged tile from its surrounding grout using a utility knife or a specialized tile removal tool. To prevent damage to adjacent tiles, work slowly and use a steady hand.
2. Prepare the Area
Clean the area around the damaged tile to remove any debris or old grout. This step ensures that the new tile will sit flush with the surrounding tiles and adhere properly.
3. Select a Replacement Tile
Find a tile that closely matches the color, pattern, and size of the damaged tile. To ensure the best match, consider requesting tile samples before making a final decision. This allows you to compare the new tile with your existing ones in different lighting and angles. If needed, consult with a professional tile installer to guarantee a seamless match and smooth integration with the rest of the surface.
4. Apply Adhesive
Spread a thin layer of tile adhesive onto the prepared area. Using a notched trowel helps distribute the adhesive evenly and ensures better bonding.
5. Position the New Tile
Carefully place the replacement tile into position and press firmly to ensure good adhesion. Wipe away any excess adhesive before it dries to maintain clean edges.
6. Grout and Seal
Fill the gaps around the new tile with grout that matches the existing grout. Allow the grout to cure completely before sealing the area to protect against moisture and stains. Proper sealing not only enhances the tile's longevity but also helps prevent future staining and water infiltration.
Blending Repairs
To ensure a seamless appearance between the repaired areas and the surrounding tiles, consider the following:
Color Matching
Choose a patching compound or replacement tile that closely matches the color and pattern of your existing tiles to minimize any visible differences. You may also want to consider using an AR tool to visualize how the new tile will look in your space before making a final decision. This helps ensure a better match and a seamless finish that blends with your current tiles. If the replacement tile is slightly off in the shade, experimenting with different grout colors can help create a more uniform look.
Texture Matching
If your tiles have a textured surface, use a textured patching compound or grout to blend the repair with the surrounding area. Lightly dabbing the grout or patching material with a sponge while it’s still wet can mimic certain tile textures for a more natural finish.
Grout Color
Select a grout color that complements the tiles and helps disguise any repair lines. When applying grout, ensure it is packed tightly between the tiles to create a smooth and consistent appearance.
Sealing
Apply a sealant to the repaired area to protect it from moisture and stains while also helping it blend in with the surrounding tiles. For high-moisture areas, using a high-quality penetrating sealant will provide extra protection and longevity.
By following these steps, you can repair your checkerboard tiles and ensure the fixes are both durable and visually consistent with the rest of the floor or wall. For a professional finish, especially with more extensive repairs, it’s often best to consult or hire a skilled tile installer.

Replacing Grout
Before applying new grout, it's essential to remove the old grout and clean the area thoroughly. Begin by using a grout saw or utility knife to carefully chip away the old grout between the tiles, taking care to avoid damaging the tiles. Once the old grout is fully removed, clean the area with a grout cleaner or mild detergent solution to eliminate any residue or dirt that could interfere with the adhesion of the new grout. If any tiles are damaged during the removal process, ensure they are repaired or replaced before moving forward with the new grout application.
Applying Grout
Proper grout application is essential for both the durability and appearance of your tiles. Follow these steps to achieve a seamless and long-lasting result:
1. Mix the Grout
Start by following the manufacturer's instructions to mix the grout to the ideal consistency. Gradually add water while stirring until the mixture is smooth and creamy. Be mindful not to add too much water, as this can weaken the grout and lead to premature cracking over time.
2. Apply the Grout
Using a grout float, spread the grout diagonally across the joints between the tiles. Press it firmly into the gaps to ensure they are fully filled, which helps create a strong bond. Work in small sections to prevent the grout from drying too quickly before it's properly set.
3. Clean Excess Grout
Once the grout is applied, use a damp sponge to gently wipe away any excess from the tile surfaces. Take care not to remove too much grout from the joints, as this can leave them uneven or incomplete. Rinse the sponge frequently to avoid spreading grout haze over the tiles and maintain a clean finish.
4. Finish the Edges
To refine the final look, use a grout finishing tool to smooth the edges of the grout and create clean, even lines. Well-shaped grout lines not only improve the overall appearance but also enhance the durability of the installation.
5. Allow to Cure
Finally, let the grout cure fully according to the manufacturer’s instructions. Avoid walking on or using the area during this period to prevent any disruption to the setting process. Since curing times can vary, refer to the product guidelines before resuming normal use to ensure the best results.
Sealing the Grout
Once the grout has cured, it's recommended to seal it to protect it from moisture, stains, and mildew. A grout sealer creates a protective barrier that repels moisture, dirt, and bacteria, extending the life of your grout. Choose a high-quality sealer suitable for your tile type to ensure maximum durability.
Be sure to follow the manufacturer's instructions for applying the sealer properly, ensuring that the grout is completely cured before sealing. Use a small brush or applicator to apply the sealer evenly, making sure it penetrates the grout lines without pooling on the tile surface. Reapply the sealer periodically, especially in moisture-prone areas like kitchens and bathrooms, to maintain long-term protection and prevent discoloration.

Creative Ideas for Checkerboard Tile Restoration
Beyond traditional cleaning and restoration methods, there are many creative ways to enhance the appearance of checkerboard tiles. By incorporating decorative accents, stenciling, or custom designs, you can transform your floors or walls into unique and visually appealing spaces.
One popular option is to add decorative accents to your checkerboard tiles. This can involve using metallic paint, glitter, or glass mosaic tiles to create intricate patterns or designs. Consider incorporating elements that complement the overall style of your home, such as geometric shapes, floral motifs, or abstract patterns.
Stenciling is another creative technique that can be used to enhance checkerboard tiles. By applying stencils with different patterns or designs, you can add a touch of personality and visual interest to your floors or walls. Stencils can be used to create borders, accents, or even entire patterns.
For a truly unique look, consider commissioning a custom design for your checkerboard tiles. A skilled artist or designer can create a one-of-a-kind pattern or image that reflects your personal style and preferences. This is a great way to add a touch of individuality and sophistication to your home. There are countless possibilities for restoring and enhancing checkerboard tiles. By exploring creative options, you can transform your floors or walls into stunning works of art that reflect your personal style and taste.
The Lasting Beauty of Checkerboard Tiles
Restoring and maintaining checkerboard tiles requires attention to detail and a commitment to regular upkeep. Beyond preserving their durability, small enhancements such as decorative accents, stenciling, or custom designs can help personalize your space while honoring the timeless appeal of these classic tiles.
By prioritizing routine cleaning, timely repairs, and proper maintenance, you can keep your checkerboard tiles looking their best for years to come. Investing in their care not only enhances their aesthetic charm but also ensures their longevity, allowing future generations to appreciate their classic beauty. If you're looking to restore your checkerboard tiles or need expert guidance on maintenance, our team is here to help. Contact us today for professional advice and personalized recommendations to keep your tiles looking stunning and well-preserved for years to come!