


When it comes to outdoor design, porcelain pavers bring a sleek, modern look while standing up to the demands of everyday use. What many homeowners don’t realize is that these tiles can often be installed without mortar, creating stable and polished surfaces with less permanence and more flexibility. This approach works well for patios, walkways, or garden paths, blending strength with a natural finish.
In this article, we’ll explain how dry-lay installation works, its pros and cons, and practical tips to keep your project performing beautifully. With the right preparation, it’s a method that delivers both style and longevity.

How Dry-Lay Installation Works
Dry-lay installation is a method where porcelain pavers are set directly on a prepared base without mortar or adhesive. This approach creates a stable surface while allowing for flexibility and easier adjustments over time. It’s popular in outdoor projects because it balances practicality, design freedom, and long-term usability.
What “Dry-Lay” Means
Dry-lay means placing pavers directly onto sand, grass, or another base layer without binding them with mortar. Instead of being permanently fixed, the pavers rest securely in place through their weight and proper leveling. This makes the installation less rigid and easier to modify if designs or layouts change. It also gives homeowners the option to replace or reset individual pavers without disrupting the entire area. In short, it’s a flexible, low-commitment alternative to traditional mortar-based methods.
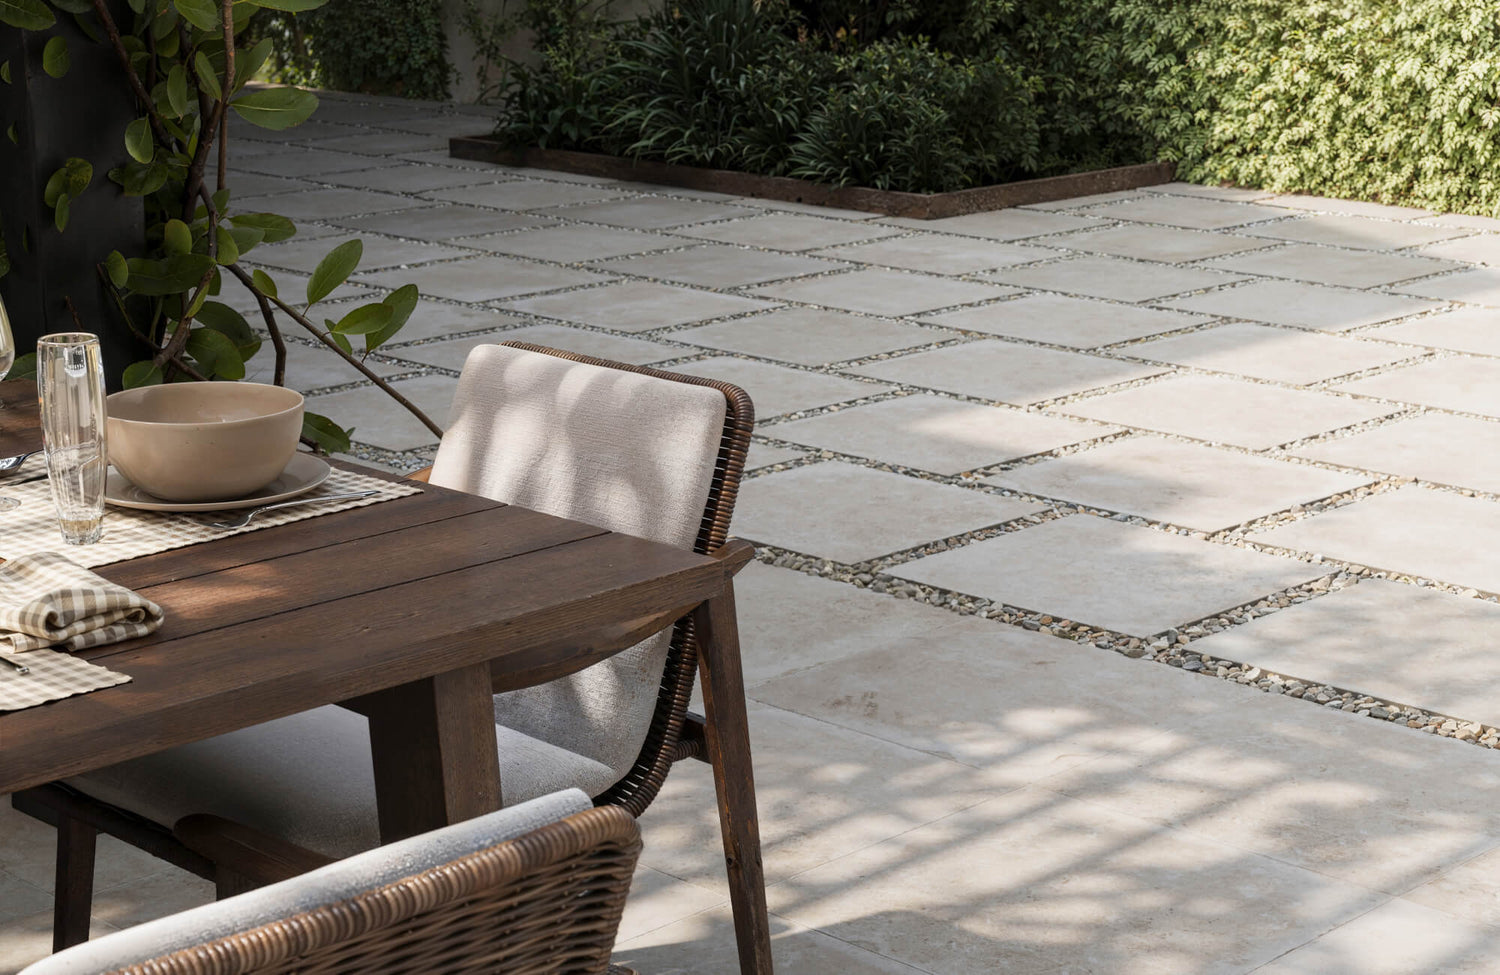
A great example is our Bowden 24x24 Grip Porcelain 2cm Paver Tile in Oat, shown above. Its warm tone and slip-resistant surface make it a durable choice for patios and garden layouts while blending naturally with outdoor textures.
Where Dry-Lay Works Best
Dry-lay installation shines in outdoor spaces that benefit from flexibility and natural integration. Patios often use this method to create inviting seating areas that can be expanded or adjusted as needed. Walkways laid without mortar blend seamlessly into landscapes, offering a more organic, soft-edged look. Garden paths are also ideal because the pavers sit comfortably against grass or gravel, creating charm without the permanence of concrete. These settings highlight dry-lay’s ability to balance function with natural appeal.
Benefits of Skipping Mortar
One of the biggest advantages of dry-lay installation is improved drainage, since water can move freely between and beneath the pavers. The process is simpler too, with no need for mixing or curing mortar, which reduces labor and costs. Flexibility is another key benefit, allowing pavers to be lifted and reset if shifting occurs or design changes are desired. This makes it easier to maintain or upgrade outdoor spaces over time. By skipping mortar, homeowners get a solution that’s practical, adaptable, and visually polished.

Preparing the Ground Properly
A successful dry-lay installation starts with thorough ground preparation. Proper site prep ensures the pavers stay level, drain correctly, and remain stable over time. Without this step, even the best tiles can shift, crack, or create uneven surfaces.
Clearing and Leveling the Area
Before laying pavers, the site needs to be cleared of debris, roots, and loose soil. A smooth, level base prevents rocking or gaps between tiles and helps maintain an even walking surface. Using a shovel, rake, or compactor ensures the ground is consistent and compacted. This step also reduces the risk of future settling that can cause unevenness. Investing time in leveling creates the foundation for a long-lasting installation.
Checking for Proper Drainage
Drainage is critical to prevent water pooling around or under pavers. Poor drainage can lead to shifting, erosion, or even mold growth in damp areas. Before installation, evaluate the slope of the ground and make adjustments to direct water away from the surface. Even a gentle slope ensures rainwater flows off naturally rather than sitting on the pavers. Proper drainage keeps the area safe, durable, and visually appealing.
Base Layers
The type of base chosen depends on where the pavers will be installed. Sand is ideal for patios and walkways, providing stability while allowing flexibility. Grass bases work well for garden paths, though they may require cutting pockets to keep pavers secure. Soil bases are less common but can be compacted for casual, lightweight uses. Choosing the right base layer ensures the pavers remain functional and fit for the intended purpose.

How To Lay Porcelain Pavers on Sand
Dry-laying on sand offers a stable, drain-friendly surface without the permanence of mortar, making it a flexible option for patios or walkways. This overview is meant as general guidance, and since ground conditions vary, it’s best to consult product instructions or a professional for large or load-bearing projects.
Step 1: Spreading and Compacting Sand
After prepping the ground, add a compacted base (e.g., crushed stone) if needed, then top with 1–1.5 inches of sharp bedding sand. Rake the sand roughly level and use metal pipes and a straight board to screed it flat. Avoid walking on the screeded surface; work backward as you go. Lightly mist and compact if the sand is fluffy, keeping the finished layer smooth and uniform. Edge restraints help the field stay put, especially on patios or walkways.
Step 2: Positioning and Aligning the Pavers
Set the first paver at a square, visible edge, and use it as your reference. Place each additional paver tightly or with spacer tabs as specified by the product to maintain consistent joints. Check alignment every few rows with a string line or straightedge. If a tile rocks, lift it, adjust the sand beneath, and reset. Keep joints clear of excess sand so the surface stays crisp.
Step 3: Leveling and Adjusting for Stability
Once a section is placed, tap pavers gently with a rubber mallet to seat them evenly. Lay a long level across multiple tiles to spot highs and lows, correcting by lifting and adding or removing a little sand. Sweep fine sand or polymeric joint sand into the gaps to interlock the field. Finish with a light mist and follow joint-sand instructions so the joints set without washing out. Walk the surface to confirm it feels even and solid underfoot.

How To Lay Porcelain Pavers on Grass
Laying porcelain pavers directly on grass, as seen above with our Carter 24x48 Grip Porcelain 2cm Paver Tile in Fossil, creates a natural, relaxed look that blends tiles seamlessly into the landscape. This method works best for light-use areas like garden paths, but because soil and climate conditions differ, professional input is recommended for heavier-use installations. When done correctly, the pavers sit flush with the lawn for a clean, safe finish.
Step 1: Marking and Cutting Grass Pockets
Begin by arranging the pavers on top of the grass to map out placement and spacing. Once satisfied, trace around each paver with a spade or edging tool to mark the outlines. Remove the grass and a shallow layer of soil, about 2 to 3 inches deep, so the pavers can sit flush with the surrounding lawn. This step ensures the tiles don’t rock or sit unevenly. Keeping the cuts clean and straight helps the final result look polished and intentional.
Step 2: Embedding the Pavers into Grass
After the pockets are cut, place each paver directly into the recess, pressing it down firmly by hand or with a rubber mallet. The goal is to have the top of the paver level with the grass line, creating a safe, trip-free surface. You can add a thin layer of sand or fine gravel beneath the tile for extra stability if the soil is soft. Make sure each paver sits flat without wobbling. This embedding process allows the tiles to blend naturally into the landscape.
Step 3: Checking Evenness and Walkability
Once all pavers are placed, walk across them slowly to test for stability and comfort underfoot. Adjust any tiles that sink or sit too high by adding or removing soil beneath them. Ensure joints between pavers and grass stay tight enough to avoid large gaps, but with space for natural lawn growth. The finished surface should feel level, secure, and visually connected to the surrounding yard. Regular mowing and trimming will help keep the lawn neat over time.

Pros and Cons of Dry-Lay Installation
One of the strongest advantages of dry-lay installation is its cost-effectiveness compared to mortar-based methods. Because it eliminates the need for adhesives and extensive labor, homeowners can often tackle the project themselves. This DIY-friendly approach not only saves money but also allows greater flexibility in design and layout. If adjustments are needed later, individual pavers can be lifted and reset without disrupting the entire surface. The ability to easily modify or expand makes dry-lay appealing for patios, walkways, and garden paths.
However, the method does come with some trade-offs that homeowners should weigh carefully. Without mortar, the installation is less permanent, and pavers may shift over time, especially in areas with heavy use or fluctuating soil conditions. This can lead to uneven surfaces that need occasional resetting. Dry-lay installations also rely heavily on proper preparation, meaning skipped steps in leveling or drainage can cause long-term problems. While flexible, the design may not provide the same locked-in stability as a traditional mortar set.
Maintenance is another factor to consider when evaluating dry-lay pavers. Grass and weeds can grow between gaps if the surface isn’t maintained, and sand bases may need replenishing over time. Seasonal changes, such as freezing and thawing, can also cause movement, requiring regular checks and adjustments. These upkeep needs don’t make the system impractical, but do demand a more hands-on approach compared to a fixed installation. For some homeowners, the trade-off is worth the convenience, while for others, it may feel like ongoing work.

Design and Styling Ideas With Porcelain Pavers
Porcelain pavers aren’t just about function; they’re also an opportunity to bring design creativity outdoors. From layout choices to blending with natural elements, these tiles can shape everything from casual garden paths to elegant entertainment spaces.
Popular Layout Patterns
A stacked layout creates a clean, structured look that works well in modern or minimalist spaces. The repetition of straight lines emphasizes geometry, giving patios and walkways a sleek edge. A staggered pattern, on the other hand, feels more relaxed and natural, softening the lines of a hardscape. Grids bring balance and rhythm, often creating a tiled “carpet” effect that feels organized but inviting. A checkerboard layout, using alternating colors or finishes, adds visual contrast and a timeless, tailored feel that works especially well for patios or entertainment spaces, as seen above with our Dawson 24x24 Checkerboard Grip 2cm Porcelain Paver Tile in Ash & Alabaster. Each pattern has its own character, allowing you to tailor the design to your preferred aesthetic.
Beyond looks, patterns also influence how a space feels when you move through it. Staggered layouts can help walkways blend more naturally into the landscape, while stacked rows highlight order and structure. Larger pavers in a grid layout can make small spaces appear more expansive. Mixing different sizes within a layout adds variation and avoids monotony. The choice of pattern can transform a simple outdoor area into a visually engaging part of the home.
Combining Pavers With Grass or Gravel
Pairing porcelain pavers with grass creates a beautiful contrast between lush greenery and crisp tile edges. This combination is ideal for stepping-stone pathways, where the grass softens the hardscape while providing a natural frame for each tile. It also allows for flexibility, as grass can grow back around tiles if layouts change over time. The look is casual yet refined, perfect for gardens or more relaxed landscapes. It’s an approach that blends man-made surfaces with nature seamlessly.
Using gravel alongside porcelain pavers adds texture and dimension to outdoor spaces. Gravel fills joints or borders to create clean transitions between surfaces while improving drainage. Light-colored gravel paired with dark pavers creates a striking contrast, while neutral gravel tones produce a subtle, cohesive effect. This mix adds depth without overwhelming the main hardscape. It’s a versatile way to highlight the beauty of the pavers while keeping the design practical.
Creating Focal Areas
Pavers can also define focal areas, turning functional spaces into design highlights. A tiled patio, for instance, becomes a central hub for gatherings when styled with distinctive patterns or bordered edges. In gardens, paver paths guide the eye and create rhythm while leading to a feature like a fountain or seating nook. These applications show how tiles shape both movement and atmosphere. The right arrangement makes outdoor spaces feel purposeful and inviting.
In seating areas, porcelain pavers add structure and create a foundation that feels intentional. A circular arrangement can frame a fire pit, while a rectangular grid highlights a dining table. Mixing in decorative accents, like a mosaic tile section, adds a touch of artistry without overwhelming the space. These details turn a purely functional surface into a designed experience.

Practical Maintenance Tips
Porcelain pavers laid without mortar require some simple upkeep to keep them looking and performing their best. Regular attention helps prevent small issues from turning into bigger repairs over time.
Routine Cleaning and Weed Control
Keeping pavers clean is essential to maintaining their appearance and safety. A quick sweep removes dirt and debris, while occasional rinsing prevents buildup of grime. In grass installations, trimming edges and addressing weeds between tiles ensures a neat, polished look. Mild outdoor cleaners can also be used when stains appear. Staying consistent with this routine keeps the surface fresh and low-maintenance.
Checking for Shifting or Settling
Over time, natural ground movement can cause some pavers to shift slightly. It’s helpful to walk across the surface periodically and note any uneven spots or rocking tiles. Small adjustments are often as simple as lifting a paver and smoothing the base beneath it. Regular checks also prevent tripping hazards from developing. By staying ahead of settling, you ensure the installation remains both functional and safe.
When to Reset or Replace Pavers
Sometimes a paver may crack, stain, or shift beyond a quick adjustment. In these cases, removing and resetting the tile is the easiest solution. Because dry-lay installation isn’t permanent, swapping out individual tiles is straightforward and doesn’t disturb the entire layout. Replacement also provides an opportunity to refresh the design or improve the base underneath. Treating issues promptly extends the life and look of the whole space.
Is Dry-Lay Right For You?
A dry-lay installation can be a smart choice for homeowners who want a flexible, cost-effective way to create patios, walkways, or garden paths. Its ability to combine design freedom with practical benefits like drainage and adjustability makes it a popular option for outdoor projects. At the same time, it’s important to consider ground conditions, maintenance, and long-term expectations before committing to this method.
If you’re ready to explore ideas, our AR tool lets you preview different tile styles directly in your space, helping you visualize patterns, colors, and layouts before making a final decision. For tailored guidance, our design consultation service can walk you through material selection, layout planning, and professional recommendations to ensure your outdoor project feels both functional and beautifully cohesive.
