


Installing porcelain pavers outdoors isn’t just about durability; it’s also about creating a long-lasting space that works for your lifestyle and holds up beautifully through the seasons. From patios and garden paths to pool surrounds and rooftop terraces, these pavers offer a practical yet stylish solution that can handle weather, wear, and changing design needs.
In this article, we’ll walk you through the key decisions, smart prep work, and proven methods that lead to a successful installation. Whether you’re updating a backyard or starting fresh, this guide is built to help you plan with confidence and avoid common missteps along the way.

Why Choose Porcelain Pavers for Outdoor Spaces
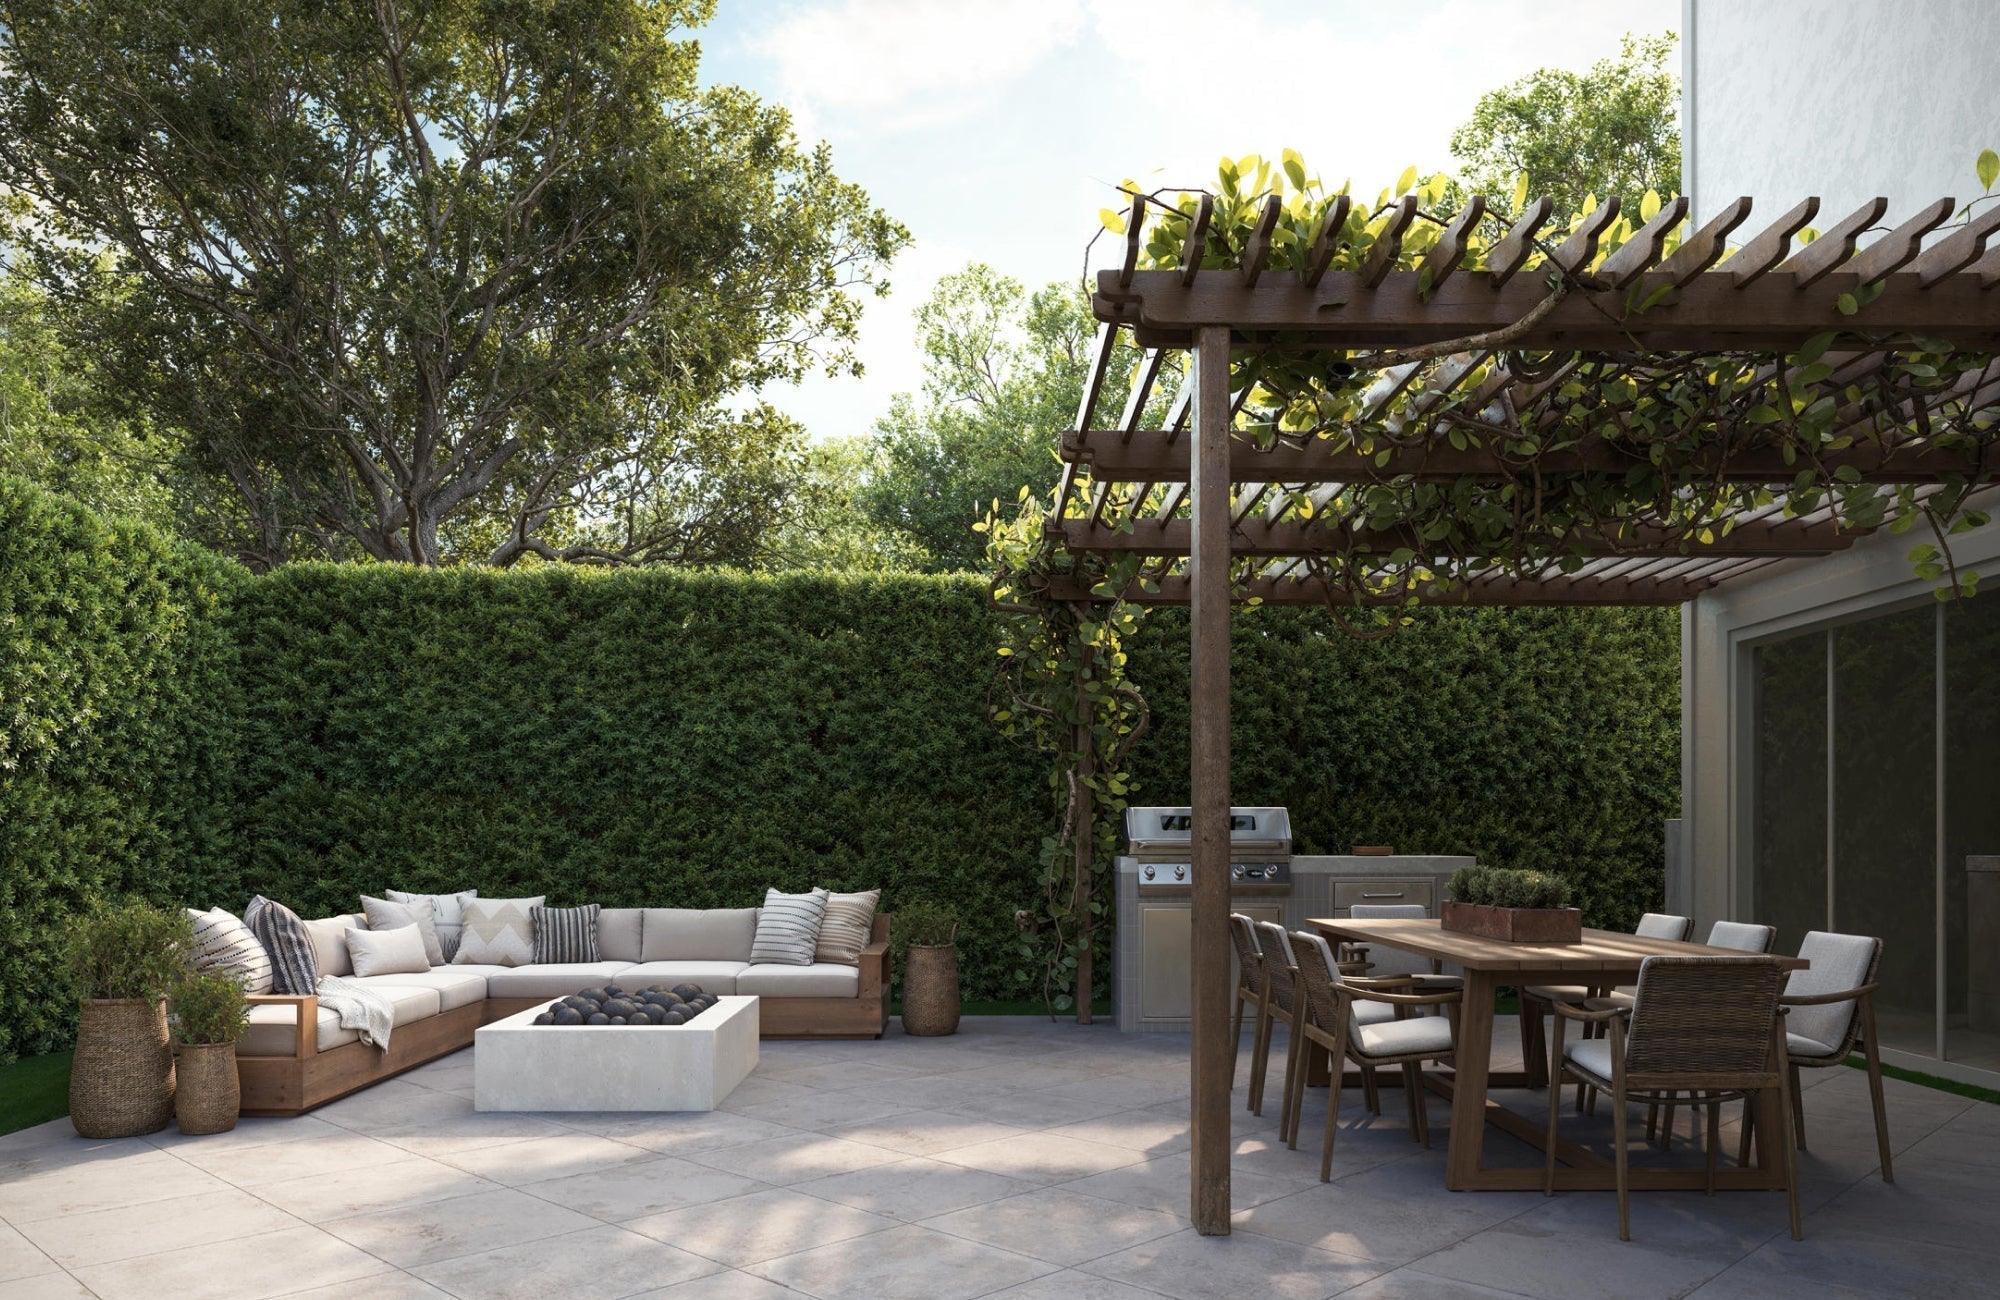
Porcelain pavers, such as our Dawson 24x48 Grip Porcelain 2cm Paver Tile in Dune above, are designed to take on the elements without wearing down easily. Unlike traditional stone or concrete, they resist cracking, fading, and moisture damage even through extreme heat, heavy rain, or freeze-thaw cycles. That kind of durability makes them a reliable choice for patios, pool surrounds, and walkways that see year-round exposure. You don’t have to worry about sealing or resurfacing often—just a solid surface that holds up over time.
They also offer excellent slip resistance, which is especially important in areas that stay damp or lead to the pool. Many outdoor-rated porcelain pavers are made with textured finishes or matte surfaces to improve traction underfoot. This gives you peace of mind in places like entryways, outdoor showers, or garden paths where water is common. It’s a practical benefit that adds safety without giving up design flexibility.
Speaking of design, porcelain pavers come in a wide range of finishes, from clean concrete-inspired tones to wood-look and natural stone textures. Whether your space leans rustic, modern, or something in between, there’s likely a style that works with it. Also, because they’re color-consistent and precisely cut, they create a more uniform look with tighter joints and cleaner lines. Combine that with low maintenance, no sealing, minimal staining, and they offer both form and function that’s hard to beat outdoors.

Planning Your Outdoor Layout with Porcelain Pavers
A well-thought-out layout is key to getting both the function and the visual impact you want from your pavers. Before installation begins, it helps to map out the area, plan your zones, and visualize how the space will flow and drain.
Measuring and Sketching Your Layout
Start by measuring the total area where the pavers will go, accounting for curves, borders, and built-in features like steps or planters. It’s helpful to sketch out the space, even roughly, to see how the pavers will sit in relation to other elements like garden beds, fences, or furniture. Make sure to include buffer zones for spacing, trimming, or edge restraint systems. This early planning avoids the common mistake of underestimating how many pavers you’ll actually need.
For example, measuring gives you a clearer sense of scale for any pattern or design choices later on. It allows you to spot potential layout issues early, like awkward edge cuts or uneven gaps around fixed features. Whether you're working with a large patio or a narrow side yard, starting with a clear visual plan helps everything else fall into place more easily.
Selecting a Pattern: Staggered, Grid, Herringbone, etc.
The pattern you choose affects both the look and performance of your paver layout. A staggered running bond can make narrow areas appear longer, while a herringbone pattern adds visual energy and strength underfoot. For a clean, modern look, a stacked grid works well in symmetrical spaces. Each style brings its own rhythm, so it’s worth choosing one that complements the shape and style of your home.
Pattern choice can impact cuts and material waste, too. Some layouts, like herringbone or basketweave, help reduce shifting in heavily used areas, which adds long-term value. In addition, aligning your pattern with the shape of the space, following long lines or architectural features, keeps things cohesive and intentional. Planning your pattern in advance prevents rushed decisions during installation.
Aligning Layout With Drainage Flow and Sunlight
Porcelain pavers may be strong, but they still need thoughtful placement to avoid issues with standing water or glare. Ideally, your layout should work with the natural slope of the area to guide rainwater away from structures or walkways. If the surface is too flat, even the best pavers may collect puddles or cause slippery spots. Adjusting the slope slightly before installation ensures water flows where it should.
Sunlight exposure is just as important as drainage. Think about how the light moves through the space during the day, especially if you’re planning seating or lounging areas. For instance, facing pavers toward softer morning light instead of harsh afternoon glare can make the space more comfortable. Reflective finishes can boost brightness, but they’re best used where they won’t overwhelm.
Dividing Zones by Function: Dining, Walking, Seating
Breaking the space into zones based on how it’s used helps create structure and purpose. For instance, a paver-lined walkway can lead to a dining area framed by larger-format tiles, while a seating nook might be slightly recessed or edged with a border pattern. These subtle layout shifts create visual separation without adding walls or fencing. It’s a smart way to define flow while keeping everything connected.
Functional zoning simplifies product planning as well. Walkways may benefit from grippier surfaces or tighter joints, while more relaxed areas can use larger pavers or decorative inlays. You can even coordinate your lighting and furniture placement more easily when each area has a clear role. Overall, zoning adds both clarity and comfort to any outdoor space.

Surface Preparation Essentials
Before any porcelain paver goes down, the ground beneath it needs to be properly prepared. Start by clearing the area of debris, vegetation, or old materials that might affect the base. Once cleared, assess the soil condition; soft or uneven ground may need to be compacted or reinforced with a deeper base. This early prep helps avoid future issues like settling or cracking after installation.
Next, it’s important to create a stable foundation using materials suited to your chosen installation method. For dry-lay projects, a compacted layer of gravel topped with bedding sand is common, while mortar-set installations often require a concrete slab. Whatever the method, the base needs to be strong, level, and uniform across the full surface. Consistent thickness and compaction prevent dips, shifts, and uneven finishes over time.
Proper drainage, as mentioned before, should also be built into the surface prep from the start. A slight slope, usually around 1–2%, helps guide rainwater away from structures and avoids pooling on the surface. Compacting the base with this slope in mind ensures your layout holds up through seasonal weather. Skipping slope planning is one of the most common mistakes in paver prep, so it’s worth getting right before anything else begins.

Installation Methods for Porcelain Pavers
Once your surface is prepped, the next step is choosing the right installation method for your space. The best technique depends on where the pavers are going, how much weight they’ll support, and how permanent you want the setup to be. Below are the most common methods used for outdoor porcelain pavers, each with its own strengths.
Dry Installation: Sand or Gravel Bed for Flexible Use
Dry-lay installation is one of the most straightforward options, ideal for patios, garden paths, or low-impact walkways. In this method, pavers are laid over a compacted gravel base topped with bedding sand, with no adhesive or mortar involved. It’s easy to adjust or replace pavers later, which makes it a flexible choice for evolving landscapes. This approach also allows for natural drainage between the joints, making it practical in areas with mild weather.
For larger patios, adding edge restraints will help keep the layout stable over time. Keep in mind that while dry-lay installations are convenient, they may not be suitable for areas that get heavy use or frequent freeze-thaw conditions. This method works best when paired with a well-compacted base and proper slope for runoff. It's a great balance of ease, affordability, and functionality for many outdoor settings.
Pedestal Installation for Rooftops or Raised Surfaces
Pedestal systems are a go-to for rooftop terraces, balconies, or raised decks where drainage and weight distribution are important. In this setup, each paver sits on adjustable pedestal supports that create an elevated surface above the waterproof membrane or base. The air gap underneath helps with water runoff and prevents heat buildup, making it ideal for rooftop applications. It also hides wiring or drainage infrastructure beneath the pavers.
This method is especially useful for commercial or high-end residential projects that need clean lines and long-term flexibility. Pedestal systems allow you to access the substructure easily without removing the whole layout. However, they require precise leveling and are typically more expensive due to the specialized hardware involved. For elevated installations where aesthetics and practicality need to work together, this system delivers both.
Mortar-Set Method for Heavy-Use or Permanent Installations
The mortar-set method creates a more permanent foundation, perfect for driveways, entryways, and busy areas. Pavers are laid onto a mortar bed over a concrete slab and then grouted, resulting in a highly stable surface. This approach prevents movement and shifting, even under constant use of human or light vehicle pressure. It’s also a good choice for areas where freeze-thaw conditions could cause issues with looser setups.
That said, mortar-set installations require more time and precision during installation, and once cured, they’re not easily altered. Expansion joints and drainage planning are essential to avoid cracking or trapped water. For homeowners looking for a long-lasting, low-maintenance setup that won’t budge, this is the most durable option. It’s especially useful in climates with heavy seasonal changes or installations near water features.
When to Use Adhesives or Bonding Agents
Adhesives or bonding agents are typically used for edge pieces, stairs, or small areas where full mortar beds aren't practical. These products help secure porcelain pavers to concrete or other hard surfaces with a strong, weather-resistant bond. They’re best used in targeted applications where precision and hold are more important than flexibility. Quick-set adhesives can also be useful for vertical installations or smaller accents.
However, not all adhesives are rated for exterior porcelain use, so it’s important to choose one designed specifically for the material and conditions. For instance, avoid interior-grade adhesives or those that can’t handle moisture fluctuations. This method isn’t meant for full patio installs, but it plays an important supporting role. When used properly, adhesives can fill in the gaps between larger installation systems.

Jointing and Spacing Considerations
Jointing may seem like a small detail, but it plays a major role in how well your porcelain pavers perform over time. The right spacing and materials help manage water, reduce cracking, and allow for seasonal movement. Below are the key considerations to get it right from the start.
Choosing Between Open Joints and Grouted Joints
Open joints, often filled with sand or left unfilled, allow water to drain through and are best suited for dry-lay or pedestal installations. Grouted joints, on the other hand, offer a cleaner, more finished look and add stability when pavers are mortar-set. The choice depends on your installation method and how much exposure the surface will have to water and movement. For outdoor areas exposed to heavy rain, open joints generally offer better drainage. Grouted joints should only be used when a solid, immobile base is in place.
Recommended Spacing for Thermal Expansion
Even porcelain, with its low porosity, expands and contracts slightly with temperature changes. Leaving small gaps, typically around 3–5 mm, between pavers allows the surface to flex without cracking or lifting. These expansion joints are especially important in sunny or uncovered areas that experience strong heat. Without this spacing, pavers can press against each other and lead to edge chipping or surface warping. Keeping joints consistent also helps with long-term maintenance and visual alignment.
Ensuring Water Drainage Through Joint Design
Good joint design helps prevent pooling by allowing water to pass through or run off effectively. Wider or open joints are especially useful in areas with high rainfall or limited slope. In pedestal or gravel systems, drainage happens naturally beneath the surface, but surface joints still guide the flow. For mortar-set installs, joints should be slightly sloped or slotted to avoid trapping water. Planning drainage into your joint spacing from the beginning reduces the risk of moisture damage later on.
Using the Right Grout or Sand for Outdoor Conditions
The materials you use between pavers need to match both the installation method and the outdoor environment. For dry installs, polymeric sand works well; it locks in place when moistened and resists erosion. In mortar-set systems, use grout designed specifically for porcelain and exterior conditions, ideally with flexibility to handle slight movement. Avoid standard indoor grouts, which can crack or wash out when exposed to moisture and temperature swings. Choosing the right joint filler ensures longevity and reduces the need for early repairs.

Common Mistakes to Avoid During Installation
Even the best materials can fall short if installation isn’t handled correctly. Porcelain pavers are durable, but they still require proper planning and execution to perform well over time. Below, we’ll walk through some of the most common missteps you’ll want to avoid, especially if you want to protect your investment and keep your space safe and beautiful.
Skipping Compaction or Using the Wrong Base Material
A stable base is essential for any porcelain paver setup, but it’s often overlooked in DIY installations. Without proper compaction, the ground underneath can shift over time, leading to uneven surfaces, cracks, or paver movement that’s hard to fix after the fact. Choosing the wrong base, like soft soil or insufficient gravel, can also result in sinking or pooling water.
To avoid this, always compact your sub-base thoroughly and match the base material to your installation method. For instance, dry installations benefit from layered gravel and sand, while mortar-set pavers need a reinforced concrete slab. Getting this part right sets the stage for a more durable, longer-lasting surface.
Incorrect Joint Widths or Uneven Spacing
The spacing between your pavers isn’t just cosmetic; it’s a key part of their performance outdoors. Too-tight joints leave no room for thermal expansion, which can cause edges to chip or even lead to surface buckling. If joints are too wide or inconsistent, water can collect in unexpected places and increase wear over time.
To prevent this, use spacers or layout lines to keep gaps consistent and aligned. You’ll also want to follow spacing guidelines specific to porcelain pavers, which often need at least a few millimeters to accommodate movement and drainage. Even small adjustments can make a big difference in how the surface feels and performs underfoot.
Finishing Touches and Post-Installation Care
Once your porcelain pavers are in place, a few final steps help lock in all the hard work and ensure a clean, stable surface. One of the most important is installing edge restraints or perimeter borders. These help hold the pavers tightly together, preventing lateral movement over time, especially important for dry-laid or pedestal systems where shifting is more likely.
Also, an initial cleaning is essential to remove any leftover residue from grout, adhesive, or general construction dust. Use a pH-neutral cleaner and soft tools to avoid scratching the surface or damaging joint materials. This step leaves your pavers looking finished and prevents film from hardening into something harder to clean later.
Lastly, don’t overlook curing time. Whether you’ve used mortar, adhesive, or sand, give everything adequate time to set before walking or placing furniture on the surface. Rushing this part can cause shifting or weaken bond strength, so be sure to follow product-specific recommendations for best results.

Long-Term Maintenance Tips for Porcelain Pavers
Even though porcelain pavers are known for their strength and low maintenance, a little routine care goes a long way in keeping them in top shape. With smart habits and seasonal upkeep, you can prevent common issues like staining, mildew buildup, or surface wear.
Routine Cleaning With Mild Soap and Soft Tools
Regular cleaning keeps your porcelain pavers looking fresh without much effort. Use a soft-bristle broom or mop and a solution of mild soap and water to remove dust, pollen, and surface grime. Avoid abrasive scrubbers or acidic cleaners, which can wear down finishes or damage grout. For best results, clean those that are in busy areas more frequently, especially after storms or heavy use. A consistent cleaning routine helps prevent buildup that’s harder to remove later on.
Preventing Algae or Mold in Damp Areas
Shaded or damp zones, like areas near garden beds, pool decks, or beneath trees, are prone to algae and mold. To prevent this, rinse the area regularly and allow for good airflow by trimming back surrounding plants. You can also use a diluted vinegar or gentle antimicrobial solution to spot-treat any green patches. Just make sure any cleaner is safe for outdoor porcelain surfaces. Addressing moisture and shade buildup early helps you avoid slippery patches and unsightly stains.
Sealing Grout (If Used) to Avoid Water Penetration
If your porcelain pavers have grouted joints, sealing them is key to preventing moisture from seeping in and weakening the bond. Choose a breathable, outdoor-rated sealer that protects without trapping moisture beneath the surface. Apply it after the grout has fully cured and reapply as needed; usually once every couple of years, depending on wear. Also, keep an eye out for cracks or gaps and reseal them before they widen. Properly sealed grout not only blocks water but also deters mildew and stains.
Protecting Pavers From Freeze Damage or Impact Chips
Porcelain is highly resistant to freezing, but water pooling between joints or under edges can still pose a risk in colder climates. Make sure your drainage system stays clear so water doesn’t settle and freeze. Also, avoid dragging heavy furniture or tools across the surface to prevent chips or scuffs, especially near edges or corners. During winter, use plastic shovels instead of metal ones and choose de-icing products that are safe for porcelain surfaces. These habits protect your pavers' finish and prevent costly repairs over time.
Making the Most of Your Porcelain Pavers
Porcelain pavers offer the kind of durability, slip resistance, and design versatility that make them an excellent choice for outdoor spaces. But the real payoff comes from proper planning and installation, getting the layout right, choosing the best method, and avoiding common missteps that can affect longevity. When installed with care and maintained thoughtfully, porcelain pavers deliver both style and performance that last through all seasons.
If you're designing a new outdoor space or upgrading an existing one, our team can help you navigate the details. Schedule a personalized design consultation to get expert insight tailored to your layout, goals, and climate needs. You can also request a high-quality 4x4 sample to see the finish and texture up close before finalizing your decision.