


A herringbone tile floor can completely change how a space feels, but it also introduces a level of precision that many DIY projects don’t require. The pattern adds movement and structure, yet small layout decisions can quickly affect how balanced the final result looks. In this blog, we’ll walk through what makes herringbone different from simpler tile patterns, explore when DIY installation makes sense, and help you decide whether added guidance can support a more confident outcome.

What Makes Herringbone Tile Installation Different?
Herringbone tile floors look striking, but they also come with challenges that don’t show up in simpler layouts. Unlike straight-lay patterns, herringbone relies heavily on alignment, consistency, and careful planning to look intentional rather than chaotic. Understanding what sets this pattern apart helps you decide whether it’s something you’re ready to take on yourself.
Why Herringbone Patterns Demand Precise Alignment
Herringbone layouts depend on each tile meeting the next at exact angles, which means alignment matters from the very first piece. If the starting point is slightly off, that error doesn’t stay contained. Instead, it repeats and multiplies as the pattern moves across the floor. Unlike straight-set tiles, you don’t have long, forgiving grout lines to visually mask small shifts. Every tile is part of a larger visual rhythm, so even minor misalignment can interrupt the flow. Because of this, herringbone requires more measuring, checking, and rechecking throughout the process.
How Small Layout Errors Become More Noticeable
In a herringbone pattern, small layout mistakes tend to stand out much more than they would in simpler designs. A slight spacing issue or uneven angle can cause the pattern to drift, making lines appear crooked or uneven across the room. These issues are especially noticeable in open spaces or areas with strong sightlines. What might be barely visible in a straight-lay floor can feel obvious in a herringbone layout. Over time, your eye naturally follows the zigzag pattern, which makes inconsistencies easier to spot. That’s why precision plays such a big role in how successful the final result looks.
The Visual Impact of Symmetry and Balance in Herringbone Floors
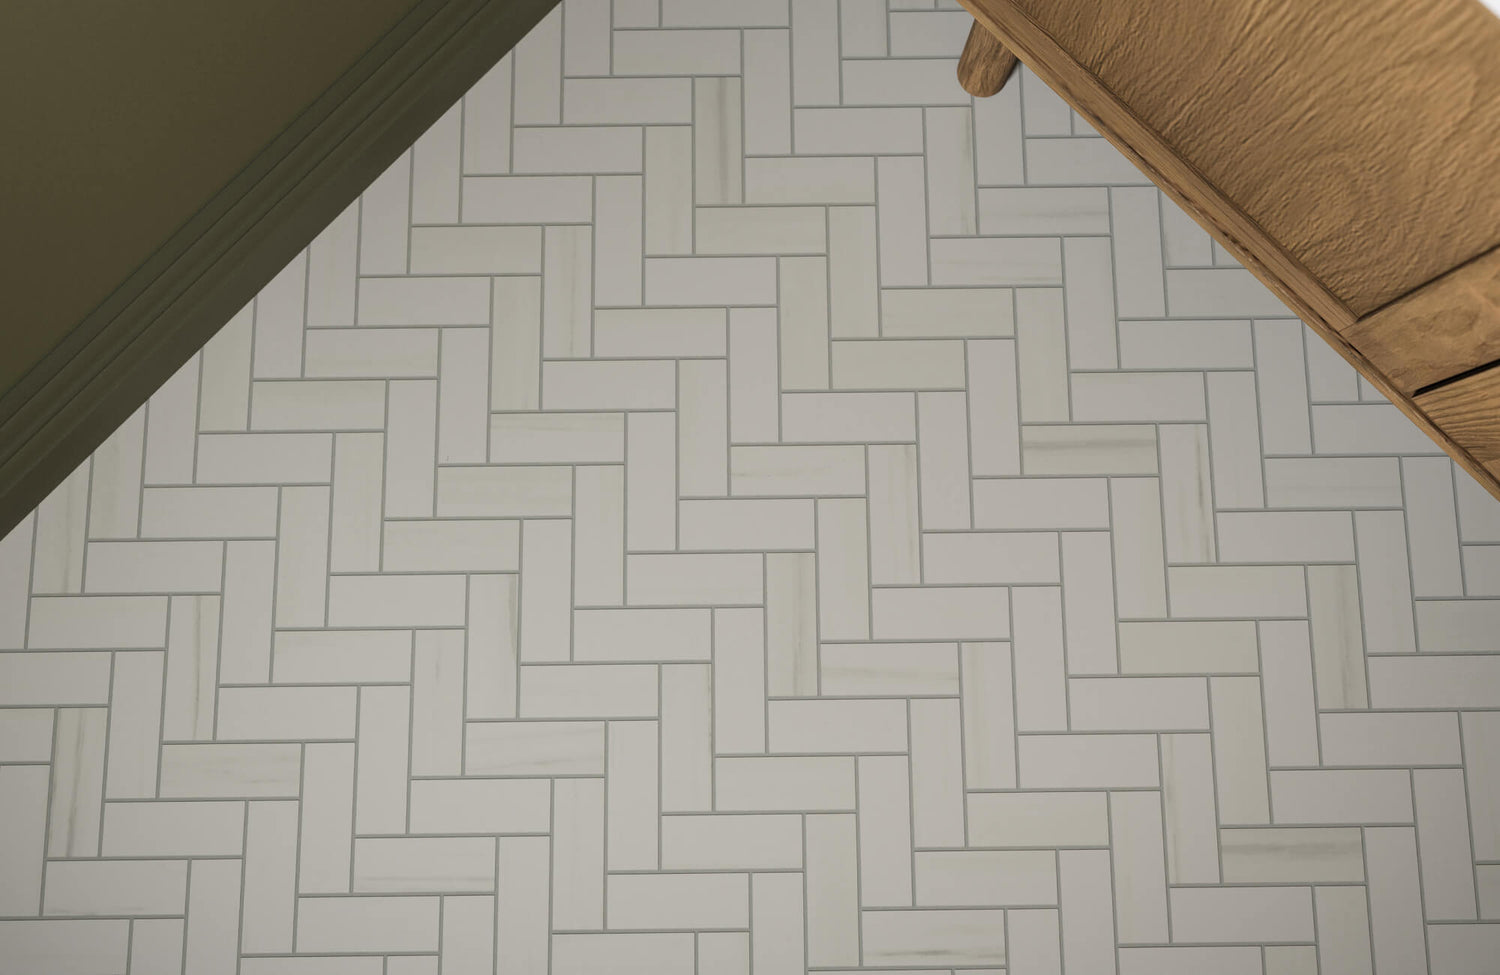
One of the reasons herringbone floors look so appealing is their sense of symmetry and balance. When installed well, the pattern feels structured, intentional, and visually satisfying. Each tile contributes to a repeating rhythm that guides the eye across the space. If that balance is disrupted, the floor can quickly feel busy or uneven instead of refined. This makes layout planning just as important as the tiles themselves. A well-balanced herringbone floor can elevate a room, but it only works when the pattern stays consistent from start to finish.
A great example is our Juliet 2.5x10 Matte Porcelain Tile in Iron above, which highlights how balance and repetition define a successful herringbone layout. Its deep gray and black tones shift subtly from tile to tile, adding natural movement while still allowing the pattern to read clean and intentional. When installed with consistent alignment, the matte, stone-like surface supports the symmetry of the layout without overpowering the space.

Deciding If a DIY Herringbone Floor Is Right for You
Before committing to a herringbone layout, it’s important to take an honest look at what the project will demand from you. This pattern can be very rewarding, but it also asks for more patience, focus, and time than many first-time tile installs. Thinking through these factors early can help you avoid frustration later on.
Skill Level Required for Herringbone vs Standard Tile Layouts
Herringbone installation generally requires a higher skill level than standard straight-set tile layouts. With straight-set patterns, small alignment issues are often easy to correct or hide as you go. Herringbone, on the other hand, requires consistent angles and spacing from the very beginning. You’ll need to be comfortable measuring, adjusting, and checking alignment frequently. This doesn’t mean you have to be a professional, but some prior tiling experience can make a big difference. If you’ve successfully handled simpler layouts before, herringbone may feel like a natural next step.
Time Commitment Compared to Straight-Set Tile
A herringbone floor typically takes longer to install than a straight-set layout, even in the same-sized space. The pattern involves more cuts, more dry-fitting, and more time spent confirming alignment. Progress can feel slower because each section depends on the accuracy of the last. This extra time isn’t wasted, but it does require patience and planning. If you’re working in short windows or trying to finish quickly, that pressure can make the process stressful. Knowing upfront that herringbone is a slower install helps set realistic expectations.
Signs a DIY Herringbone Project May Be Too Advanced
There are a few signs that a herringbone floor might be more than you want to tackle right now. If precise measuring already feels frustrating, or if you tend to rush through projects, this pattern can quickly become overwhelming. Limited time, uneven subfloors, or complex room shapes can also raise the difficulty level. It’s worth considering how you typically handle detailed work over long periods. Being honest about your comfort level doesn’t mean giving up; it just helps you choose the right project for your skills.

Tools and Materials You’ll Need Before You Start
A successful herringbone tile installation starts long before the first tile is set. Having the right tools on hand and planning your materials carefully can make the process smoother and far less stressful. Because herringbone relies on precision, preparation matters just as much as technique.
Essential Tools for Accurate Cuts and Alignment
Herringbone patterns depend heavily on clean, accurate cuts to keep the layout consistent. Tools that allow you to cut straight lines and repeat angles reliably are especially important for this type of pattern. You’ll also need tools that help you check alignment often, because even slight shifts can affect the overall look. Measuring tools should be easy to use and precise, since you’ll rely on them throughout the project. When your tools are reliable, it’s easier to focus on placement instead of constantly correcting mistakes.
Accurate alignment also depends on tools that help you maintain straight reference lines across the floor. These visual guides make it easier to keep the pattern consistent as it spreads across the room. Without them, it’s easy for the layout to drift without you noticing right away. Having everything set up before you begin keeps the workflow steady. This preparation helps reduce frustration once the install is underway.
Tile Shapes and Sizes That Are More DIY-Friendly
Not all tile shapes and sizes are equally easy to work with in a herringbone layout. Smaller or narrower tiles tend to be more forgiving because minor alignment shifts are less noticeable. Larger tiles can look striking, but they require more precision and careful handling. Choosing a tile size that matches your comfort level can make the project feel far more manageable. For many DIY installers, starting with a classic rectangular format offers a good balance of control and visual impact.
Tile thickness and edge consistency also play a role in how smoothly the installation goes. Uniform tiles are easier to align and help reduce uneven edges as the pattern develops. Irregular sizing can make adjustments more time-consuming, especially in a detailed layout like herringbone. Thinking through these details ahead of time can save a lot of correction work later. The right tile choice sets you up for a more confident installation.
Planning for Waste, Spacers, and Layout Adjustments
Herringbone layouts typically generate more waste than straight-set patterns due to the number of cuts involved. Planning for extra tiles helps ensure you don’t run short halfway through the project. It also gives you flexibility if you need to redo a section or adjust the layout. Having extra material on hand reduces pressure and keeps the install moving smoothly. This is especially helpful if replacement tiles aren’t immediately available.
Spacers and layout tools also deserve extra attention in a herringbone project. Consistent spacing helps maintain the pattern’s rhythm and keeps lines looking clean. You may find that you need to adjust spacing slightly as the pattern develops, which is normal. Planning for these adjustments ahead of time makes them easier to handle. With enough materials and the right spacing tools, you’re better prepared for the fine-tuning herringbone requires.

Preparing the Subfloor for a Successful Installation
A well-prepared subfloor is essential for any tile project, but it becomes even more critical when working with a detailed pattern like herringbone. Because the layout relies on consistent angles and alignment, even small surface issues can affect the final look. Taking time to prep properly helps the pattern read clean and intentional once installed.
Why Flatness Matters More With Herringbone Patterns
Flatness is especially important with herringbone because the pattern creates continuous lines that travel across the floor. Any dips or high spots can interrupt those lines, making the layout look uneven or slightly off. Unlike straight-set tile, herringbone doesn’t hide imperfections very well. Small variations in height can quickly become visible as the pattern spreads. This is because each tile depends on the next to stay aligned. A flat surface gives the pattern the consistency it needs to look clean and balanced.
Common Subfloor Issues That Affect Alignment
Several common subfloor issues can interfere with a herringbone layout if they aren’t addressed early. Uneven areas, cracks, or slight slopes can cause tiles to shift as the pattern develops. Over time, these issues make it harder to keep the angles consistent across the floor. In a patterned layout, small alignment problems tend to stand out more than they would in a simple grid. You may not notice the issue right away, but it often becomes obvious once more tiles are in place. Identifying and correcting these problems ahead of time helps keep the pattern visually consistent.
How Proper Prep Prevents Lippage and Uneven Lines
Proper subfloor preparation plays a big role in preventing lippage, which is when tile edges sit at slightly different heights. In a herringbone pattern, lippage can disrupt the flow of the design and catch light in an unflattering way. Uneven lines can also form if the surface isn’t stable or level. Taking the time to address these issues helps the tiles sit evenly and maintain clean intersections. This attention to prep work also makes the installation process smoother overall. When the surface is ready, the pattern has a much better chance of staying crisp and uniform.

Laying Out a Herringbone Pattern the Right Way
Laying out a herringbone pattern is where most of the success of the installation is decided. Unlike straight-set tile, herringbone relies heavily on balance, alignment, and repetition, which means early layout choices affect the entire floor.
Finding and Marking the True Center of the Room
Finding the true center of the room is essential because a herringbone pattern expands outward in multiple directions. If the layout starts off-center, the pattern can quickly feel unbalanced, especially once it reaches walls, doorways, or transitions. Marking a clear center point helps the angles mirror each other and keeps the floor visually grounded. This is especially important in modern spaces, where symmetry and proportion are more noticeable. Even in rooms that aren’t perfectly square, a well-defined center gives you a reliable reference to work from. Starting here helps the pattern feel deliberate rather than improvised.
Dry-Laying Tiles to Test Alignment
Dry-laying tiles allows you to see how the herringbone pattern behaves in the space before anything is permanently set. This step makes it easier to check spacing, alignment, and the overall rhythm of the layout without pressure. It also helps reveal where cuts may fall, which is important because herringbone edges are more visually exposed than straight-set layouts. By testing the pattern ahead of time, you can make small adjustments that have a big impact later. Dry-laying also builds confidence, especially for DIY installers who want to understand the flow of the design. It’s a practical way to reduce mistakes and improve consistency.
Keeping the Pattern Straight as You Work Outward
As the pattern moves outward from the center, maintaining straight lines and consistent angles becomes increasingly important. Herringbone layouts magnify even minor shifts, so regular checks help prevent the pattern from slowly drifting. Reconfirming alignment as you go keeps the floor looking clean and intentional rather than uneven. This steady approach also helps edges and transitions feel more balanced once the pattern reaches the perimeter. Working methodically supports a smoother visual flow across the entire room. Over time, this attention to alignment is what separates a polished herringbone floor from one that feels slightly off.

Tile Patterns You Can Try Beyond Herringbone
Herringbone is often the pattern people focus on first, but it’s far from the only option when planning a tiled floor. Different layouts offer varying levels of visual impact, alignment demands, and flexibility, which can make a big difference for DIY installers.
Straight-Lay Patterns for First-Time DIY Projects
Straight-lay patterns are one of the most approachable options for DIY tile installation because they rely on consistent spacing and parallel lines. Tiles are aligned in a simple grid, which makes layout planning more predictable and adjustments easier to manage. This pattern works well when you want a clean, modern look without drawing attention to the layout itself. Because the lines run evenly across the room, small inconsistencies are less noticeable compared to more complex patterns. Straight-lay designs also adapt easily to different room shapes and sizes. For many DIYers, this pattern offers a strong balance between simplicity and visual polish.
Herringbone Patterns for Added Visual Movement
Herringbone patterns introduce a sense of motion that straight-lay layouts don’t naturally provide. The angled placement creates rhythm and visual energy, which can make floors feel more dynamic and architectural. This added movement is appealing, but it also means the pattern demands greater consistency and attention to alignment. Even slight shifts can stand out more clearly once the pattern repeats across the space. That said, when executed well, herringbone adds depth and interest that feels intentional rather than decorative. It’s a strong option for DIYers who want impact and are comfortable working with tighter tolerances.
Mosaic Tile Layouts and Mesh-Mounted Designs
Mosaic tiles, such as our Leona 3x3 Matte Porcelain Hexagon Mosaic Tile in Calacatta above, offer a different kind of flexibility, especially when they come mesh-mounted for easier placement. Because the pattern is already established on the backing, alignment tends to focus more on sheet placement rather than individual tiles. This can simplify layout work while still delivering a visually detailed surface. Mosaics work particularly well in smaller spaces or as accent flooring where intricate patterns feel appropriate. However, consistency still matters, since misaligned sheets can interrupt the flow of the design. When handled carefully, mosaic layouts can feel both decorative and controlled.
Offset and Staggered Patterns for Subtle Interest
Offset and staggered patterns add variation without fully stepping into complex geometry. By shifting tiles slightly from row to row, these layouts introduce movement while maintaining a relatively straightforward installation process. This approach works well when you want more visual interest than a straight grid but less intensity than herringbone. It also helps disguise minor inconsistencies because the pattern already includes variation. Offset layouts adapt well to rectangular tiles and modern interiors. Overall, they offer a comfortable middle ground for DIYers looking to level up without overcomplicating the process.
Chevron vs Herringbone and Why They Differ
Chevron and herringbone are often confused, but they behave very differently during installation. Chevron tiles are cut at angles so the ends meet cleanly, creating a continuous V-shaped pattern. This precision gives chevron floors a crisp, directional look, but it also leaves less room for adjustment. Herringbone, by contrast, uses rectangular tiles laid at right angles, which creates a staggered zigzag effect. While both patterns are visually striking, the chevron requires exact cuts and alignment from the start. Understanding this distinction helps DIYers choose the pattern that best matches their comfort level and design goals.

When Hiring a Professional Is the Smarter Choice
DIY installation can be rewarding, but there are situations where professional experience brings real advantages. In some projects, the scale, layout complexity, or time constraints can outweigh the savings of doing it yourself. Knowing when to bring in a professional helps protect both the finished look and the long-term performance of the floor.
Large Rooms vs Small Entryways or Bathrooms
The size of the space plays a major role in how manageable a herringbone installation feels. Smaller areas like entryways or bathrooms are often more forgiving because the pattern covers less ground and errors are easier to correct early. Large rooms, on the other hand, require long-term consistency across many rows of tile. Even slight alignment shifts can become more noticeable as the pattern extends. Professionals are trained to maintain accuracy over large areas without losing the rhythm of the layout. In these cases, their experience can help ensure the pattern looks intentional from wall to wall.
Complex Layouts With Multiple Transitions
Spaces with doorways, corners, stairs, or transitions between rooms add another layer of difficulty to herringbone layouts. Each transition requires careful planning so the pattern doesn’t feel interrupted or awkwardly cut off. DIY installers may find it challenging to keep the layout consistent when working around these obstacles. Professionals are used to planning transitions in advance and adjusting the pattern without breaking its flow. This helps the floor feel cohesive rather than segmented. When a layout includes multiple transitions, professional installation often results in a cleaner, more seamless finish.
Balancing Cost, Time, and Long-Term Results
While DIY projects can save money upfront, they often require a significant time investment. Herringbone floors in particular demand patience, repeated checks, and careful corrections along the way. For homeowners with limited time, a professional can complete the job more efficiently without sacrificing precision. There’s also the long-term perspective to consider, since mistakes in patterned layouts can affect durability and appearance over time. Hiring a professional doesn’t mean DIY isn’t an option, but it can be a smart choice when lasting results matter most. In the end, the best decision balances budget, timeline, and confidence in the final outcome.
Making the Right Call on a DIY Herringbone Floor
Installing a herringbone tile floor yourself can be done, but it tends to go best when you approach it like a precision project rather than a weekend upgrade. The pattern rewards careful layout, a flat subfloor, and consistent measuring, because small shifts rarely stay small once the zigzag starts expanding across the room. If you’ve already installed straight-lay tile successfully and you’re comfortable working slowly, herringbone can be a solid next step. On the other hand, if you’re short on time, working with an uneven surface, or dealing with lots of transitions, bringing in a pro often protects the final look. The goal is not just getting tile down, but making the pattern read clean, balanced, and intentional from start to finish.
If you want extra clarity before committing, our team can support you through a design consultation focused on your specific space and layout goals. Working directly with a designer helps you visualize how tile choices, pattern direction, and finishes come together before anything is ordered. This kind of guidance can be especially helpful when planning a detailed layout like herringbone, where early decisions affect the entire floor. Having professional input early on helps reduce guesswork and keeps the process feeling more manageable from start to finish.