


Subway tile, with its clean lines and timeless appeal, has become a staple in contemporary interior design. Its versatility allows it to seamlessly integrate into various styles, from minimalist modern to cozy traditional. Whether adorning backsplashes, shower walls, or accent walls, subway tile offers endless possibilities for elevating a space.
Beyond its aesthetic value, subway tile boasts impressive durability and easy maintenance, making it a practical choice for busy areas. However, the true magic lies in the pattern you choose to lay your tiles. The pattern can dramatically influence the overall look and feel of a room, from creating a sleek, minimalist ambiance to adding a touch of vintage charm. In this guide, we'll explore popular tile laying patterns and provide tips on selecting the perfect one for your space. Let's dive in and discover the transformative power of subway tile patterns!

Subway Tile and Its Versatile Nature
Subway tile, with its distinctive rectangular shape and smooth, glazed ceramic surface, has been a popular choice for interior design since the early 20th century. Initially used in New York City subway stations for its durability and easy maintenance, this utilitarian tile has evolved into a versatile design element that complements a wide range of styles.
Beyond its functional benefits, subway tile possesses an undeniable aesthetic appeal. Its streamlined and minimalist design effortlessly complement various interior styles, from traditional to contemporary. Its versatility also extends beyond its classic application, as it can be used to create stunning accent walls, fireplace surrounds, or even outdoor kitchen backsplashes. By experimenting with different colors, sizes, and patterns, you can personalize your space and achieve a unique look. Whether you prefer a subtle, monochromatic palette or a bold, contrasting color scheme, subway tile offers endless possibilities.
Subway tile is also valued for its adaptability across different materials and finishes, expanding its design potential even further. While classic glazed ceramic remains a favorite, subway tiles are now available in porcelain, glass, natural stone, and even handmade variations, each offering distinct texture and character. Matte finishes also create a soft, contemporary feel, while glossy surfaces reflect light and add brightness to kitchens and bathrooms. This range of material and finish options allows you to tailor subway tile not only to a specific style but also to the functional needs of the space, whether prioritizing durability, light reflection, or subtle texture.

Classic Subway Tile Laying Patterns
Classic subway tile patterns have stood the test of time, offering a timeless and sophisticated look. Here are some of the most common options:
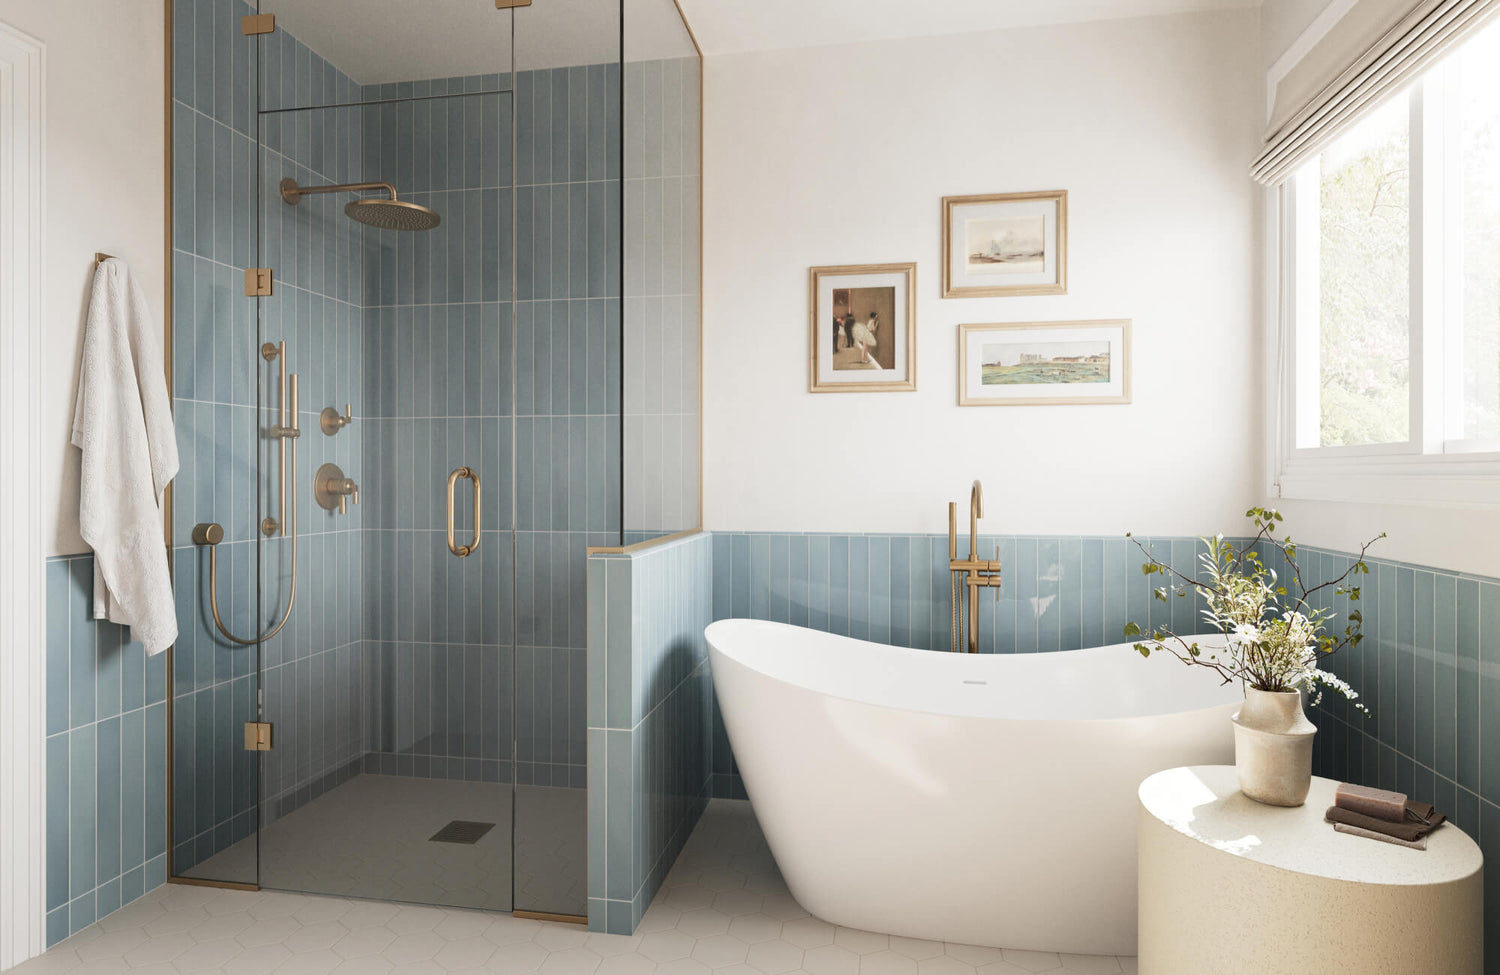
Horizontal Straight Stack
The horizontal straight stack pattern is a classic choice for subway tile installations, offering a clean, minimalist aesthetic that complements a wide range of interior design styles. By arranging tiles in a simple, horizontal alignment, this pattern creates a sense of order and visual width, making it ideal for spaces where you want to emphasize spaciousness and continuity. The horizontal stack pattern is particularly well-suited for modern, contemporary spaces, where clean lines and simplicity are key design principles.
For a small bathroom or kitchen, the horizontal straight stack pattern is especially effective in creating an open, airy feel. Choosing lighter tile colors can further enhance this effect, adding brightness and a sense of space. Alternatively, leaning into deeper, more saturated tones can create a dramatic and intimate atmosphere. For example, Edward Martin’s Remi 2x17 Glossy Ceramic Tile in Rust, as shown in the photo above, brings warmth and richness to a horizontal straight stack layout. Its elongated proportions emphasize the linear flow of the pattern, while the glossy finish reflects light beautifully, adding depth and dimension. In a moody bar nook, powder room, or statement backsplash, this tile transforms the simple stacked arrangement into a refined architectural feature with striking visual impact.
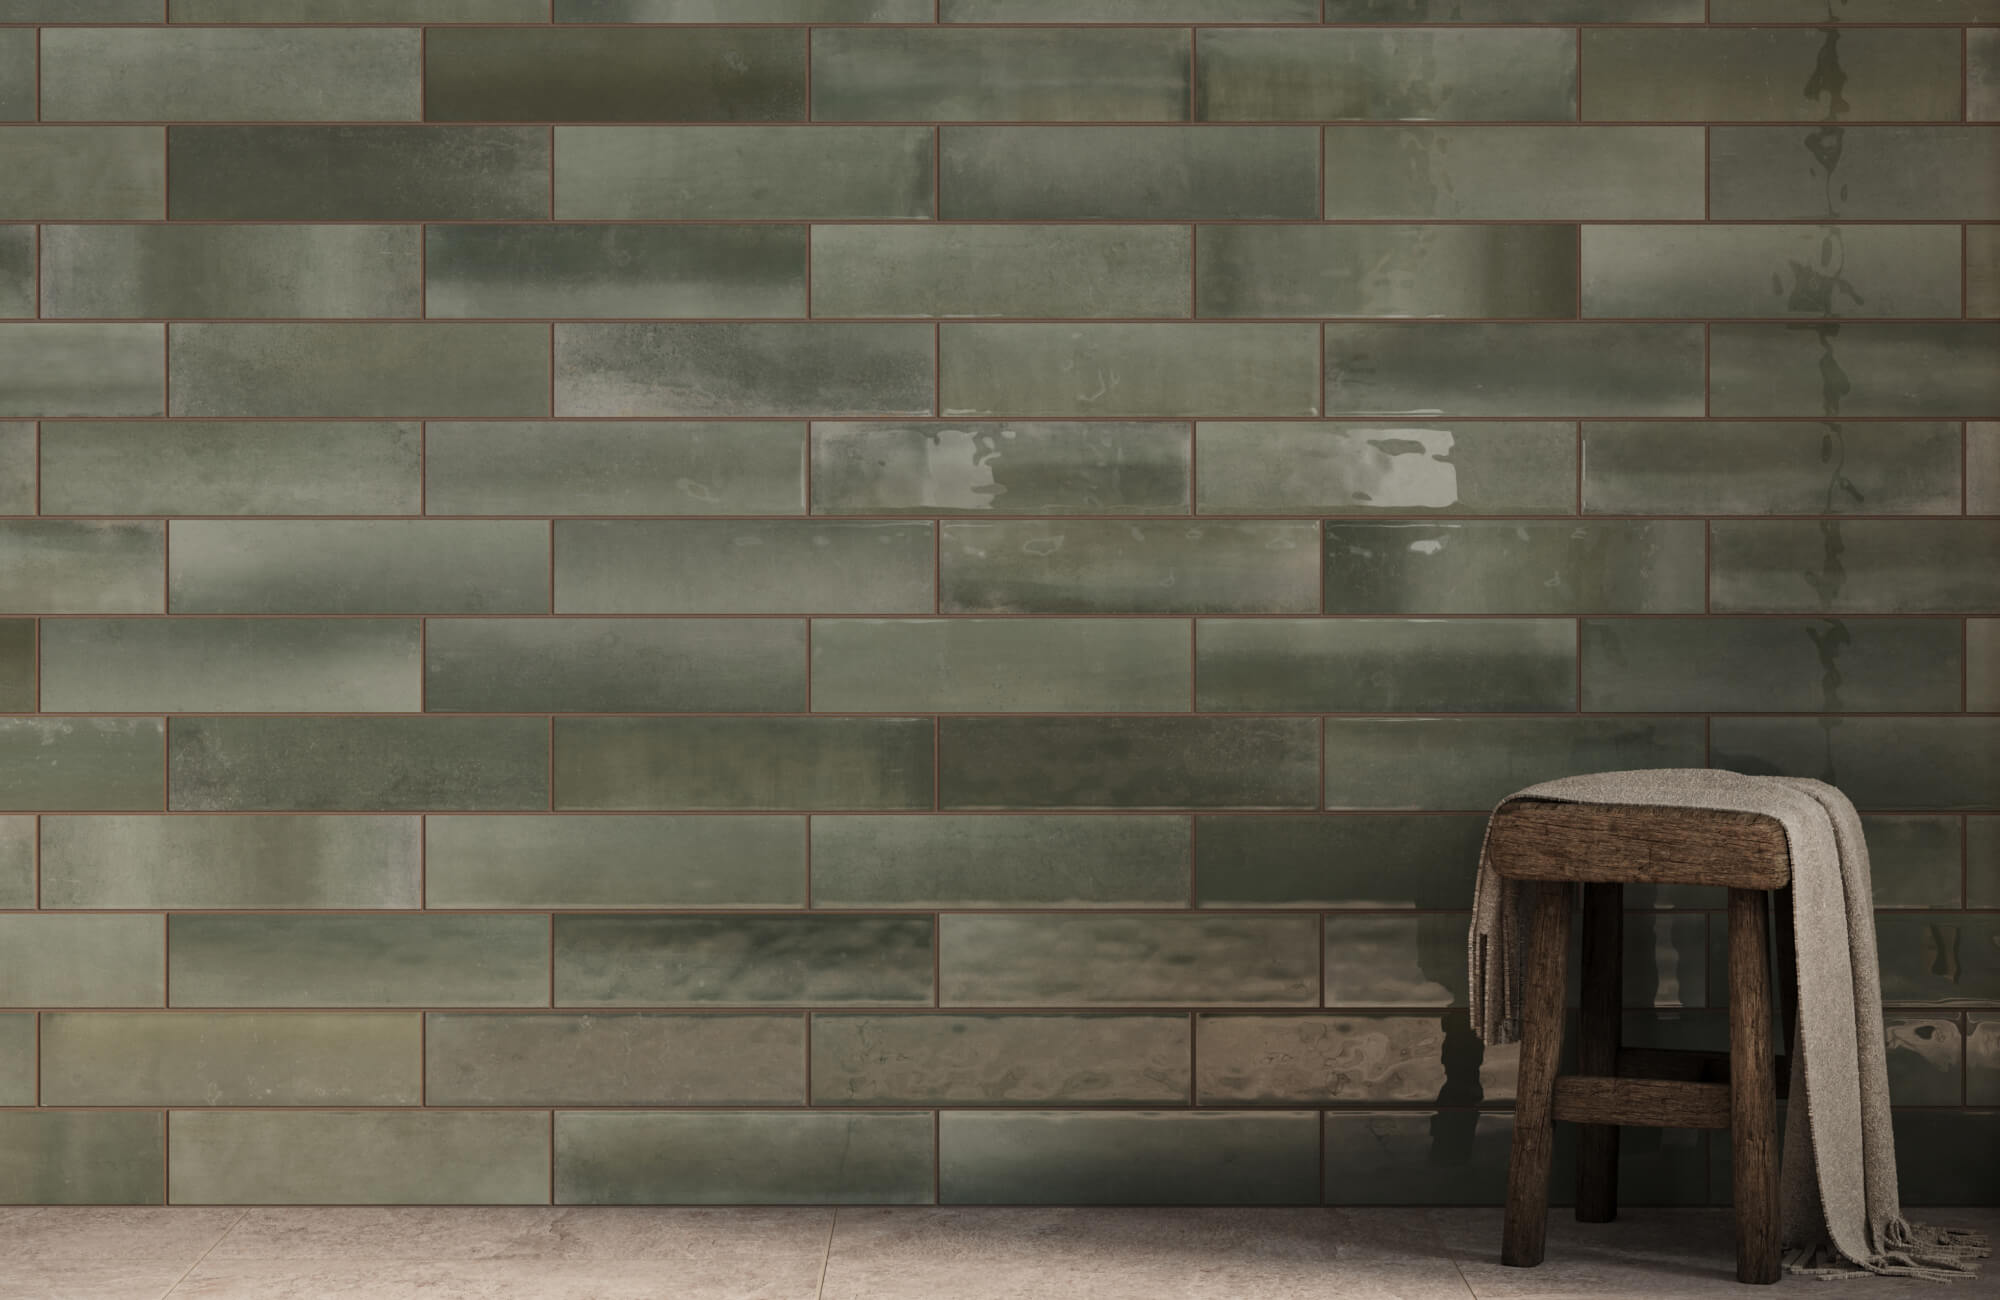
Brick Pattern
The brick pattern is a timeless classic that adds visual interest and texture to any space. By offsetting each row of tiles by half a tile length, this pattern creates a dynamic, staggered effect that feels both structured and relaxed. Because of its traditional roots, the brick layout is often associated with classic subway tile installations, yet it remains incredibly versatile in modern interiors.
One of the strengths of the brick pattern is its ability to soften rigid lines while still maintaining visual rhythm. The staggered joints also help disguise minor wall imperfections and can make a space feel more inviting and less formal than a straight stack layout. It’s a popular choice for subway tile backsplashes, bathroom walls, and shower surrounds because it balances movement with simplicity. Pairing it with contrasting grout can emphasize the offset design for a bold, graphic look, while matching grout creates a more seamless and understated finish.
Herringbone Pattern
The herringbone pattern is a sophisticated choice for those seeking a more intricate and eye-catching design. This pattern involves arranging subway tiles in a V-shape, creating a distinctive zigzag motif. It’s particularly well-suited for modern, contemporary interiors, as well as traditional and eclectic styles.
A warm-toned tile, like the Olivia 4x16 Glossy Ceramic Tile in Cotto, can elevate the herringbone pattern, bringing a touch of earthy sophistication that works beautifully in both classic and modern spaces. While stunning, the herringbone pattern can be complex to install, making it a good candidate for professional help if you’re aiming for precision. For small spaces like powder rooms, a herringbone accent wall can add an unexpected touch of class.
Diagonal Pattern
The diagonal pattern is a bold and modern choice that can make a room feel larger and more spacious. By laying subway tiles diagonally, this pattern creates a dynamic, geometric effect that draws the eye and adds visual interest to a room, especially in small spaces. It’s often used to create a focal point, such as a backsplash or accent wall. The diagonal lines also create a sense of movement, making this pattern ideal for areas where you want to add energy and depth, such as entryways or home offices. For those who want to experiment with color, this pattern works well with two contrasting hues.

Creative Subway Tile Laying Patterns
While classic tile patterns offer timeless appeal, creative tile layouts can elevate your space to new heights. Here are some creative subway tile laying patterns to elevate your interior design and make a bold statement.
Vertical Stack
The vertical stack pattern is a contemporary take on the traditional straight stack. By orienting the subway tiles vertically, this pattern creates a sense of height and drama, making it ideal for small spaces or rooms with low ceilings. The vertical stack can be used to create a sleek, minimalist look or a bold, eye-catching statement, depending on the color and size of the tiles.
For a refined yet impactful design, the Kai 3x12 Matte Porcelain Tile in Marine is a standout choice for this layout. Its rich, deep green tone adds depth and sophistication, while the matte finish softens the overall look, preventing glare and enhancing the tile’s natural texture. When installed in a vertical stack, the elongated proportions draw the eye upward, emphasizing ceiling height and creating a clean architectural backdrop. Paired with warm wood cabinetry and brass fixtures—like in the space shown—the marine hue delivers a balanced blend of modern structure and timeless elegance.
Basketweave Pattern
The basketweave pattern is a classic design that has been used for centuries. This pattern involves weaving subway tiles together in a basket-like formation, creating a sophisticated and timeless look. It is also a versatile choice that can be used in a variety of settings, from traditional to contemporary, and is an excellent way to add texture and depth to a space.
What makes the basketweave layout especially appealing is its subtle intricacy. Unlike bold geometric patterns, it introduces movement and dimension without overwhelming the room. The interlocking design naturally draws the eye, making it ideal for feature walls, shower surrounds, or statement backsplashes where you want added visual richness. For a vintage or retro vibe, black and white tiles emphasize the woven effect beautifully, while tonal color pairings create a softer, more understated interpretation. This approach works particularly well in kitchens and bathrooms, where the detailed layout adds character while maintaining balance and elegance.
Pinwheel Pattern
The pinwheel pattern is a fun and whimsical choice for those who want to add a touch of personality to their space. This pattern involves arranging subway tiles in a circular or spiral formation, creating a dynamic and eye-catching effect. The pinwheel pattern is a great way to create a focal point in a room, such as a backsplash or accent wall. It’s also particularly well-suited for children’s bathrooms or playful, eclectic interiors.
What makes the pinwheel layout especially striking is its sense of movement. The rotating arrangement naturally draws the eye outward, adding energy and visual rhythm to otherwise simple rectangular tiles. Depending on the color combination, the pattern can feel bold and graphic or soft and artistic. For a more subtle look, monochrome pinwheels create a sophisticated, layered appearance suitable for accent walls in common areas, while contrasting hues highlight the geometric structure and make the design feel more dramatic and expressive.

Choosing the Right Pattern for Your Space
Choosing the right tile pattern is a crucial decision that can significantly impact the overall aesthetic of your space. Whether you're aiming for a sleek, minimalist look or a bold, eclectic design, the careful selection of a subway tile pattern can elevate your interior to new heights.
Tailoring the Pattern to Your Space's Dimensions
When selecting a subway tile pattern, it’s essential to consider the size and shape of your space. For small rooms, lighter colors and simpler patterns can create a more open and airy feel. Conversely, larger spaces can accommodate bolder patterns and darker colors without feeling overwhelming. Additionally, the orientation of the tiles can impact the perceived dimensions of a room. For instance, laying subway tiles vertically can make a room appear taller, while laying them horizontally can make it seem wider.
Tile size also plays a key role in how proportions are perceived. Longer formats, such as the Piper 3x24 Glossy Porcelain Tile in Pine, as featured in the photo above, naturally elongate walls and emphasize height when installed vertically. Its extended length creates fewer horizontal interruptions, allowing the eye to travel upward smoothly—an effect that works beautifully in dining nooks, bathrooms, or accent walls where you want to enhance vertical space. The glossy finish further amplifies light, adding depth and dimension while maintaining a clean, streamlined look.
To achieve balance, choose a pattern and tile size that align with the function and scale of the room. For frequently used areas, like kitchens, go for layouts that wear well and maintain visual harmony, whether that’s a structured vertical stack with elongated tiles or a classic brick pattern that adds subtle movement.
Harmonizing Pattern and Style
The chosen subway tile pattern should also complement your overall design aesthetic. For a minimalist, modern space, a simple, clean pattern like a straight stack or a subtle herringbone can enhance the sleek, streamlined look. Traditional interiors, on the other hand, may benefit from more intricate patterns like basketweave or pinwheel. Ultimately, it’s important to strike a balance between the pattern’s complexity and the room’s overall style.
Patterns like chevron and vertical stack are often best paired with minimal, modern furniture, while classic brick or basketweave works well with vintage or eclectic decor. To help you visualize specific subway tile patterns in your home, try our Augmented Reality (AR) tool at Edward Martin. This feature allows you to place a tile pattern on your wall or floor virtually, using your smartphone or tablet. It’s invaluable for seeing each subway tile pattern and color within your actual space, helping you make confident decisions from the comfort of your home.
The Power of Color and Grout
The color of your subway tiles and grout can significantly impact the final appearance of your space. Light-colored subway tiles and grout can create a bright, airy feel, while darker colors can add drama and sophistication. Consider also the color palette of your room and choose tile and grout colors that complement or contrast with your existing decor. A well-chosen grout color can enhance the pattern’s visual impact, while a neutral grout color can create a more understated look. For a contemporary look, try pairing dark grout with white subway tiles to emphasize the tile shape and pattern. In contrast, a matching grout color can soften the lines, making the pattern blend seamlessly with the space.

DIY Tile Installation Tips
While DIY installation can be rewarding, hiring a professional tile installer is often the best way to ensure precise results and long-lasting performance.
Ready to take on a DIY subway tile project? With careful planning and the right techniques, you can transform your space and achieve stunning results. Here, we’ll walk you through the essential steps, from preparing the surface to grouting and sealing. Let’s get started!
Essential Tools and Materials
Before embarking on a DIY subway tile installation project, it’s crucial to gather the necessary tools and materials. This typically includes a tile cutter or wet saw, tile nippers, a level, tile spacers, a notched trowel, tile adhesive, grout, grout float, grout sponge, sealant, and, of course, the subway tiles themselves. It’s advisable to invest in high-quality tools to ensure a professional finish.
Additionally, having a measuring tape, chalk line, and mixing bucket on hand will help streamline the process and improve accuracy. Proper preparation with the right equipment can significantly reduce mistakes and save time during installation.
Preparing the Surface
A well-prepared surface is essential for a successful subway tile installation. Begin by removing any existing tile or wallpaper and cleaning the surface thoroughly to remove dirt, grease, and other contaminants. Next, assess the surface for any unevenness or damage. Minor imperfections can be addressed with a leveling compound, while significant issues may require more extensive repairs. A properly prepared surface will ensure optimal adhesion and prevent future problems. It’s also important to confirm that the surface is completely dry before applying adhesive. Moisture trapped behind tiles can compromise adhesion and lead to long-term issues.
Precision Cutting
Cutting subway tiles to fit around corners, outlets, and other obstacles is a skill that requires practice. A tile cutter or wet saw is ideal for straight cuts, while tile nippers can be used for smaller, more intricate cuts. When cutting tiles, it’s important to wear safety goggles and a mask to protect your eyes and lungs from tile dust. Practice makes perfect, so don’t be afraid to experiment with different cutting techniques. Always measure twice before making a cut to avoid unnecessary waste. Taking your time with detailed areas will ensure cleaner edges and a more polished final result.
Grouting and Sealing
Grouting is the process of filling the gaps between subway tiles with a mortar-like mixture. It not only enhances the appearance of the tile installation but also strengthens the overall structure. After applying the grout, it’s essential to wipe away excess grout with a damp sponge, being careful not to remove too much. Sealing the grout is also particularly important in high-moisture areas such as bathrooms and kitchens. Allow the grout to cure fully before sealing to ensure maximum protection. Proper sealing helps prevent staining, discoloration, and moisture penetration over time.

When to Hire a Professional Tile Installer
While a DIY subway tile installation can be a rewarding experience, there are certain situations where it’s best to leave the job to a professional. If you’re dealing with a complex layout, intricate patterns, or large-scale projects, hiring a skilled subway tile installer can save you time, effort, and potential headaches. Patterns such as herringbone, diagonal, or custom inlays require precise measurements and consistent spacing to maintain symmetry throughout the space.
For example, installing a herringbone floor using a tile like our Makenna 3x11 Matte Porcelain Tile in Cotto demands careful planning and expert execution. The angled layout requires exact cuts along edges, transitions, and stair lines to preserve the pattern’s rhythm and alignment. Even minor miscalculations can disrupt the visual flow, especially in open areas or entryways where the design is highly visible. A professional installer ensures the pattern remains crisp, balanced, and structurally sound from start to finish.
Additionally, if you lack confidence in your tiling abilities or have limited experience, it’s wise to seek professional assistance to ensure a flawless result. Professional tile installers possess the expertise, tools, and experience to handle even the most challenging tile projects. They can accurately measure and cut tiles, ensuring a precise and aesthetically pleasing installation. Moreover, professionals have access to high-quality materials and can provide expert advice on tile selection and pattern layout. By hiring a professional, you can rest assured that your subway tile installation will be completed efficiently and to the highest standards.
Bringing Your Subway Tile Vision to Life
Choosing the right subway tile pattern is a crucial decision that can significantly impact the overall aesthetic of your space. By carefully considering factors such as room size, design style, and personal preference, you can select a pattern that complements your aesthetic vision. Whether you opt for a classic straight stack or a bold, creative design, remember to consider the practical aspects of your tile installation, such as grout color and maintenance. If you’re unsure about tackling a DIY subway tile project, don’t hesitate to consult with a professional tile installer.
For personalized guidance, Edward Martin’s design services team is available to help you select the perfect tile, layout, and finish for your space. Contact us to bring your subway tile vision to life with confidence and expert support!
