


A checkerboard floor instantly adds personality to a space. Whether you're leaning toward a bold black-and-white look or something more colorful and playful, this classic pattern brings charm and character to everything from kitchens to patios. It’s simple, stylish, and works well in both modern and traditional interiors.
In this guide, we’ll walk you through the process of making your own checkerboard floor, from picking the right materials to laying out your pattern with clean, precise lines. With the right prep and a bit of patience, you can create a design that feels custom and timeless.

Planning Your Checkerboard Floor
Before picking up a paintbrush or selecting tiles, it’s important to plan out your checkerboard floor carefully. A little upfront thinking can save a lot of time later and help ensure the final result looks clean, balanced, and intentional. From choosing the right colors to laying out your pattern, this section walks you through each step to help your vision come together smoothly.
Choosing Your Colors
Black and white is a classic for a reason; it works in just about any space and feels polished, timeless, and clean. Whether your style is traditional or modern, this high-contrast combo grounds the room and complements a wide range of interior palettes. But if you're looking for something more unexpected, a different color can give you plenty of room to express personality while keeping the checkerboard structure intact.
You might consider vibrant pairings like mustard and teal for a lively, playful feel, or go bold with charcoal and burgundy for something moodier and more dramatic. If you’re after something softer, try sage and cream or blush and dove gray. You can also play with visual transitions, such as a light-to-dark gradient that flows across the floor.
Material Selection
The material you choose has a big impact on both the look and longevity of your checkerboard floor. If you’re working on a creative refresh or want maximum flexibility, paint is a solid choice, especially on smooth surfaces like wood or concrete. It allows for custom layouts and color combinations while staying budget-friendly. Just be sure to use paint made for floors, ideally with a built-in primer for better coverage and durability.
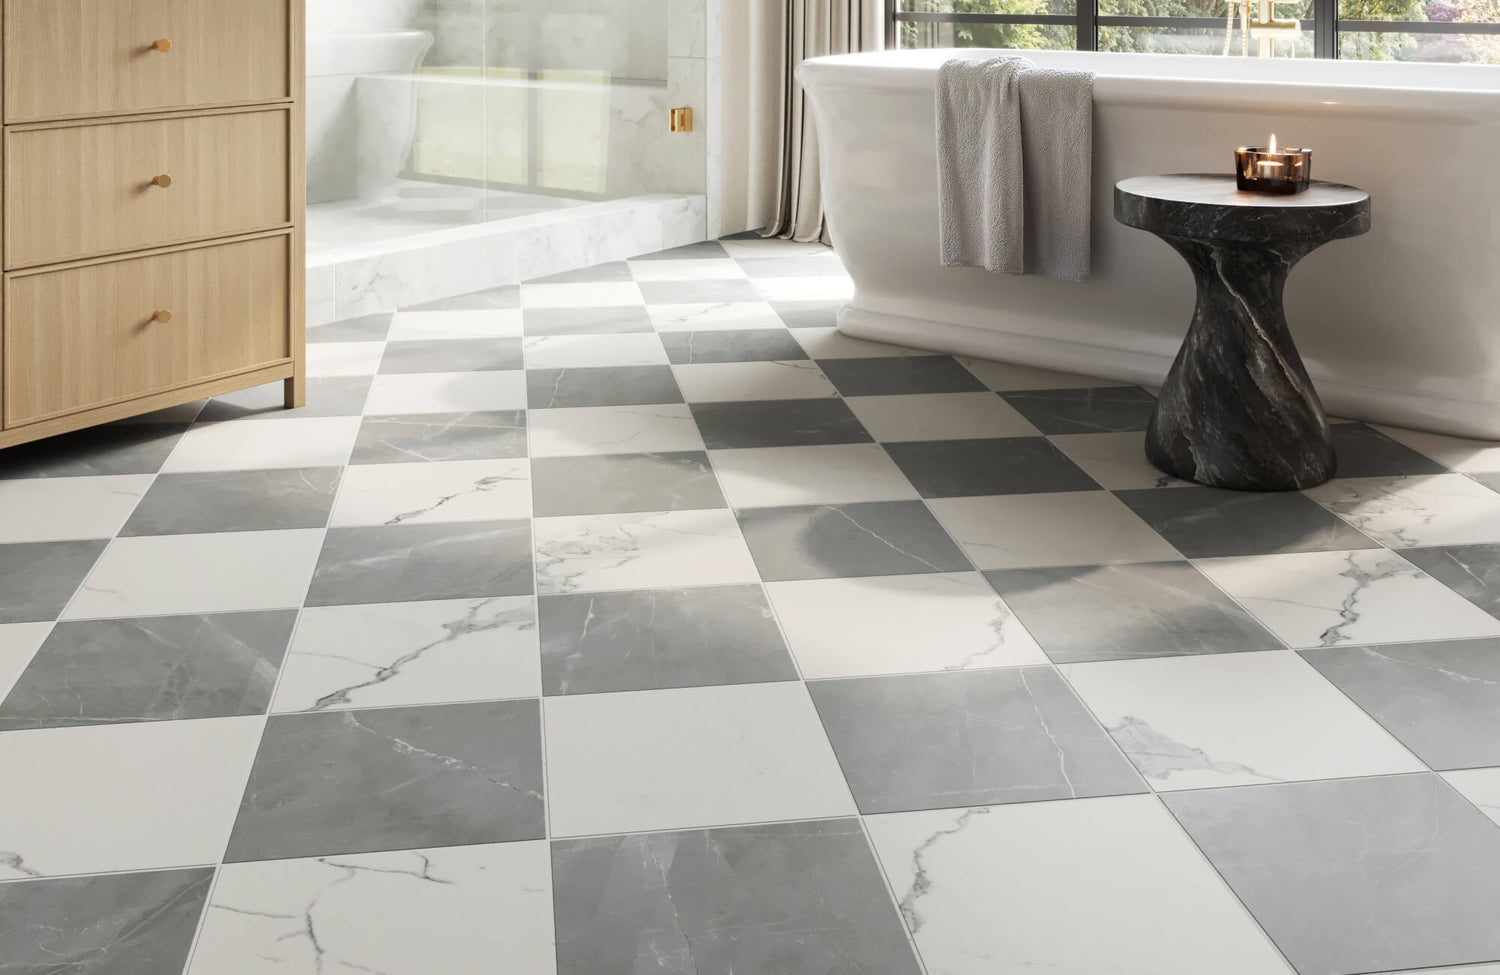
For something more permanent, tile offers long-term durability and a polished finish that stands up well to moisture and daily use. Porcelain and ceramic tiles, such as our Leona 24x24 Checkerboard Matte Porcelain Tile in Calacatta and Amani Grey above, are especially popular for checkerboard designs, thanks to their strength and refined look. If you're installing in a busy area like a kitchen or hallway, tile is often the best choice for dependable performance. Vinyl is also an option for quick updates, though it’s better suited for low-moisture rooms and temporary applications where ease of installation is the top priority.
Measuring and Layout
Accurate measurements are the foundation of a successful checkerboard floor. Start by measuring the full dimensions of your space with a tape measure or laser level, and calculate how many squares you’ll need based on your preferred size. A small misstep in the math can throw off the whole pattern, especially in visible areas. Double-checking your figures early will help everything line up neatly in the final result.
Once you have your measurements, sketch out the layout on paper before making any marks on the actual surface. This is especially useful if you're planning borders, color transitions, or a diagonal pattern. Try to scale your square sizes to the room’s proportions so they don’t feel too large or too busy. A clear plan helps the floor feel well-balanced and more intentional once it's installed.
Choosing a Starting Point
Where you begin laying the pattern affects how the entire floor comes together. Starting in the center of the room is a smart approach if you want a symmetrical look, especially in more formal areas or spaces with a clear focal point like a fireplace or dining table. This method helps distribute the squares evenly and keeps the overall layout feeling balanced and centered.
No matter what your method is, make sure the surface is well-prepped before applying paint or tile. It should be clean, dry, and level to support even coverage and long-term durability. Skipping this step can lead to issues like peeling paint or uneven tiles later on. A smooth, well-prepped base gives you a strong start and helps your checkerboard floor look its best for years to come.

Painting a Checkerboard Floor
Painting is a practical way to add character and style to your floor without a full renovation. It’s a great option for homeowners who want a customized look on a manageable budget. With the right prep and materials, you can achieve a checkerboard design that feels fresh, creative, and long-lasting.
Choosing the Right Paint
Before you begin, choosing the right paint is essential for both performance and appearance. The type of surface you're working with, along with the room's function, will guide your selection. A well-matched paint makes a big difference in how your floor looks and how well it holds up over time.
Floor Material Compatibility
Start by choosing a paint that’s made specifically for floors, and make sure it’s compatible with your surface, wood, concrete, vinyl, or linoleum. Standard wall paints won’t bond properly and are likely to chip or peel under pressure. Look for “floor-grade” labels and always do a patch test if you're unsure. Matching the paint to the material from the beginning saves you from future maintenance headaches.
Durability and Wear Resistance
Floors deal with more wear than walls, so your paint needs to be tough. An acrylic-based formula is a reliable choice, especially for heavily used areas or rooms with occasional moisture. These paints resist abrasion and help prevent scuffing or early fading. If you’re working in a busier room, you can also add a clear topcoat for extra protection.
Moisture Resistance
In rooms where moisture is common, like bathrooms, kitchens, or basements, opt for waterproof or water-resistant paint. These types help prevent bubbling, peeling, or mildew buildup over time. Concrete and wood floors especially benefit from moisture protection since they can absorb water and deteriorate if unsealed. A moisture-resistant paint keeps your floor looking better for longer.
Finish
The finish you choose affects both the look and upkeep of your floor. Glossy finishes reflect more light and give a bold, modern feel, but can highlight imperfections. Satin finishes strike a balance with subtle sheen and good stain resistance. Matte hides surface flaws best, though it may need more regular cleaning to maintain its look.
Paint with Built-in Primer (Optional)
Some paints come with built-in primer, which can save time, especially on smoother surfaces or newer floors. These combo products reduce the need for multiple coats and help with coverage on uniform surfaces. However, if your floor has stains, uneven areas, or previous finishes, a dedicated primer may still be the better option. It ensures better adhesion and more even results.
Painting Process
Once your materials are ready and your surface is prepped, it’s time to start painting your checkerboard floor. This stage is all about patience and precision; taking your time with each step ensures a crisp, balanced finish. From the base coat to the final square, every layer matters.
Apply the Base Coat
Begin by painting the entire floor with your lighter color. Use a roller for wide, open areas and an angled brush to cut in around corners and edges. Make sure to stir the paint thoroughly before application, and apply smooth, even strokes that slightly overlap. Once the base coat is complete, allow it to dry completely before moving on.
Allow Drying Time
Drying time can make or break the quality of your checkerboard floor. Follow the manufacturer’s recommended drying time, which is usually several hours. Avoid the temptation to move ahead too quickly; even slightly tacky paint can cause smudging, lifting, or uneven tape lines. A little patience here goes a long way toward a clean final result.
Creating Crisp Lines with Painter’s Tape
Use a measuring tape, straightedge, or chalk line to map out your checkerboard pattern with precision. Apply painter’s tape carefully, pressing it down firmly to create a tight seal that prevents bleeding. For curved edges or unique layouts, stencils or cardboard templates can help you maintain accuracy. Always double-check your measurements before committing to the layout.
Applying the Darker Color
Once everything is taped off, begin applying your darker paint color within the outlined squares. Use thin, even coats to avoid build-up, and allow each layer to dry fully before adding another. Two to three coats usually provide full coverage and a smooth, solid finish. When done, peel away the tape slowly and touch up any minor edges if needed.

Tiling a Checkerboard Floor
Tiling is the go-to option for creating a durable, low-maintenance checkerboard floor that stands the test of time. It’s ideal for busy areas like kitchens, bathrooms, and entryways where moisture and daily wear are common. While installation requires more prep and precision, the final result delivers a clean, long-lasting finish that feels polished and professional.
Choosing the Right Adhesive
The adhesive you choose plays a major role in how well your tiles stay in place and how long your floor lasts. It needs to match both your tile type and your subfloor to avoid issues like lifting or cracking later on. Taking a few moments to choose the right adhesive upfront can save you from costly repairs down the road.
Tile Material Compatibility
Different types of tile require different adhesives, and using the wrong one can lead to poor bonding or premature failure. Porcelain and ceramic tiles, such as our Palmer 12x12 Checkerboard Raw Porcelain Tile in White and Grey seen above, typically work best with modified thin-set mortar, which offers excellent strength and moisture resistance. Be sure to check the manufacturer's recommendations to confirm compatibility. A reliable adhesive is key to keeping your checkerboard pattern secure and seamless over time.
Subfloor Compatibility
Your subfloor material affects how the adhesive will behave, so it’s important to match the two correctly. Concrete subfloors are generally compatible with most mortars, but wood subfloors may require a more flexible adhesive to account for natural movement. If flexibility is overlooked, your tiles may crack or loosen over time. Choosing the right adhesive helps ensure the floor holds steady as conditions shift.
Moisture Exposure
If you’re tiling a space that deals with humidity or water, like a bathroom or laundry room, make sure to use a waterproof or moisture-resistant adhesive. These formulations help prevent water from seeping through the grout and damaging the subfloor underneath. Skipping this step can lead to long-term problems like mold or tile lifting. Waterproof adhesive is essential for lasting performance in wet areas.
Curing Time
Not all adhesives cure at the same rate, and timing can affect how efficiently your project moves along. Fast-curing adhesives are helpful for small areas or when you're on a tight schedule, while slower-curing options give you more flexibility during installation. Knowing your working time is important so you can avoid rushed adjustments or dried-out adhesive before tiles are in place. Always refer to the product’s label for cure time guidelines.
Flexibility
In rooms that experience temperature swings or slight structural movement, a flexible adhesive is often the safest choice. This added elasticity allows the adhesive to expand and contract without compromising the tile bond. It’s particularly useful when working with large-format tiles or in spaces with wooden subfloors. A flexible adhesive can prevent cracking in both the tile and grout over time.
Laying the Tiles
Once you’ve chosen the right adhesive and mapped out your layout, it’s time to start installing your checkerboard tile floor. This part of the process is all about patience, precision, and consistent alignment. Each tile you place contributes to the final look, so working carefully makes a noticeable difference.
Prepare the Adhesive
Start by mixing your adhesive if it’s not premixed. Follow the manufacturer’s instructions closely, gradually adding water and stirring until the mixture is smooth and lump-free. Avoid overmixing, which can reduce working time or affect bond strength. Let the adhesive rest briefly after mixing so it activates fully before application.
Spread the Adhesive
Use a notched trowel to spread the adhesive in manageable sections, working only in areas you can tile within 15 to 30 minutes. Hold the trowel at a consistent angle to create even ridges, which help the tiles bond securely to the floor. Make sure the coverage is uniform to avoid hollow spots beneath the tile. Taking your time here sets the foundation for an even installation.
Lay the Tiles
Begin placing your tiles from your chosen starting point, often the center of the room, for balance. Alternate between your two colors to maintain the checkerboard pattern, and use spacers to ensure even grout lines. Press each tile firmly into place and gently tap it with a rubber mallet to keep it level with adjacent tiles. Continue row by row, checking your alignment as you go.
Checking Level and Making Adjustments
As you work, use a level to check for flatness across the floor. If a tile sits too high, gently tap it down into place. If it’s too low, lift it and apply a little more adhesive underneath before resetting it. Also, keep a damp sponge nearby to wipe away any adhesive that squeezes up between the tiles before it dries.
Cutting Tiles for Edges and Intricate Patterns
When you reach the edges of the room or encounter corners and obstacles, precise cutting becomes essential. Use a wet saw for ceramic or porcelain tiles, especially for curved or complex cuts. For straight edges, a snap cutter or scoring tool may be sufficient. Always practice on a spare tile before making final cuts to avoid waste.
Maintaining the Checkerboard Pattern
Throughout the tiling process, regularly refer back to your layout diagram to ensure the pattern stays consistent. A misplaced tile can throw off the rhythm of the design, especially in high-visibility areas. Take your time double-checking color placement before pressing each tile into place. A slow, careful approach helps maintain visual symmetry from start to finish.
Finishing Touches
Once all the tiles are laid, allow the adhesive to cure fully, usually between 24 to 48 hours, depending on the product. After curing, apply grout evenly between the tiles, wiping away excess as you go. Once the grout is dry, consider sealing it for added protection, especially in moisture-prone areas. This final step locks everything in and gives your floor a finished, long-lasting appearance.

Pro Tips and Troubleshooting
Even with solid planning and prep, it’s normal to run into a few bumps along the way during a checkerboard floor project. Whether you’re working with paint or tile, small mistakes can happen, but most are easy to fix with the right tools and a little patience. These quick tips will help you maintain clean lines, prevent pattern misalignment, and recover from common issues without starting over.
Keeping Lines Clean and Consistent
Clean, even lines are essential to any checkerboard floor, whether you’re taping off squares to paint or laying down tile row by row. If painting, use high-quality painter’s tape labeled as safe for floors, and apply it to a clean, dry surface to prevent lifting or bleed-through. Press it down firmly along all edges, and for added accuracy on curves or detailed layouts, use stencils or cut cardboard templates.
Tiling also depends on accurate alignment. A laser level or long straightedge helps you keep your pattern square, especially over longer runs or when working diagonally. It’s worth double-checking your square size and layout plan before applying adhesive or paint, because even a small shift early on can throw off the entire pattern as you go.
Correcting Common Mistakes
When painting, minor errors like a small smudge or missed corner can usually be cleaned up with a fine brush and touch-up paint in the contrasting color. For larger issues like paint bleeding under tape, you may need to let the area dry, gently sand down any raised spots, and repaint the section with careful edge control. Always allow the surface to dry fully before taping or reapplying another coat.
For tiles, mistakes like setting a tile out of order or breaking alignment can often be fixed before the adhesive cures. If caught early, use a flat pry bar to gently lift the tile without damaging adjacent pieces. Scrape off any remaining adhesive from both the tile and the subfloor, apply fresh adhesive, and reset the tile carefully. Checking your pattern every few rows and before each tile is pressed down helps avoid having to make more difficult adjustments later.

Design Ideas and Inspiration
The beauty of a checkerboard floor lies in its incredible versatility. Whether you're drawn to something timeless and bold or playful and colorful, this pattern can be tailored to fit just about any style. And if you’re unsure how to bring your vision to life, Edward Martin offers personalized design consultations to help you create a look that complements your home beautifully. Below are a few standout ideas to help spark inspiration for your project.
Timeless Black and White
The classic black and white checkerboard, such as our Leona 24x24 Checkerboard Matte Porcelain Tile in Calacatta and Nero Marquina above, remains a popular choice for good reason. It adds structure and visual interest without overwhelming a space, making it suitable for kitchens, bathrooms, hallways, and more. Whether your style leans traditional or modern, this high-contrast look works well with nearly any décor. The balance between dark and light adds just enough drama while staying clean and familiar.
You can also influence the room’s mood by adjusting the finish. A glossy surface reflects light and adds energy, ideal for smaller or darker rooms. A satin or matte finish feels more grounded and tends to hide everyday scuffs or uneven surfaces. You can even experiment with square sizes; larger white squares and smaller black ones can help a room feel more open while still keeping that bold, graphic pattern intact.
Creative Color Combinations
While black and white is timeless, other colors open up endless creative possibilities. Introducing soft pastels, muted earth tones, or bright accent hues can instantly shift the mood of a space. A checkerboard pattern in sage green and cream, for example, adds warmth and softness to a bedroom or reading nook. Bolder combinations like teal and ochre can energize a creative studio or dining area.
What matters most is how the color combination fits within your home’s palette. Try coordinating with surrounding wall colors, furniture, or natural light to create harmony. This flexibility makes checkerboard floors more versatile than people often expect. With either paint or tile, color play can add personality without sacrificing the pattern’s clean structure.
Borders and Custom Patterns
For a checkerboard floor that feels custom, think beyond just alternating squares. Adding a decorative border can frame the floor and help visually anchor the pattern within the room. This works especially well in open layouts, where a border helps define space without using walls or rugs. You can also use a different material or color for the border to give it contrast and clarity.
Another way to personalize your floor is by layering subtle details into the pattern itself. For instance, using stencils to add stripes or dots within each square can bring depth and texture. Even shifting the orientation of squares into a diagonal layout gives the pattern a new twist. These small adjustments make the checkerboard design feel more intentional and connected to the overall space.
Material-Inspired Styles
If you're drawn to the idea of a checkerboard floor but want something that feels more textured or layered, consider using finishes that mimic natural materials. Marble-look squares add elegance and a sense of luxury, especially in bathrooms or formal dining areas. Wood-look finishes bring in warmth and work beautifully in rustic, vintage, or Scandinavian interiors. These styles offer a fresh take while still respecting the checkerboard structure.
You can also create bold effects using concrete, terrazzo, or stone-inspired finishes. Concrete-look tiles or paint techniques lend an industrial feel that's great for modern or urban spaces. Terrazzo adds a playful quality with its speckled colors and varied textures, often making it the focal point of a room. Whether you’re painting these effects or choosing tile that replicates them, material-inspired styles offer a unique way to personalize your floor while keeping it practical and durable.
Finishing Your Space with a Checkerboard Floor
When planning a checkerboard floor, there’s more to consider than just the color palette or pattern style. Surface preparation, material durability, and room usage all play a role in creating a floor that’s both beautiful and practical. Whether you lean toward classic black and white or something more playful, this design adds structure and visual rhythm to any space.
For long-term performance, many homeowners turn to porcelain or ceramic tile, which offers lasting durability along with a wide range of aesthetic options. No matter the room, checkerboard floors can bring personality and balance when thoughtfully executed. If you need assistance in selecting the right checkerboard tile, contact us. We're here to help you find a quality option that offers durability, style, and long-term value.
