


Herringbone floor tile is more than just a flooring choice—it is a timeless design statement that captures elegance through geometry and craftsmanship. With its signature zigzag pattern, it introduces rhythm, depth, and sophistication, transforming ordinary rooms into spaces of architectural beauty. Whether expressed through porcelain herringbone tile in a modern kitchen, natural stone herringbone in a luxurious entryway, or engineered wood herringbone in a cozy living room, this design adapts seamlessly to different styles. The interplay of layout, material selection, color contrast, and precision installation ensures that each floor becomes both functional and artistic. When paired with thoughtful styling, herringbone flooring creates interiors that are not only practical but also beautifully curated, embodying a sense of refined elegance that endures.

Planning the Herringbone Layout for Maximum Impact
The way herringbone tiles are arranged can completely change the perception of a room by influencing its scale, flow, and sense of proportion. When the layout is planned with intention, the pattern enhances architectural strengths and creates a natural visual rhythm that feels both refined and timeless.
Orientation Choices
When laid diagonally at 45 degrees, herringbone flooring expands sightlines and adds a sense of movement, which can make compact spaces feel noticeably larger. In contrast, a horizontal orientation emphasizes stability and width, creating a balanced foundation that grounds expansive interiors. A vertical arrangement, on the other hand, works differently, naturally drawing the eye upward to highlight ceiling height and bring a sense of grandeur to narrow hallways or entryways. Orientation should always be chosen in harmony with room dimensions and the direction of natural light so the pattern feels integrated rather than imposed. By guiding sightlines and emphasizing architectural flow, orientation transforms the herringbone pattern into a functional design element as well as an aesthetic one. Establishing orientation early also ensures that every other design choice aligns seamlessly with the layout.
Tile Scale and Proportion
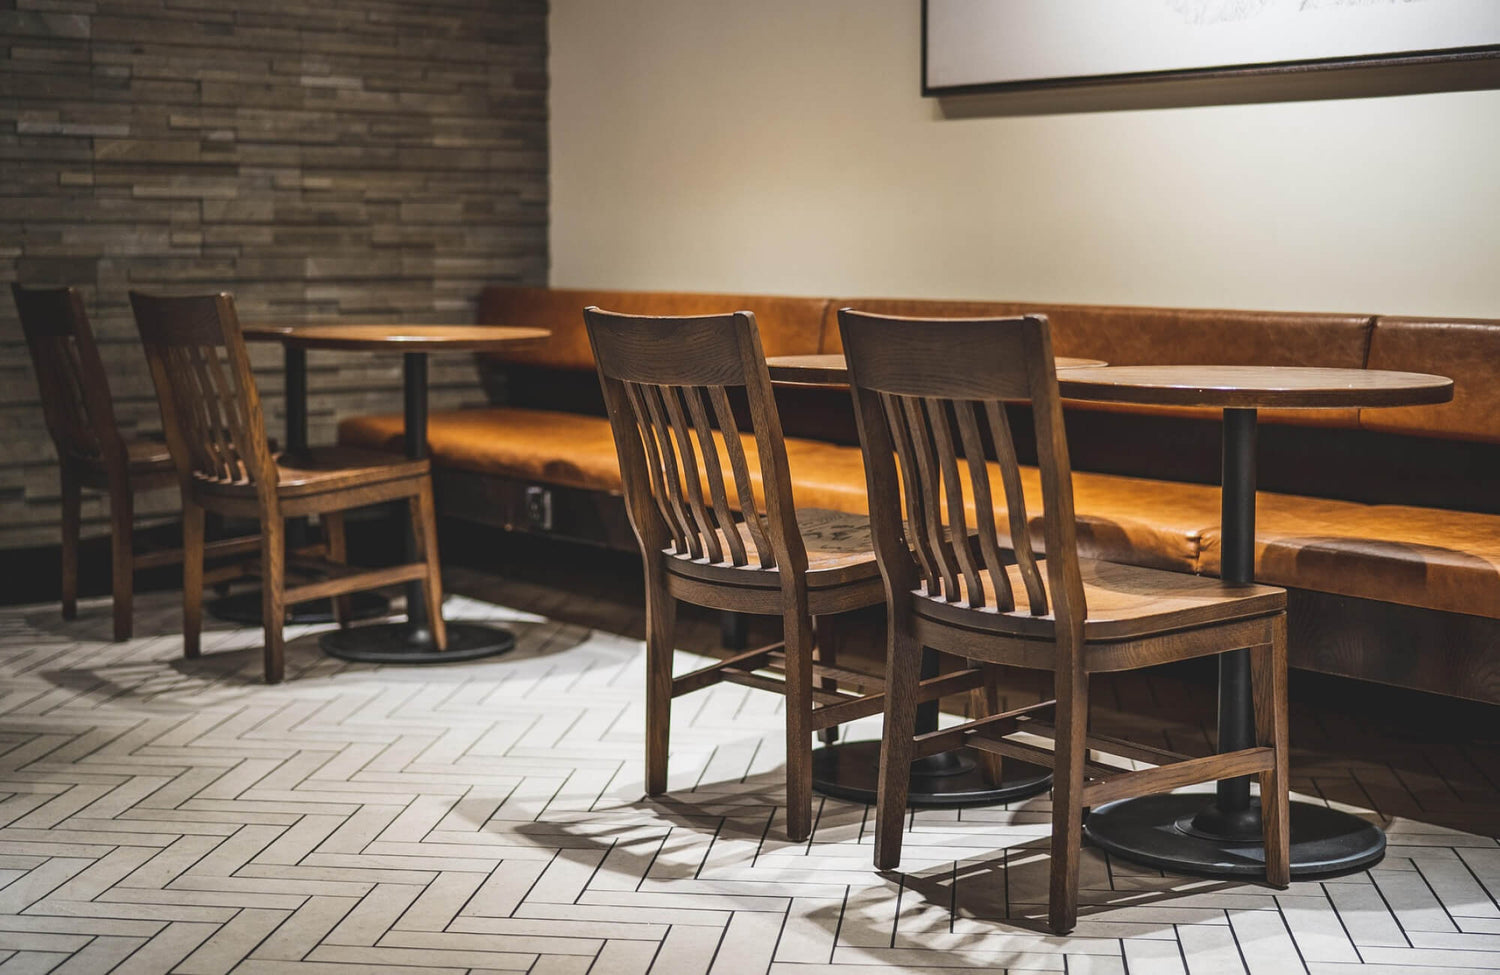
Large format herringbone tiles deliver a sleek, modern aesthetic by reducing grout lines, which allows the eye to follow smooth, uninterrupted lines across the floor. Smaller-scale tiles, on the other hand, introduce intricacy and craftsmanship, giving compact spaces such as bathrooms or foyers a traditional charm. The proportion between tile size and room scale is also essential, since oversized tiles can overpower smaller rooms while undersized tiles may feel too busy in open layouts. Designers often strike a balance by matching tile scale with the room’s dimensions and its intended level of visual impact.
In addition, proportion affects practicality, as more grout lines mean increased cleaning and maintenance requirements. Edward Martin’s Chantel 12x15 Matte Porcelain Herringbone Mosaic Tile in Dolomite, as displayed in the photo above, showcases how smaller-scale herringbone mosaics bring refinement and detail, making them an ideal choice for bathrooms and intimate spaces. When tile scale and room size are carefully balanced, the herringbone floor maintains both elegance and functionality.
Focal Point Placement
Strategically centering the herringbone pattern around focal points reinforces architectural intent and creates a sense of order within the space. For example, in entryways, a centered herringbone layout draws visitors naturally inward while enhancing the first impression of the room. In larger spaces, aligning the pattern with defining features such as a fireplace or kitchen island further produces a sense of symmetry and visual emphasis. To achieve this effect, designers often dry-lay sections beforehand, which helps confirm alignment and prevents awkward cuts along the perimeter. As a result, this approach not only ensures the pattern remains elegant but also establishes flow that feels deliberate rather than accidental. Ultimately, when placement is carefully considered, herringbone flooring becomes an architectural partner rather than just a decorative feature.

Selecting Materials and Finishes
The choice of material and finish determines both the durability and character of herringbone flooring. By selecting the right combination, the pattern not only complements the space aesthetically but also meets the demands of daily function with long-term resilience.
Porcelain and Ceramic Tile
Porcelain herringbone tiles are highly valued for their exceptional density and low porosity, which makes them resistant to moisture, stains, and wear—qualities that make them ideal for kitchens, entryways, and bathrooms. Rectified porcelain tiles, with precisely cut edges, further elevate the look by allowing thinner grout joints that create sleek, seamless lines. Ceramic tiles, on the other hand, while less dense, provide affordability and an impressive range of designs, allowing for greater creative flexibility. Both materials are capable of replicating the look of natural stone or wood, enabling you to achieve elegance without the cost or upkeep of authentic materials.
Maintenance is also straightforward, requiring only simple cleaning routines to preserve their beauty. Options such as the Maggie 12x12 Glossy Porcelain Herringbone Mosaic Tile in Off White, as shown in the picture above, demonstrate how porcelain can combine durability with a polished, luminous finish, making it an excellent choice for brightening modern interiors. Together, porcelain and ceramic provide versatility that blends practicality with timeless elegance.
Natural Stone Options
Marble herringbone flooring instantly conveys luxury, with unique veining patterns that make each installation a one-of-a-kind statement. Travertine, with its earthy tones and natural texture, introduces warmth and rustic character, making it well-suited for Mediterranean or traditional interiors. Limestone, in contrast, provides a soft matte finish that communicates understated sophistication and pairs seamlessly with neutral palettes. Its natural variation not only enhances visual depth but also creates authenticity that manufactured materials rarely match. But because natural stone is porous, sealing is essential to protect against moisture and staining, ensuring the floor remains beautiful for decades.
Engineered Wood and Luxury Vinyl
Engineered wood herringbone floors combine the rich aesthetic of hardwood with improved structural stability, thanks to layered plywood cores that resist warping. Luxury vinyl herringbone planks, for instance, replicate the appearance of natural wood with remarkable realism while offering moisture resistance that makes them perfect for bathrooms or basements. Vinyl also absorbs sound, creating quieter interiors that are especially beneficial in multi-level homes. Both engineered wood and vinyl are easier to install than natural stone or ceramic, making them practical for homeowners and installers alike. These materials provide cost-effective ways to achieve the look of herringbone hardwood without high maintenance demands. With their balance of authenticity, durability, and accessibility, they are strong contenders for creating elegant yet functional spaces.
Finish Considerations
The surface finish of a herringbone floor greatly influences how it interacts with light and, in turn, how the space feels. Matte finishes, for example, reduce glare and emphasize texture, giving interiors a calm, contemporary elegance. Polished finishes, by contrast, reflect light and amplify brightness, which is especially useful in darker spaces where glamour and vibrancy are desired. In addition, honed finishes provide a middle ground, balancing smoothness with a soft sheen that suits both modern and transitional interiors. For areas prone to moisture, slip-resistant finishes measured by DCOF ratings are essential for safety. Maintenance should also be factored in, since matte finishes conceal wear more effectively while polished finishes require more upkeep. By selecting the right finish, the herringbone floor enhances both style and practicality.

Leveraging Color and Contrast for Visual Depth
The interplay of color, grout, and tonal variation determines whether herringbone flooring becomes a subtle backdrop or a defining centerpiece. Through thoughtful combinations, designers can create depth, movement, and balance that complement the overall interior scheme.
Neutral Color Schemes
Soft gray herringbone floors offer a versatile foundation, effortlessly complementing minimalist or Scandinavian interiors while maintaining depth and subtle sophistication. Cream and white tones, on the other hand, brighten spaces and expand their perceived size, giving small rooms an airy and inviting atmosphere. Beige and taupe shades also add warmth, softening modern interiors without overwhelming the geometric pattern.
Moreover, neutral palettes serve as flexible backdrops, allowing bold furniture and accessories to stand out without visual competition. Subtle veining or tonal variation prevents neutral flooring from feeling flat, ensuring it retains character while remaining refined. Tiles such as our Mabel 12x12 Glossy Porcelain Herringbone Mosaic Tile in White highlight how neutral tones can introduce both brightness and elegance, making them an ideal option for timeless, adaptable interiors. These qualities make neutral herringbone floors a timeless choice that adapts gracefully as styles evolve.
Bold and Dark Palettes
Charcoal and black herringbone tiles provide striking sophistication, anchoring interiors with drama and depth. Navy and emerald green floors also introduce bold personality while still maintaining elegance, making them ideal for eclectic or modern luxe designs. When paired with lighter walls, dark floors create contrast that feels balanced rather than heavy, especially in open spaces. Adequate lighting is critical, as it ensures the richness of darker tones is enhanced rather than diminished. Gloss finishes further amplify this effect by reflecting light across the surface, creating a sense of depth and vibrancy. With the right balance, bold palettes transform herringbone flooring into a commanding architectural statement.
Grout as a Design Tool
Grout selection significantly shapes the final look of herringbone flooring, acting as either a highlight or a subtle complement. For example, high-contrast grout accentuates the zigzag geometry, making the floor a focal feature that demands attention. Color-matched grout, in contrast, blends seamlessly with the tile, softening transitions and achieving understated sophistication. Moreover, specialty options such as metallic or tinted grout introduce unique artistry, adding subtle detail that elevates the design. The width of grout joints also plays a role, with narrow joints creating sleek precision while wider ones evoke vintage charm. By considering grout as a design tool, you gain another layer of control over the elegance of your herringbone floors.
Tonal Variation and Lighting
Tonal variation adds richness and movement to herringbone floors, preventing the pattern from appearing static. Blending warm and cool tones within the same installation creates dynamic depth, producing interest that shifts with the angle of light. Natural daylight. For instance, highlights undertones differently throughout the day, while artificial lighting can adjust the overall mood of the space. Installing dimmable fixtures enhances flexibility, allowing a single room to shift from vibrant and lively to soft and intimate. Variation also offers practical benefits by concealing minor wear, ensuring the floor continues to look polished over time. When paired with thoughtful lighting design, tonal variation turns herringbone flooring into a surface that feels alive and adaptable.

Precision Installation
Herringbone flooring achieves its full elegance only when installed with accuracy, as even small misalignments can disrupt the pattern’s flow. Careful preparation, correct adhesives, and strict adherence to technical standards ensure both beauty and durability. Still, entrusting the work to professional installers is the most reliable way to achieve flawless results and preserve the lasting beauty of herringbone flooring.
Subfloor Preparation
A properly prepared subfloor forms the foundation for a polished herringbone installation. For example, concrete bases require moisture testing to prevent adhesive failure, while wooden subfloors may need reinforcement to handle heavy tile or stone. In addition, uneven surfaces should be corrected with self-leveling compounds to guarantee the floor lies flat. Without these steps, issues such as lippage, cracking, or uneven joints can quickly compromise the final appearance. Moreover, proper preparation ensures the floor withstands daily wear while maintaining its elegance. By investing in subfloor readiness, the herringbone layout achieves the precision that defines its sophistication.
Adhesive and Mortar Application
Choosing the correct adhesive is essential for the longevity of herringbone flooring. For instance, thinset mortar, spread with the proper notched trowel, ensures secure bonding for porcelain and ceramic tiles, while back-buttering larger tiles prevents voids. Vinyl planks, in particular, often require pressure-sensitive adhesives or click-lock systems, both of which demand precision to maintain the integrity of the pattern. In addition, observing curing times prevents tiles from shifting, preserving alignment as the mortar sets. Conversely, skipping these details risks hollow spots or eventual failure. Ultimately, correct adhesive application creates the stability needed for a floor that looks elegant and performs reliably.
Alignment and Spacing
Maintaining alignment throughout installation ensures the herringbone pattern remains rhythmic and symmetrical. To achieve this, chalk lines and grid references establish a clear framework, while tile spacers help maintain consistent joints across the surface. Starting with a precisely measured first row prevents small errors from magnifying as the pattern expands. In larger rooms, laser levels provide added assurance of accuracy. Regular alignment checks during installation further preserve symmetry and flow. With proper spacing and precision, the complexity of the herringbone pattern resolves into a clean, refined surface.
Expansion and Movement Joints
Expansion joints allow the floor to adapt naturally to shifts in the building’s structure or changes in temperature. Without them, stress accumulates, leading to cracks or separation that ruin the elegance of the design. ANSI A108 standards also provide guidelines for joint placement, ensuring durability and consistency. Flexible sealants within these joints maintain performance while blending visually with the floor. Expansion joints are especially important in expansive, open-plan layouts where movement is more pronounced. Their inclusion ensures herringbone flooring remains beautiful and stable for many years.

Styling and Layering to Complement the Herringbone Pattern
Once installed, herringbone flooring sets the stage for the entire interior, requiring furnishings and accessories that highlight rather than compete with its intricate design. Through thoughtful layering, balance, and cohesion, the floor remains a focal point while the overall space feels harmonious and inviting.
Furniture Placement
The placement of furniture can enhance the geometry of herringbone floors by working with the natural zigzag flow. In particular, floating layouts expose more of the pattern, allowing the flooring to shine as a central feature. Meanwhile, heavier furniture is best positioned near focal points like fireplaces, where it anchors the design without obscuring too much of the pattern. Additionally, choosing pieces with visible legs, such as sofas or chairs with open bases, maintains an airy atmosphere. Placement also plays a role in balancing scale, ensuring furniture complements rather than overwhelms the flooring. Ultimately, thoughtful arrangement allows the craftsmanship of herringbone floors to remain visible while supporting functional use of the space.
Area Rugs and Soft Textiles
Area rugs bring warmth and comfort to herringbone floors while also helping define specific zones within open spaces. To avoid visual conflict, rugs are most effective when kept solid or subtly textured, letting the geometric pattern remain dominant. Soft furnishings such as throws and cushions can be layered in complementary tones to reinforce continuity throughout the room. Using too many busy patterns risks competing with the herringbone design and diminishing its elegance. Rugs like Edward Martin’s Lafferty Wool Blend Rug in Midnight also improve acoustics by absorbing sound, balancing the hard surface of wood, tile, or stone. With careful selection, textiles enhance comfort while allowing the floor to remain the star of the room.
Material Pairings
Pairing herringbone floors with other materials introduces depth and dimension to interior spaces. Smooth finishes like glass, lacquered wood, or metal contrast beautifully against the textured zigzag, highlighting the intricacy of the flooring. Organic materials such as reclaimed wood furniture or natural stone countertops also reinforce warmth and authenticity. Mixing multiple textures prevents monotony and creates a layered, dynamic environment.
Designers often tailor material pairings to emphasize stylistic intent, whether sleek and modern or rustic and traditional. A great example. As featured in the photo above, is our Marsden 3x10 Matte Ceramic Tile in Almond, which, when arranged in a herringbone layout, provides a warm, earthy foundation that pairs seamlessly with brass fixtures, natural light, and organic accents. When chosen thoughtfully, complementary materials enrich the elegance of herringbone flooring by creating balance and cohesion.
Transition Between Zones
In open-plan homes, transitioning between flooring types is often necessary, and herringbone layouts benefit from seamless solutions. For instance, flush thresholds maintain smooth continuity, while intentional borders can serve as subtle design details that frame the flooring. Additionally, contrasting materials such as polished concrete or large-format tiles highlight the uniqueness of the herringbone pattern while still preserving harmony. Choosing tones that align across surfaces further prevents transitions from feeling abrupt or disjointed. As a result, these strategies allow different functional areas to be defined without compromising visual flow. Ultimately, by managing transitions with care, designers ensure herringbone flooring integrates seamlessly across the entire home.
Edward Martin’s augmented reality (AR) tool makes it easy to visualize herringbone floor tile in your own space. Simply use your smartphone or tablet to preview layouts, colors, and finishes in real time. This interactive tool helps you choose with confidence, ensuring your flooring design achieves refined elegance.
Creating a Lasting Impression with Herringbone Floor Tile
Herringbone flooring offers more than durability—it delivers artistry, sophistication, and timeless beauty that elevates any interior. By blending precise layout planning, carefully chosen materials, and seamless installation, the pattern becomes a feature that feels both intentional and enduring. When paired with balanced colors, curated finishes, and thoughtful styling, each herringbone floor transforms into a statement of refined taste. The result is a space that not only functions beautifully but also reflects a sense of elegance that will remain captivating for years to come.
For those ready to move from inspiration to selection, Edward Martin also offers the option to request tile samples. Experiencing the material’s texture, tone, and finish firsthand ensures your herringbone floor tile not only conveys elegance but also defines the space with enduring sophistication.