


Born out of practicality and elevated by design, subway tiles have come a long way from their origins in New York City’s 1904 subway system. Originally chosen for their glossy finish, ease of cleaning, and structured format, these 3"x6" tiles were the blueprint for what would become a timeless interior staple.
Today, subway tiles are no longer just utilitarian, they’re a foundation for creative expression. From elongated profiles and textured finishes to precision-cut edges and layout versatility, they offer a dynamic mix of performance and style. This guide explores what makes subway tiles a design essential and how to use them with confidence in any space.

The Enduring Appeal and History of Subway Tiles
To truly appreciate the enduring charm of subway tiles, it helps to understand where they began and how they've evolved. From their practical roots to their modern-day versatility, these tiles have earned their reputation as a design essential for good reason.
The Origins of Subway Tiles
The story begins in 1904, when subway tiles were first introduced as part of New York City’s subway system. Architects George C. Heins and Christopher Grant La Farge selected 3"x6" white glazed ceramic tiles arranged in a staggered brick pattern to create a clean, bright, and easily maintained environment.
This choice was driven by practical reasons: the tiles’ dense, impervious body, created by firing natural clay at high temperatures, and their glossy glaze, which resisted moisture, stains, and bacteria. Their practicality quickly caught on in residential interiors, especially in kitchens and bathrooms, and they soon became a defining element in early 20th-century design movements like Arts and Crafts and Art Deco.
Why Subway Tiles Remain a Design Favorite
Over a century later, subway tiles are prized for their combination of durability, ease of maintenance, and timeless style. Their consistent sizing supports precise installation and layout versatility, with patterns like herringbone, vertical stack, and basketweave offering fresh takes on a classic form.
In addition to traditional glazed ceramic, today’s subway tiles are available in porcelain for added strength and water resistance, as well as glass and natural stone for enhanced depth and texture. Their low-maintenance surfaces and compatibility with a range of aesthetics, from rustic to contemporary, ensure their continued relevance in both residential and commercial spaces.

Unpacking the Numerous Benefits of Choosing Subway Tiles
Beyond their timeless look, subway tiles deliver real-world advantages that make them a smart choice for nearly any space. From lasting performance to everyday practicality, it’s easy to see why they continue to stand out in both form and function.
Durability and Longevity
A key strength of subway tiles lies in their long-lasting durability, thanks to their high-fired ceramic or porcelain construction. Porcelain, with its ultra-low absorption rate (below 0.5%), excels in high-moisture environments by resisting water infiltration, thermal stress, and stains.
In addition to their dense body, the glazed surface adds another layer of protection, defending against scratches and discoloration while maintaining visual clarity. When properly installed, subway tiles perform exceptionally well in bathrooms, kitchens, and other demanding areas, making them a durable, low-maintenance solution that stands the test of time.
Versatility in Design
But durability isn’t the only reason subway tiles continue to stand out, design flexibility is also a major contributor to their success. Their modular dimensions, ranging from the classic 3"x6" to elongated or beveled variations, allow for a variety of patterns such as running bond, herringbone, and vertical stack, each offering its own design nuance.
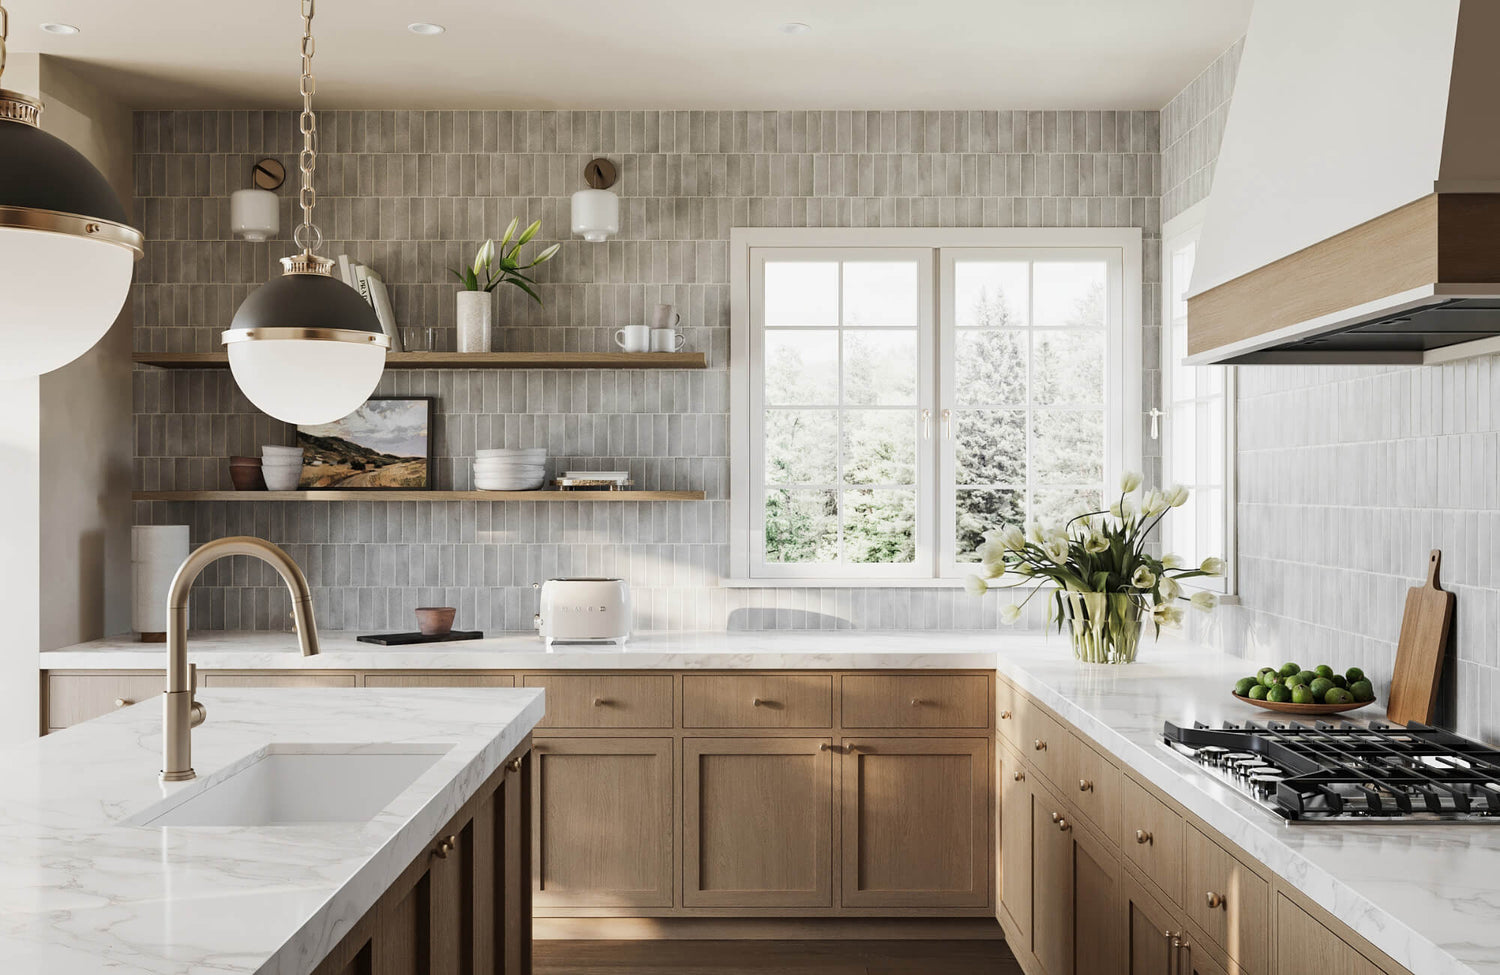
Beyond traditional applications, these tiles are equally effective beyond backsplashes and bathrooms. High-grade porcelain options are durable enough for flooring, while their aesthetic adaptability makes them suitable for fireplace surrounds, shower niches, and accent walls. For instance, Edward Martin’s Harley 3x12 Polished Porcelain Tile in Greige, as displayed in the photo above, shows how an elongated format and soft veining can add refined movement and dimension to a space, pairing easily with a range of finishes and palettes.
Ease of Cleaning and Maintenance
Not only are subway tiles visually versatile, but they're also incredibly easy to care for. With smooth, non-porous surfaces, glazed subway tiles are exceptionally easy to maintain. A simple wipe with a mild detergent keeps them clean, and their resistance to mold and mildew makes them especially practical in kitchens and bathrooms.
To reduce maintenance further, rectified edges support tighter grout joints, while modern grouts, such as epoxy and urethane-based blends, offer stain resistance and antimicrobial benefits. Together, these features contribute to long-term hygiene with minimal effort.
Cost-Effectiveness
Subway tiles remain one of the most accessible and economical tile options. Their standardized sizes and mass production keep material costs low, while their straightforward installation minimizes labor expenses, ideal for both professionals and DIY renovators.
Surprisingly, even premium materials like marble or glass become more accessible when produced in small-format subway styles. Combined with their design impact and ease of installation, subway tiles deliver a strong return on investment for projects of all scales.

Expert Tips for Choosing the Perfect Subway Tiles
Once you’ve considered the broad benefits, it’s time to dive into the specifics. Choosing the perfect subway tile is as much about technical decisions as it is about personal style. From material and color to grout and edging, each choice directly shapes the appearance, atmosphere, and functionality of your finished space.
Understanding Material Options
The first step is choosing between ceramic and porcelain, two materials with distinct characteristics.
Let’s start with ceramic, the traditional choice for subway tile applications. These are crafted from red or white clay and topped with a glazed finish that adds color and sheen. They're easier to cut and generally more affordable, making them ideal for walls in kitchens, bathrooms, and other low-impact areas.
In contrast, porcelain tiles are made from denser clay and fired at higher temperatures. These tiles offer greater durability and water resistance, and are ideal for steam showers, bathroom floors, or outdoor applications. Their low absorption rate (below 0.5%) makes them more resilient, though they require special tools for cutting due to their hardness.
Selecting the Right Size, Color, and Finish
Subway tiles come in a range of sizes and proportions that influence both layout options and visual impact. While the 3"x6" classic format remains popular, longer tiles like 3"x12" or 4"x16" lend a sleeker, more modern feel. Smaller formats, on the other hand, can add texture in compact areas, and larger ones reduce grout lines, visually expanding a room.
Once size is selected, color becomes a key factor. It should reflect your space’s lighting and palette. Classic white is still a go-to option as it brightens and enlarges, while dark or muted tones add contrast and depth.
Equally important is the finish, which significantly affects both the look and performance of the tile. For instance, glossy surfaces reflect light and are easy to clean, great for backsplashes and bathrooms, while matte tiles offer a softer, more contemporary look and mask smudges better in high-touch areas. In contrast, specialty textures like crackle glazes, beveled edges, or hand-molded finishes add character without overwhelming a design.
For example, as shown in the photo above, Edward Martin’s Jaden 2.5x16 Glossy Ceramic Tile in Ink pairs a rich, reflective finish with an elongated form, creating striking lines and dramatic depth, especially effective on statement walls and backsplashes.
Grout Selection and Its Impact on the Final Look
Beyond tile choice, grout has a major influence on both the style and longevity of your installation.
Color-wise, a matching grout color creates a seamless effect, while a contrasting grout outlines each tile, emphasizing pattern and rhythm, ideal for layouts like herringbone or stacked designs.
Grout type also plays an important role in tile installation. While cementitious grout is commonly used, it often requires sealing to maintain its appearance and durability. On the other hand, epoxy grout offers excellent stain resistance and waterproofing, though it can be more labor-intensive to apply. Additionally, be sure to match the grout to your joint size. Unsanded grout is best for joints under 1/8", while sanded grout provides better stability and shrinkage control for wider lines.
Considering Edge Treatments and Special Features
Finishing details like edge treatments are essential for a refined look. Rectified tiles, with precisely cut edges, allow for tighter grout lines and a clean, modern profile. Cushion-edged tiles have softer, rounded edges that suit traditional styles.
To finish edges or transition between surfaces, incorporate bullnose tiles, pencil liners, or chair rails. These pieces frame the tilework and add definition around windows, niches, and open ends.
To add even more visual interest, consider accent options like mosaics, metallic inserts, or hand-painted tiles, which can break up large installations and introduce texture or color contrast.
To help visualize how these choices will look in your space, Edward Martin’s Augmented Reality (AR) Visualization Tool lets you preview tile selections and layouts in real-time. Simply tap "View in Your Space" while browsing the collection, and place tiles digitally using your device. When you're ready, request a tile sample to confirm your favorite in person before installation.

Step-by-Step Guide to Subway Tile Installation
Getting that clean, timeless subway tile look isn’t just about picking the right tile, it’s about how well it’s installed. With the right prep, layout strategy, and finishing techniques, even a simple design can look professionally crafted and last for years to come. For best results, it's always recommended to hire experienced tile professionals who can ensure precision and long-term performance.
Preparing the Surface
A solid foundation is key. Ensure the substrate is clean, dry, and structurally sound, free of grease, dust, or old adhesive. Suitable backings include cement backer board (e.g., HardieBacker), moisture-resistant green board, or primed drywall in dry areas.
Next, check for uneven spots using a level, and address any deviations over 1/8" across 10 feet with a leveling compound. In wet zones like showers or backsplashes, apply a waterproofing membrane such as RedGard or Schluter Kerdi. Use corrosion-resistant screws and tape all seams for a stable, moisture-protected base.
Laying Out the Tiles
Start by identifying a natural focal point for your layout—often the center of a key wall or aligned with a major fixture like a range or vanity. From there, use a laser level or chalk line to establish clean, level reference lines both horizontally and vertically. These guides will help keep your tile rows straight and symmetrical as you work across the surface.
Before applying any adhesive, dry-lay a row of tiles to get a feel for spacing and to preview how the cuts will fall along the edges. Try to avoid ending with narrow slivers, anything smaller than one-third of a tile, as they can interrupt the visual flow. Tile spacers are essential for maintaining even grout lines, with 1/16" offering a sleek, contemporary look and 1/8" providing a more traditional finish.
For more intricate patterns like herringbone or vertical stacks, taking the time to measure carefully, or even create a mock-up, can save effort and ensure a polished, professional result.
A perfect example of how layout and material work in harmony is Olivia 4x16 Glossy Ceramic Tile in Cotto. The tile’s elongated shape brings subtle movement to any wall, while its warm, earthy tone adds depth and character. Whether laid in a classic running bond or a bold vertical stack, Olivia effortlessly combines design flexibility with timeless appeal, proving that the right tile, placed with intention, can elevate the entire room.
Applying Adhesive and Setting the Tiles
Once your layout is set, it’s time to prepare your adhesive. To start the installation, use a modified thin-set mortar for reliable tile adhesion, especially in damp or busy areas. Mix to a smooth, peanut butter-like consistency, allow it to slake, then remix before use.
Next, spread mortar with a 1/4"x1/4" notched trowel and comb in one direction for full coverage. For added bond, back-butter larger tiles. Then, set each tile with a slight twist, aligning with layout lines and spacers. Periodically lift tiles to check for proper coverage—aim for 80% on walls, 95% in wet areas. To prevent lippage, consider a leveling system.
Finally, let the adhesive cure for 24 hours before moving to grout.
Grouting and Sealing
Once the tiles are set and spacers removed, mix your grout to a smooth consistency. Use unsanded grout for joints under 1/8", and sanded grout for wider gaps.
With grout ready, begin by applying it diagonally using a rubber float, pressing firmly into joints. Remove excess at a 45-degree angle, and wipe down with a damp sponge after 15–30 minutes. Rinse frequently to prevent haze.
After curing (24–72 hours), apply a penetrating sealer to protect grout, especially in kitchens and bathrooms. Natural stone tiles may require sealing before and after grouting.
As a final step, finish with a soft cloth polish and inspect for missed spots or touch-ups. This way, proper sealing enhances both durability and appearance.
To see how a well-finished tile installation comes together, take Edward Martin’s Ellie 2.5x8 Matte Ceramic Tile in Tan. Its soft finish and precise grout lines demonstrate how, with the help of skilled professionals, attention to detail in sealing and finishing can elevate both the longevity and design appeal, especially in high-moisture spaces.

Caring for Your Subway Tiles Maintaining Their Beauty
Even the most durable materials benefit from a little routine care, and subway tiles are no exception. With the right upkeep and timely attention to common issues, you can keep them looking crisp, clean, and beautiful for years to come. However, always refer to the manufacturer’s care guidelines to ensure you're using the safest and most effective maintenance methods for your specific tile.
Regular Cleaning
Once your subway tiles are in place, protecting their finish and longevity becomes the next essential step. Start with simple, regular cleaning using pH-neutral products. For glazed ceramic or porcelain tiles, wipe with a soft cloth or sponge and mild detergent to remove dust, grease, or soap scum. Avoid acidic or alkaline cleaners like vinegar or bleach, which can damage grout or etch finishes.
For high-gloss or glass tiles, a microfiber cloth and streak-free cleaner enhance shine. In kitchens, use tile-safe degreasers around cooking areas and rinse thoroughly to prevent residue buildup.
While glazed tiles are generally low-maintenance, matte or unglazed options, like natural stone or specialty finishes, require extra care. Use products formulated for the specific material and avoid abrasives, which can scratch or dull the surface.
This is especially true for Edward Martin’s Catalina 2x16 Matte Porcelain Tile in Clay, whose soft texture and earthy tone offer a handcrafted look. Gentle, regular cleaning helps maintain its tactile quality and visual warmth, particularly in splash-prone areas like backsplashes and countertops.
Addressing Common Issues
In high-use or humid areas, grout discoloration, mildew, and occasional tile damage may occur. To clean stained grout, use a soft-bristle brush with an oxygenated bleach solution or grout-safe cleaner, never metal tools, which can scratch or weaken the grout.
To combat mildew in bathrooms or kitchens, ensure proper ventilation and apply mildew-resistant grout or sealer. If mold appears, a diluted hydrogen peroxide solution is effective and surface-safe.
For cracked tiles, whether caused by impact or structural movement, monitor hairline cracks and replace damaged tiles promptly to avoid moisture intrusion. More extensive cracking may require a substrate inspection by a tile professional.
Tips for Long-Term Maintenance and Preservation
To keep your tiles looking their best for years to come, preventative care is key. Apply a penetrating grout sealer every 12–24 months, or more often in high-moisture zones, to protect against stains and water absorption. Reapply as needed for long-lasting protection.
Don’t overlook expansion joints and caulked seams. These flexible barriers accommodate movement where tile meets tubs, counters, or windows. Check them regularly and replace deteriorated silicone with mildew-resistant caulk to prevent leaks and cracking.
As a final measure, protect your installation by using trivets, cutting boards, and rugs in active or work areas. Routine inspections and timely repairs will keep both the structure and appearance of your subway tile in peak condition.
Timeless Tile, Enduring Value
Subway tiles continue to earn their place in design for good reason, they merge aesthetic clarity with lasting performance. Whether you’re drawn to traditional white ceramic or modern formats in porcelain and stone, their adaptability makes them a reliable choice across styles and spaces.
As you move forward with your tile project, the right choices in material, layout, and detail can make all the difference. Edward Martin is here to guide you with trusted expertise and tools designed to bring your vision to life, beautifully and confidently.
